Contents
Sears, Roebuck And Co., Hoffman Estates, IL 60179 U.S.A
Safety Operation Maintenance Storage EspaSol,
Using this product, read this manual
Model No
Exclusions
Content
General Operation
RepairfromtimetotimeThatswhenhavingRepair
HereswhatsincludedtheAgreement
Handsandfeet
Chute,removinganygrassordebris,ormakingany Adjustments
Underlowtreebranches,wires,dooropeningsetc
Beawareofthemowerandattachmentdischarge
General Service
Your Responsibility
Safe Handling Of Gasoline
Attaching Mulch Plug
Unpacking
Loose Parts
Attaching Side-Discharge Chute
Wing Nut
Side Discharge Chute
Ulchin Plug
Indicator Ignition Switch Side Discharge
Know Your Riding Mower
Throttle/Choke
Grass Fill Level Indicator
Safety Interlock
Using Shift Lever
Using Throttle/Choke
Using Parking Brake
Engine Model
Before Starting
Filling Up Gasoline
Battery
Starting Engine
Operating the Riding Mower
BakHandle
Using the Riding Mower
To Empty Grass Catcher
Mulching
Blade Care
General Recommendations
Spark Plug
Air Cleaner
Lubrication
Engine
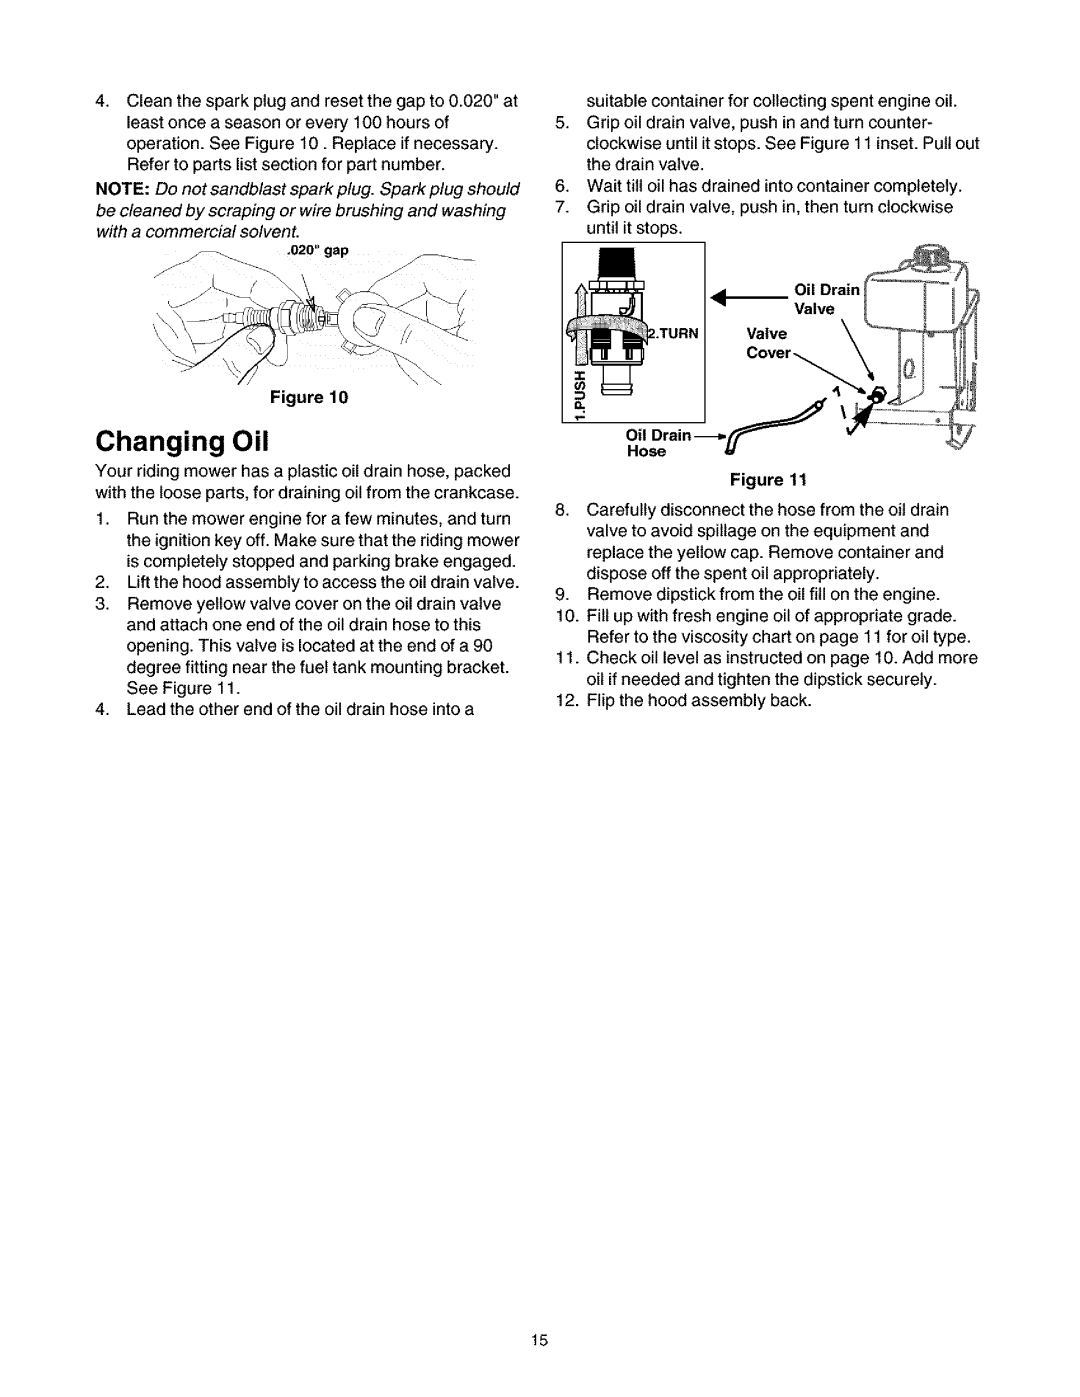
Oil Drain Valve Cover Oil Drain-Jf Hose
Changing Oil
Cutting Height
Adjustments
Brake Pedal
Go Pedal
Wheel Alignment
Adjusting the Deck
Seat Position
Blade Engagement Pedal
Test 3 Checking Side to Side Leveling
Adjusting Rear Deck Height
Front to Rear Leveling
Test 2 Checking Front to Rear Leveling
Deck Belt
Belt Replacement
Fuse Replacement
Adjusting the Carburetor
Pulley
Battery Service
Safe Handling
Lower Drive Belt
Andcausedamagetotheenginesalternatingsystem
To jump-start the battery
To charge the battery
Attaching Battery Cables
Cable
Fuel Filter
ClamClamp
Wing Nut -b Negative Terminal Positive
Excessivevibration
Battery
Riding Mower
Trouble Possible
Remedy
Trouble Possible Cause
Parts List for Craftsman Riding Lawn Mower Model
Description
\10
Key No. Part No
Parts List for Craftsman Riding Lawn Mower Model
KsyNo. Part No
683-0149B
763-0529
\14
\ -only
I33
Key No, Pad no Description
Pad No
15xxxx-0637 Powder Black Oyster Gray Sears Red
Link Rod
Key No. Part No
710-0825
631-0084
710-0286
710-0564
Key No. Part
OlZC
334
21o/2o2i 222Yj
246
692125 Screw
PaN no Description
Labels
Labels On Engine
PartNo Description
=o=
Page
Exclusiones
Servicio de Instalaci6n Sears
Funcionamiento general
Haga Io siguiente
Funcionamiento en pendientes
No haga Io siguiente
Nifios
Servicio
Manejo seguro de la gasolina
Su responsabilidad
Unibn del adaptador para abono
Desempaque
Partes sueltas
Unibn de la tolva de descarga lateral
Tuerca de marieosa
JTolva de descarga lateral
Tuerca
Bul6n Ixaxagonal
Palanca de ajuste de la altura de corte Use para
Conozca las propiedades de la podadora
Gravemente. Utilice siempre
Indicador de Nivel de Ilenado de csped Use para
Detencibn de la podadora
Indicador de Nivel de Ilenado de
Sped
Modelo de motor
Uso del Freno de mano
Antes de encender
Llenado de combustible
Encendido del motor
Operacibn de la podadora montable
Bateria
Uso de la podadora montable
Manija de la bolsa Tolva para recorte de csped
Montaje
Cuidado de la cuchilla
Recomendaciones en general
Bujia de encendido
Motor
AjustelatuercaconrebordeVealaFigura8
Filtro de aire
Lubricacibn
Ajustes
Pedal del freno
Freno Cable
Altura del corte
Posicibn del asiento
Alineacibn de las ruedas
Ajuste de la cubierta
Prueba 3. Revisibn del nivel comparativo lado a lado
Altura palanca Enlace
Ayudante
Resorte
Ajuste del carburador
Servicio a la podadora montable
Cambio de banda
Tornilo
Polea Motor
Bateria
BandaVerFigura17
Transmisi6n
Reemplazo de la bateria
Carga de la bateria
Filtro de gasolina
Filtro de gasolina
Remedio
Problema Causas posibles
Baterfa
Podadora montable
De la banda estan
Problema
LE-FOYER Mc
Your Home
MY-HOME
Canada

