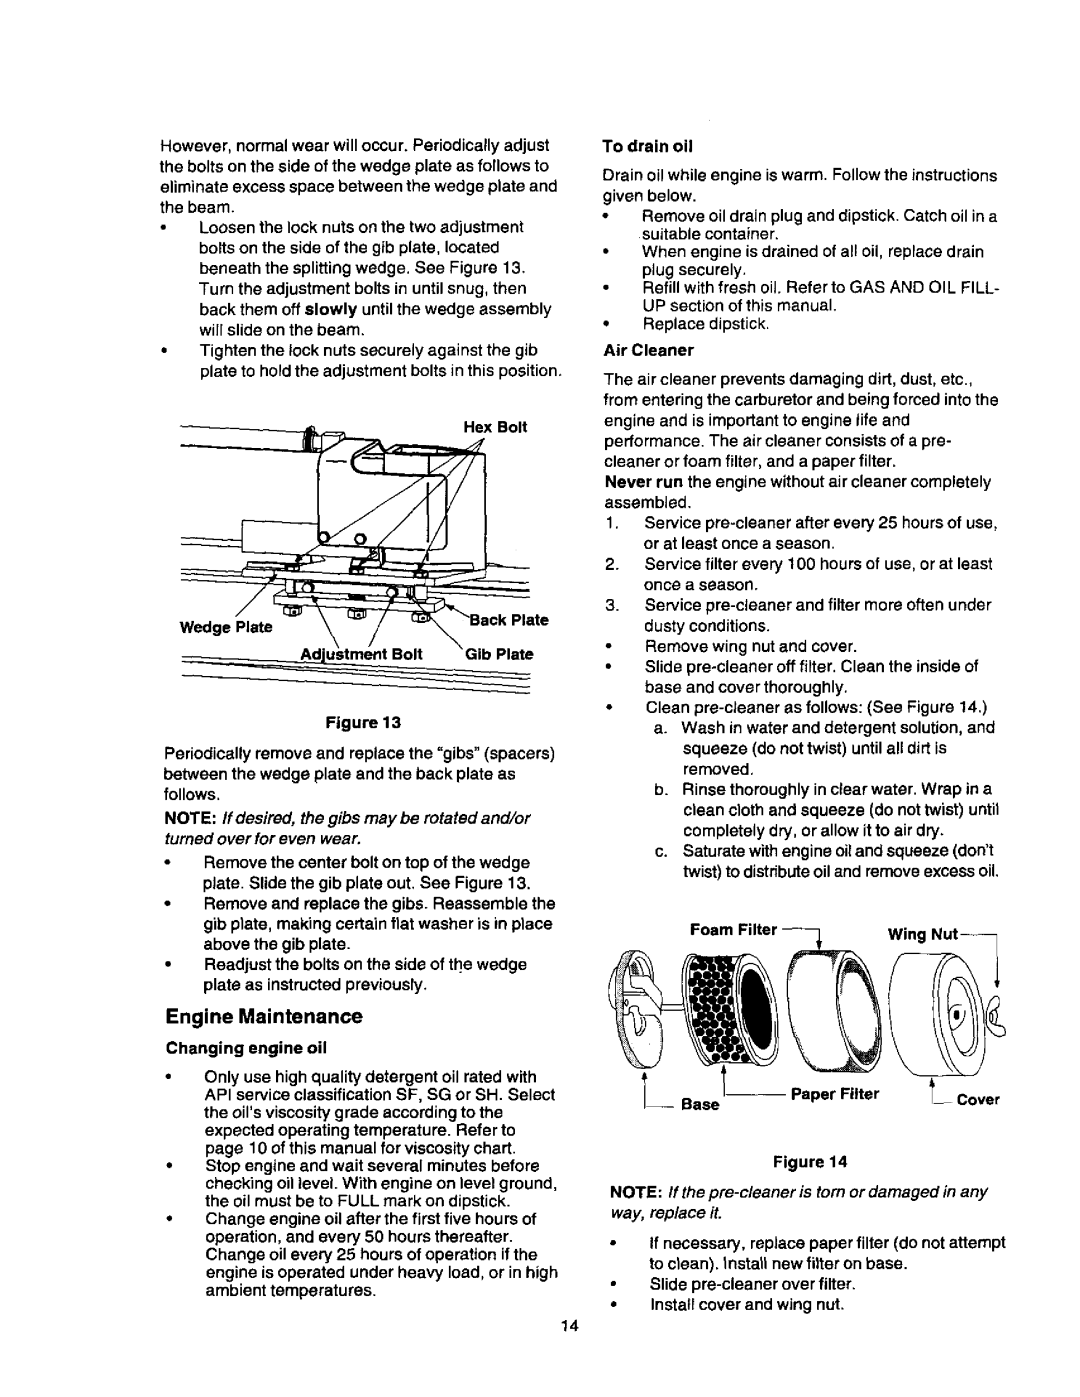
However, normal wear will occur. Periodically adjust the bolts on the side of the wedge plate as follows to

eliminate excess space between the wedge plate and the beam.

Loosen the lock nuts on the two adjustment boltson the side of the gib plate, located beneath the splitting wedge. See Figure 13.

Turn the adjustment bolts in until snug, then

back them off slowly untilthe wedge assembly willslide on the beam.

Tighten the lock nuts securely against the gib plate to hold the adjustment bolts in this position,

-_

Hex Bolt

Figure 13

Periodically remove and replace the "gibs" (spacers) between the wedge plate and the back plate as follows.

NOTE: If desired, the gibs maybe rotated and/or turned over for even wear.

Remove the center bolt on top of the wedge plate. Slide the gib plate out, See Figure 13.

Remove and replace the gibs. Reassemble the gib plate, making certain flat washer is in place above the gib plate.

Readjust the bolts on the side of tl_ewedge plate as instructedpreviously.

Engine Maintenance

Changing engine oil

Only use high quality detergent oil rated with API service classification SF, SG or SH. Select the oil'sviscosity grade according to the expected operating temperature. Refer to page 10 of this manual for viscositychart.

Stop engine and wait several minutes before checking oil level. With engine on level ground, the oil must be to FULL mark on dipstick.

Change engine oil after the first five hours of operation, and every 50 hours thereafter. Change oil every 25 hours of operation if the engine is operated under heavy load, or in high ambient temperatures.

To drain oil

Drain oil while engine is warm. Follow the instructions given below.

Remove oildrain plug and dipstick. Catch oil in a suitable container.

When engine is drained of all oil, replace drain

plug securely.

Refill with fresh oil. Refer to GAS AND OIL FILL-

UP section of this manual.

Replace dipstick.

Air Cleaner

The air cleaner prevents damaging dirt, dust, etc., from entering the carburetor and being forced into the engine and is important to engine life and performance. The air cleaner consists of a pre- cleaner or foam filter, and a paper filter.

Never run the engine without air cleaner completely assembled.

1.Service pre-cleaner after every 25 hours of use, or at least once a season.

2.Service filter every 100 hours of use, or at least once a season.

3.Service pre-cieaner and filter more often under dusty conditions.

Remove wing nut and cover.

Slide pre-cleaneroff filter. Clean the inside of base and cover thoroughly.

Clean pre-cleaner as follows: (See Figure 14.) a. Wash in water and detergent solution, and

squeeze (do not twist) until all dirt is removed,

b.Rinse thoroughly in clear water. Wrap in a clean cloth and squeeze (do not twist) until completely dry, or allow it to air dry.

c.Saturate with engine oil and squeeze (don't twist) to distrfbute oil and remove excess oil.

Foam Filter _-_

Wing Nut--

Base --Paper Filter _ Cover

Figure 14

NOTE: If the pre-cleaneris tom or damaged in any way, rep/ace it.

If necessary, replace paper filter (do not attempt to clean). Install new fitter on base.

Slide pre-cleaner over filter.

Install cover and wing nut.

14

Page 14
Image 14
Craftsman 247.79452 owner manual Engine Maintenance, Hex Bolt

247.79452 specifications

The Craftsman 247.79452 is a versatile and efficient snow blower designed to tackle the toughest winter conditions. It is an ideal choice for homeowners looking to maintain their driveways, sidewalks, and outdoor spaces free from heavy snowfall. This powerful machine blends user-friendly features with advanced technology to provide a reliable snow-clearing solution.

One of the standout features of the Craftsman 247.79452 is its robust 24-inch clearing width, allowing users to quickly and effectively clear large areas with each pass. The 208cc engine offers impressive power, enabling it to handle wet, heavy snow with ease, making it suitable for a variety of snowfall conditions. The electric start technology further enhances convenience, allowing users to start the machine effortlessly with the push of a button, sparing them from the hassle of pulling cords in cold weather.

The snow blower is equipped with a 2-stage system that efficiently lifts snow and discharges it through a chute. The adjustable chute allows for a 180-degree rotation, giving users the flexibility to direct snow away from driveways and pathways, preventing unnecessary buildup. This feature is particularly beneficial for homeowners with large driveways or those living in areas that receive significant snowfall.

Another notable characteristic is its self-propelled capability, which helps users navigate through deep snow without excessive effort. The Craftsman 247.79452 offers multiple speed settings, allowing for both forward and reverse motion, making it easier to maneuver in tight spaces and around obstacles.

Durability is a key aspect of the Craftsman brand, and the 247.79452 is no exception. Built with high-quality materials, this snow blower is designed to withstand the rigors of winter use while providing long-lasting performance. The heavy-duty auger and impeller are engineered for optimal snow clearing, minimizing the risk of clogging even in challenging conditions.

In conclusion, the Craftsman 247.79452 snow blower combines power, convenience, and durability to make snow removal a much simpler task. Its innovative features, such as the electric start, self-propelled capability, and adjustable chute, provide users with a reliable instrument for managing winter storms. With the Craftsman 247.79452 in your arsenal, you can confidently tackle whatever Mother Nature throws your way.