24. DONOToperatethetoolifyouareundertheinfluence 14. CUTonlyoneworkpieceatatime.Makesurethetable
ELECTRICAL REQUIREMENTS
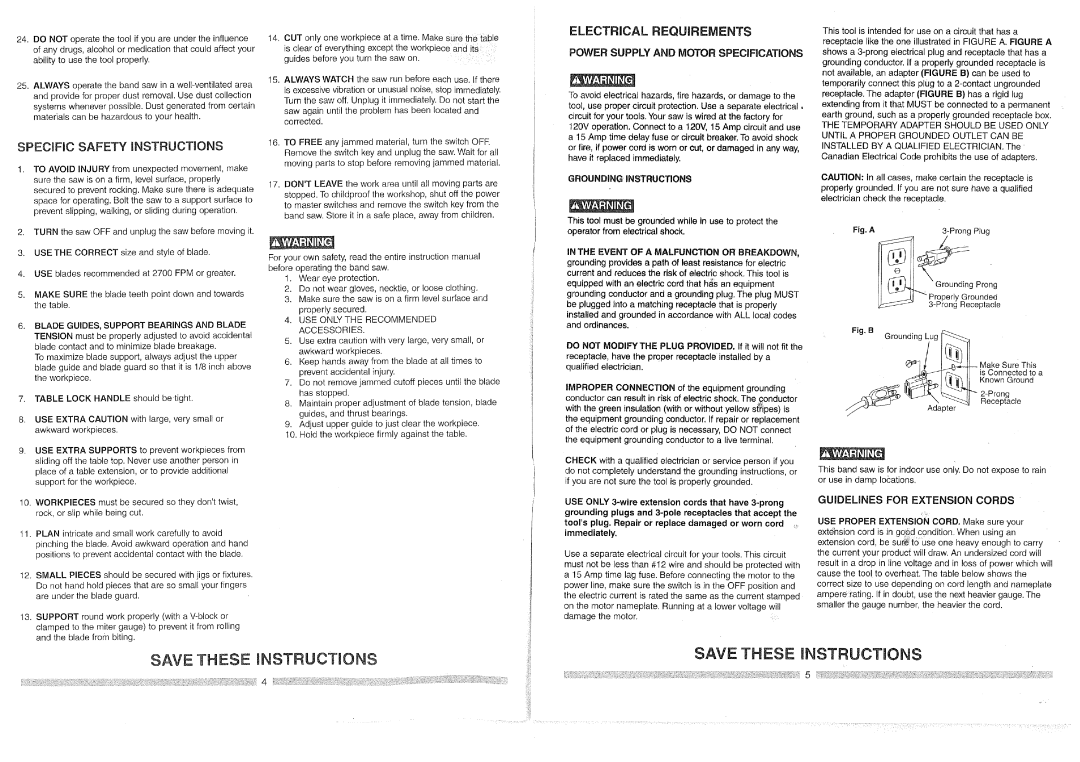
This tool is intended for use on a circuit that has a receptacle like the one illustrated in FIGURE A. FIGURE A
ofanydrugs,alcoholormedicationthatcouldaffectyour
abilitytousethetoolproperly,
25.ALWAYSoperatethebandsawin
SPECIFIC SAFETY INSTRUCTIONS
,TO AVOID INJURY from unexpected movement, make sure the saw is on a firm, level surface, properly secured to prevent rocking. Make sure there is adequate space for operating. Bolt the saw to a support surface to prevent slipping, walking, or sliding during operation.
2.TURN the saw OFF and unplug the saw before moving it.
isclearofeverythingexcepttheworkpieceandits guidesbeforeyouturnthesawon.
15.ALWAYSWATCHthesawrunbeforeeachuse.Ifthere
isexcessivevibrationorunusualnoise,stopimmediately.
Turnthesawoff.UnplugitimmediatelyDonotstartthe.
sawagainuntiltheproblemhasbeenlocatedand corrected.
!6. TO FREE any jammed material, turn the switch OFF. Remove the switch key and unplug the saw. Wait for all moving parts to stop before removing jammed material.
17.DON'TLEAVE the work area until all moving parts are stopped. To childproof the workshop, shut off the power to master switches and remove the switch key from the band saw. Store it in a safe place, away from children.
POWER SUPPLY AND MOTOR SPECIFICATIONS
To avoid electrical hazards, fire hazards, or damage to the tool, use proper circuit protection. Use a separate electrical, circuit for your tools. Your saw is wired at the factory for 120V operation. Connect to a 120V, 15 Amp circuit and use a 15 Amp time delay fuse or circuit breaker. To avoid shock or fire, if power cord is worn or cut, or damaged in any way, have it replaced immediately.
GROUNDING INSTRUCTIONS
This tool must be grounded while in use to protect the operator from electrical shock.
shows a
THE TEMPORARY ADAPTER SHOULD BE USED ONLY UNTIL A PROPER GROUNDED OUTLET CAN BE INSTALLED BY A QUALIFIED ELECTRICIAN. The Canadian Electrical Code prohibits the use of adapters.
CAUTION: In all cases, make certain the receptacle is properly grounded. If you are not sure have a qualified electrician check the receptacle.
Fig. A |
|
3.USE THE CORRECT size and style of blade.
4.USE blades recommended at 2700 FPM or greater.
5.MAKE SURE the blade teeth point down and towards the table.
,BLADE GUIDES, SUPPORT BEARINGS AND BLADE TENSION must be properly adjusted to avoid accidental blade contact and to minimize blade breakage.
To maximize blade support, always adjust the upper blade guide and blade guard so that it is 1/8 inch above the workpiece.
7.TABLE LOCK HANDLE should betight.
8.USE EXTRA CAUTION with large, very small or awkward workpieces.
9, USE EXTRA SUPPORTS to prevent workpieces from sliding off the table top. Never use another person in place of a table extension, or to provide additional support for the workpiece.
10.WORKPIECES must be secured so they don'ttwist, rock, or slip while being cut.
11.PLAN intricate and small work carefully to avoid pinching the blade. Avoid awkward operation and hand positions to prevent accidental contact with the blade,
12.SMALL PIECES should be secured with jigs or fixtures. Do not hand hold pieces that are so small your fingers are under the blade guard.
13.SUPPORT round work properly (with a
For your own safety, read the entire instruction manual before operating the band saw.
1.Wear eye protection.
2.Do not wear gloves, necktie, or loose clothing.
3.Make sure the saw is on a firm level surface and properly secured.
4.USE ONLY THE RECOMMENDED ACCESSORIES.
5.Use extra caution with very large, very small, or awkward workpieces.
6.Keep hands away from the blade at all times to prevent accidental injury.
7.Do not remove jammed cutoff pieces until the blade has stopped.
8.Maintain proper adjustment of blade tension, blade guides, and thrust bearings.
9.Adjust upper guide to just clear the workpiece.
t0. Hold the workpiece firmly against the table.
IN THE EVENT OF A MALFUNCTION OR BREAKDOWN, grounding provides a path of least resistance for electric
current and reduces the risk of electric shock. This tool is
equipped with an electric cord that h_s an equipment
grounding conductor and a grounding plug. The plug MUST be plugged into a matching receptacle that is properly installed and grounded in accordance with ALL local codes and ordinances.
DO NOT MODIFYTHE PLUG PROVIDED. If it will not fit the receptacle, have the proper receptacle installed by a
qualified electrician.
IMPROPER CONNECTION of the equipment grounding conductor can result in risk of electric shock, The conductor
with the green insulation (with or without yellow stripes) is the equipment grounding conductor. If repair or replacement of the electric cord or plug is necessary, DO NOT connect the equipment grounding conductor to a live terminal.
CHECK with a qualified electrician or service person if you do not completely understand the grounding instructions, or if you are not sure the tool is properly grounded.
USE ONLY
Use a separate electrical circuit for your tools. This circuit must not be less than #12 wire and should be protected with a 15 Amp time lag fuse. Before connecting the motor to the power line, make sure the switch is in the OFF position and the electric current is rated the same as the current stamped on the motor nameplate. Running at a lower voltage will damage the motor.
|
|
|
| Grounding | Prong |
| |
|
|
|
| Properly Grounded |
| ||
|
|
|
| Receptacle |
| ||
Fig. B | Grounding | Lug ____.._ |
|
| |||
|
| (_]/ |
| _1 |
| Make | sure This |
|
| J | is Connected to a | ||||
|
| _._¢_p | ! i]_" | _ | Known | Ground | |
__ |
| 't_l_ |
| ||||
_ |
| . N. | Receptacle | ||||
//,i<Y_- |
|
|
| Adapter |
|
|
|
This band saw is for indoor use only. Do not expose to rain or use in damp Ioc:ations.
GUIDELINES FOR EXTENSION CORDS
USE PROPER EXTENSION CORD. Make
result in a drop in line voltage and in loss of power which will cause the too! to overheat. The table below shows the
correct size to use depending on cord length and nameplate ampere rating. If in doubt, use the next heavier gauge. The smaller the gauge number, the heavier the cord.
SAVE THESE INSTRUCTmONS | _!ill | SAVE THESE NSTRUCT ONS |
| ||
|
|
5