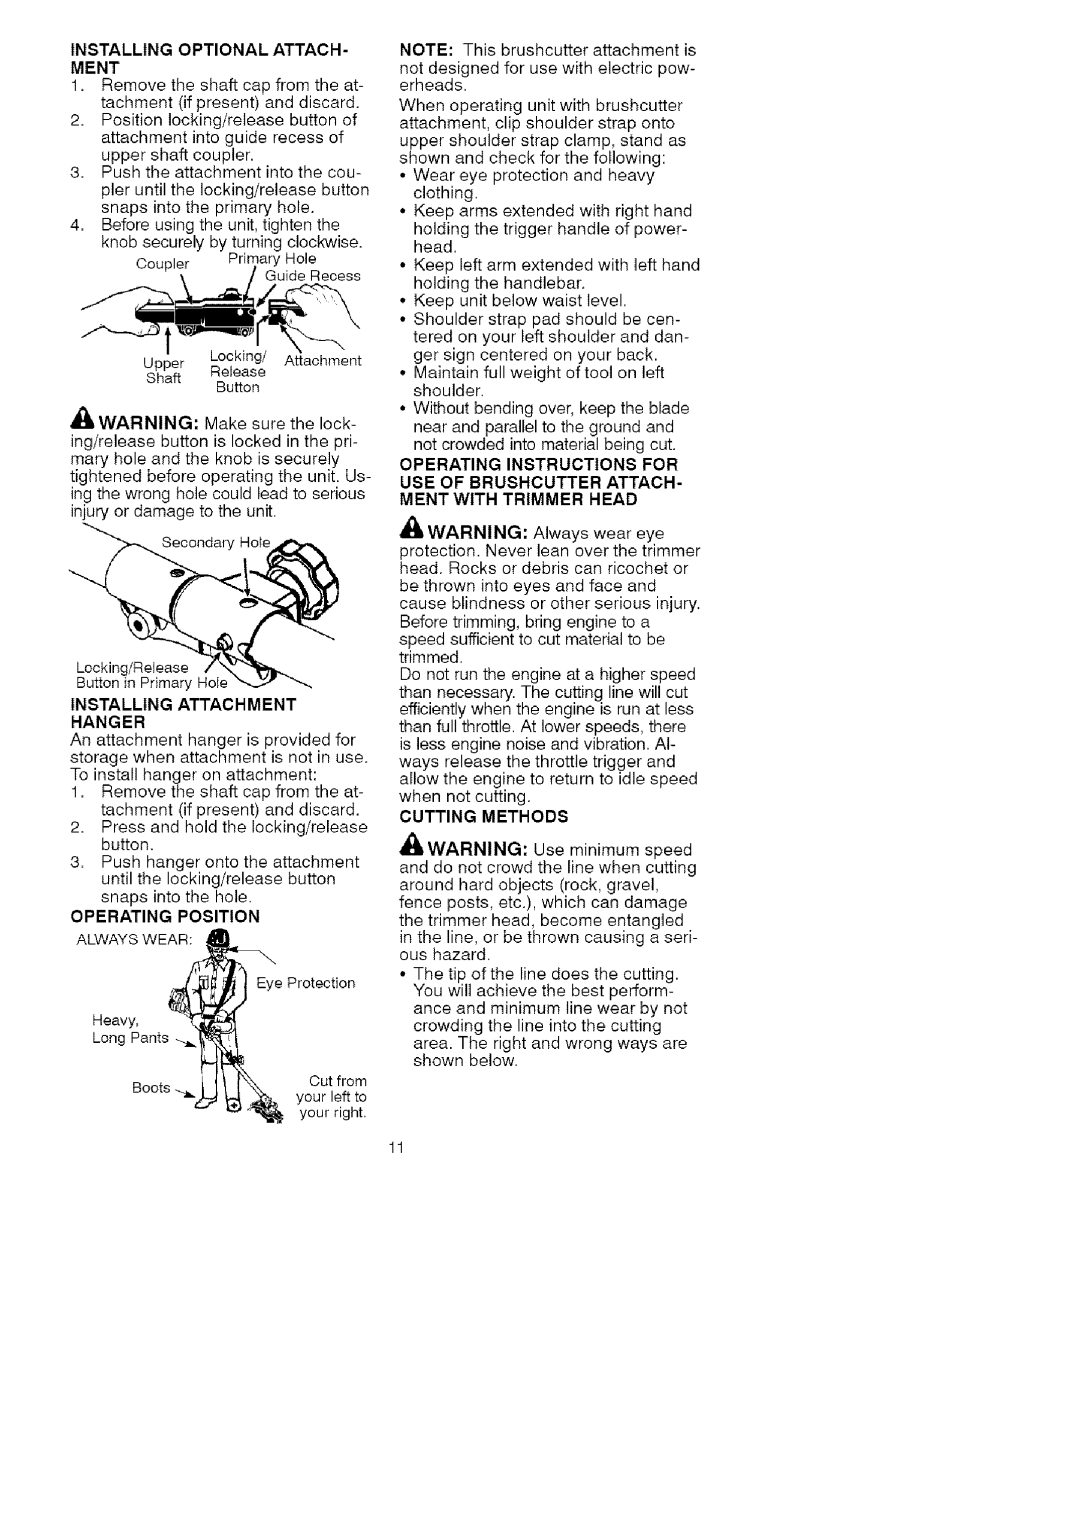
INSTALLINGOPTIONAL ATTACH-

MENT

1.Remove the shaft cap from the at- tachment (if present) and discard.

2.Position locking/release button of attachment into guide recess of upper shaft coupler.

3.Push the attachment into the cou- pler until the locking/release button snaps into the primary hole.

4.Before using the unit, tighten the knob securely by turning clockwise.

Coupler Primary Hole

Guide Recess

Upper Locking/ Attachment

Shaft Release

Button

,_ WARNING: Make sure the lock-

ing/release button is locked in the pri- mary hole and the knob is securely tightened before operating the unit. Us- ing the wrong hole could lead to serious injury or damage to the unit.

Secondary Hoie

Locking/Release

Button in Primary HoIe

INSTALLING ATTACHMENT

HANGER

An attachment hanger is provided for storage when attachment is not in use. To install hanger on attachment:

1.Remove the shaft cap from the at- tachment (if present) and discard.

2.Press and hold the locking/release button.

3.Push hanger onto the attachment until the locking/release button

snaps into the hole.

OPERATING POSITION

ALWAYS WEAR:

Eye Protection

Heavy,

Long Pants

Cut from

your left to your right,

NOTE: This brushcutter attachment is

not designed for use with electric pow- erheads.

When operating unit with brushcutter attachment, clip shoulder strap onto upper shoulder strap clamp, stand as shown and check for the following:

Wear eye protection and heavy clothing.

Keep arms extended with right hand

holding the trigger handle of power- head.

Keep left arm extended with left hand holding the handlebar.

Keep unit below waist level.

Shoulder strap pad should be cen- tered on your left shoulder and dan- ger sign centered on your back.

Maintain full weight of tool on left shoulder.

Without bending over, keep the blade

near and parallel to the ground and not crowded into material being cut.

OPERATING INSTRUCTIONS FOR

USE OF BRUSHCUTTER ATTACH-

MENT WITH TRIMMER HEAD

WARNING: Always wear eye

protection. Never lean over tile trimmer head. Rocks or debris can ricochet or

be thrown into eyes and face and cause blindness or other serious injury. Before trimming, bring engine to a speed sufficient to cut material to be trimmed.

Do not run the engine at a higher speed than necessary. The cutting line will cut efficiently when the engine is run at less than full throttle. At lower speeds, there is less engine noise and vibration. Al- ways release the throttle trigger and allow the engine to return to idle speed when not cutting.

CUTTING METHODS

,_WARNING: Use minimum speed and do not crowd the line when cutting around hard objects (rock, gravel, fence posts, etc.), which can damage the trimmer head, become entangled

in the line, or be thrown causing a seri- ous hazard.

The tip of the line does the cutting. You will achieve the best perform- ance and minimum line wear by not crowding the line into the cutting

area. The right and wrong ways are shown below.

11

Page 11
Image 11
Craftsman 358.792443 manual Installingoptional Attach Ment, Hanger, USE of Brushcutter Attach Ment with Trimmer Head

358.792443, 79244 specifications

The Craftsman 79244,358.792443 is a versatile and robust tool designed for both professional and home repair enthusiasts. Crafted with precision and engineered for durability, this tool is an essential addition to any toolkit. One of the standout features of the Craftsman 79244 is its ergonomic design, which ensures comfort during extended use. The grip is contoured, providing excellent control and reducing fatigue, allowing users to tackle projects with increased efficiency.

This model boasts a powerful motor that delivers high performance across a variety of tasks. Whether you're drilling into wood, metal, or plastic, the Craftsman 79244 handles it with ease. With adjustable speed settings, users can customize their drilling experience, providing the flexibility needed for different materials and applications. The tool's ability to switch between high and low speeds offers enhanced precision for delicate tasks as well as the power required for more demanding jobs.

Another key characteristic of the Craftsman 79244 is its durability. Built with high-quality materials, this tool is designed to withstand the rigors of daily use. The housing is made from impact-resistant materials, ensuring it can withstand drops and bumps without compromising performance. Additionally, the internal components are engineered to last, reducing the likelihood of breakdowns, and extending the tool's lifespan.

Technologically, the Craftsman 79244 features a built-in LED light that illuminates the workspace, enabling users to work in dimly lit areas without straining. This feature is particularly useful for intricate tasks where visibility is crucial. The tool also includes an integrated battery management system, optimizing battery life and providing users with information on the remaining charge, which helps to avoid unexpected downtime during projects.

In terms of versatility, the Craftsman 79244 is compatible with a wide range of accessories, allowing users to change bits and attachments quickly. This adaptability makes it suitable for various tasks, from simple household repairs to more complex construction projects. Additionally, the tool's compact design makes it easy to store and transport, ensuring that you can take it wherever your projects lead you.

In summary, the Craftsman 79244,358.792443 combines power, durability, and user-friendly features to offer an exceptional experience for all levels of users. Whether you're a seasoned professional or a DIY novice, this tool is designed to meet your needs effectively and efficiently.