Procedimientos de operaci6n

Procedimiento diario de arranque

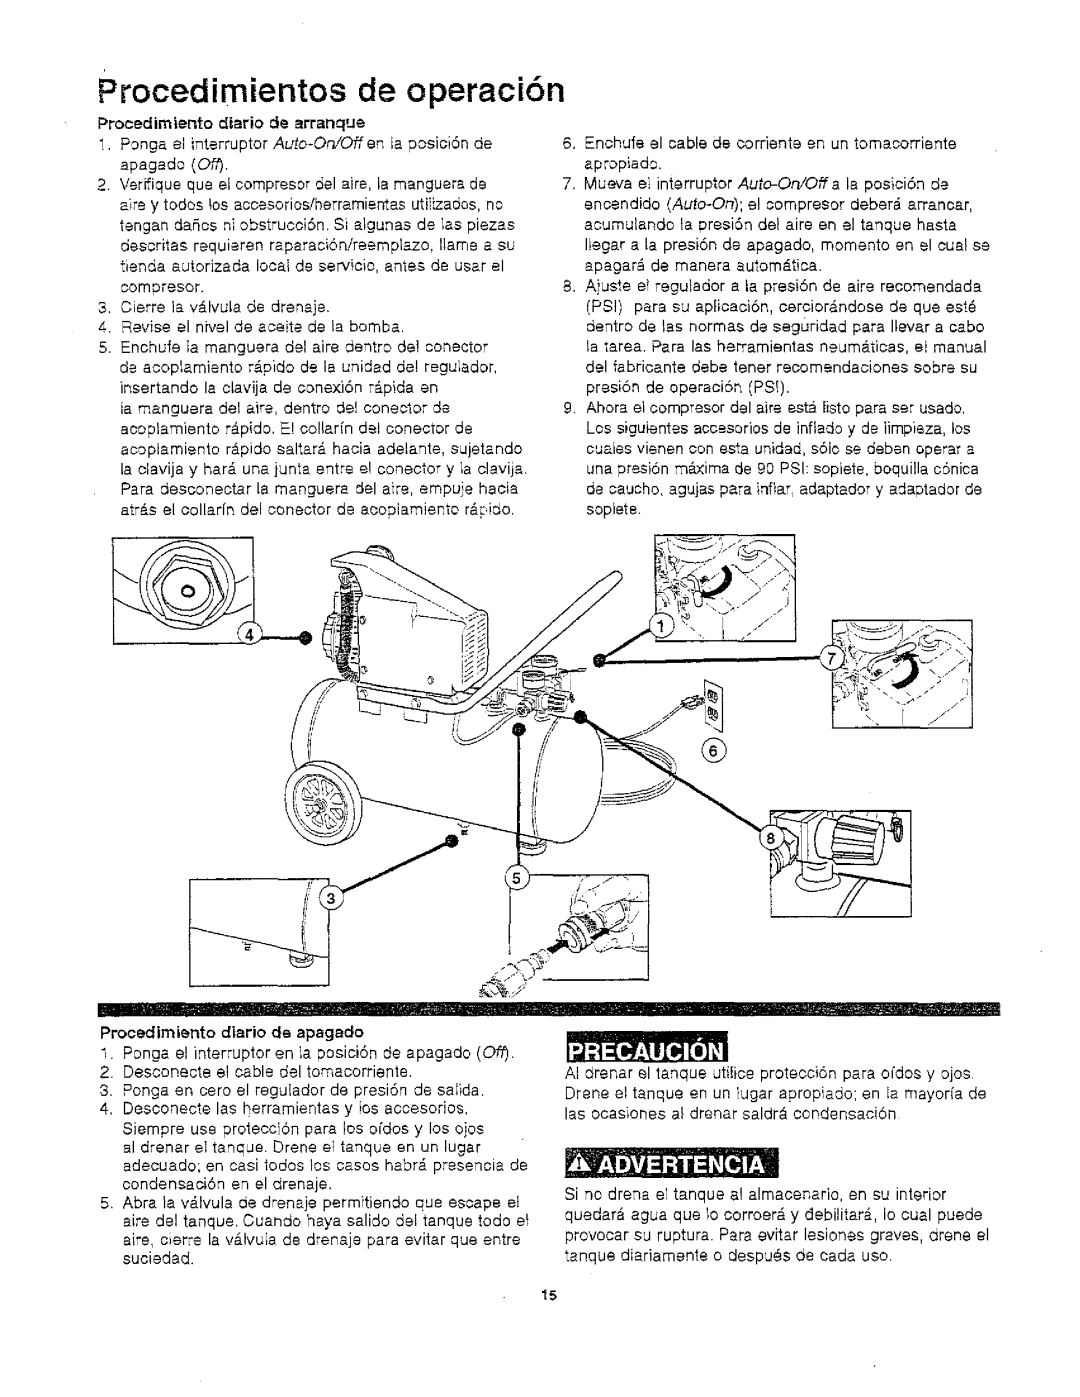
1.Penga el interrupter Auto-On/Oftenla posici6n de apagado (On.

2.Ver_ique qua el compresor del aire, ia manguera de airey todos bs accesorios/harramientas utilizados, no tengan daSos ni ebstrucci6n. Si algunas de las piezas

descritas requieren raparaci6n/reampiazo, liarr_e a su tienda autorizada local de servicio, antes de user el oompresor.

3.Cierre }a v_lvula de drenaje.

4.Revise el nivel de aeeite de ;a bomba.

5.Enchufe la manguera del aire dentro de! conector de aeoplamiento r_.pido de la unidad del reguladar, insertando la clavija de aonexi6n rApida en

la manguera de1 aire, dentro del coneetor de aeeptamienta r_.pida. El eollarfn del conecter de acoplamiento r_.pido saltar_ haeia adelante, aujetando la clavija y har_. una junta entre el conector y la clavija. Para deseoneotar la manguera del aire, empuje hacia atr#,s el collarfn del eonecter de aooplamiento r_.pido.

6, Enahufe el cable de corriente en un tomacorriente aprepiada.

7.Mueva ei interrupter Auto-OniOffala posiei6n de eneendido (Auto-On); e! sempresor deber_ arranaar, acumulando ta presi6n del aire an el tanque hasta Ilegar a la preai6n de apagado, memento en el cual se apagar_ de manera autom_.tiaa.

8.Ajuste el regutador a la presi6n de sire recomendada

(PSI) pars su aplicaci6n, oeraier&ndose de qua est_ dentro de tas normas de seguridad para Ilevar a cabo la tarea. Para las herramientas neuma.tiaas, el manual del fabrieante debe tenet recomendacienes sabre su presi6n de operaei6n (PSI).

g.Ahora el eompresor del aire asta listo para ser usado. Los siguientes accesorios de infiado y de limpiaza, los cuales vienen con esta unidad, s6io se deben operar a una presi6n m&xima de 90 PSI: sopiete, bequilla c6nica de caucho, agujas para infiar, adaptador y adaptador de sopiete.

/

®

¶'_]r

Procedimiento diario de apagedo

1.Pangs el interrupter en la pasiei6n de apagado (Off).

2.Desconecte el cable del temacorriente.

3.Pangs en aero el reguiader de presi6n de salida.

4, Desconecte las herramientas y los accesorics,

Siempre use pretecci6n para les aides y los ojos al drenar el tarlque. Drene el tanque en un lugar adecuado; en casi redes los cases habr_, presencia de condensaci6n en el drenaje.

5.Abra }a v_.tvula de drenaje permftiendo qua escape et aire del tanque. Cuando hays salido del tanque todo el

aire, cierre la v_.lvula de drenaje pars evitar qua entre suciedad.

AI drenar el tanque utilice proteoci6n para aides y ojos

Drene el tanque en un lugar apropiado; en la mayer[a de las ocasiones al drenar saldr& condensaci6n

Si no drena el tanque al almacenarlo, en su interior quedar& agua que Io corroer_ y debilitar&, Io eual puede provocar su ruptura. Pars evitar lesiones graves, drene el tanque diariamente a despu_s de eada use.

15

Page 17
Image 17
Craftsman 921.166390 owner manual Procedimientos de operaci6n

921.166390 specifications

The Craftsman 921.166390 is a versatile and durable tool that has garnered attention for its reliability and innovative features. Designed for both professionals and DIY enthusiasts, this multipurpose tool stands out in the competitive market of power tools.

One of the main features of the Craftsman 921.166390 is its powerful motor, which provides robust performance for a variety of applications. With its efficient power output, users can tackle tasks ranging from cutting and shaping materials to drilling holes and fastening components. This makes it an ideal choice for woodworking, metalworking, and home improvement projects.

The tool is equipped with an adjustable speed setting, allowing users to customize the speed according to the task at hand. This feature is particularly beneficial when working with different materials, as it helps prevent damage and ensures precision. The variable speed control gives users the flexibility to optimize performance, whether they are working with delicate materials or require high-speed cutting.

Another significant characteristic of the Craftsman 921.166390 is its ergonomic design. The tool is crafted to fit comfortably in the user’s hand, reducing fatigue during extended use. The non-slip grip promotes stability, enabling users to maintain control even in challenging working conditions. This thoughtful design is crucial for achieving accuracy while minimizing the risk of accidents.

In terms of construction, the Craftsman 921.166390 is built with high-quality materials that enhance durability and longevity. The robust housing protects the internal components from damage, ensuring the tool can withstand the rigors of daily use. Additionally, the easy-to-replace parts contribute to its maintenance, allowing users to keep the tool in optimal working condition for years to come.

The versatility of the Craftsman 921.166390 is further enhanced by its compatibility with various attachments and accessories. This allows for a wide range of applications, making it a multi-functional tool that can adapt to different tasks. Whether users need to drill, cut, or shape materials, this tool can handle it all, making it a valuable addition to any toolkit.

In summary, the Craftsman 921.166390 is characterized by its powerful motor, adjustable speed settings, ergonomic design, and robust construction. These features combine to create a reliable tool that meets the demands of various applications, making it a preferred choice among both professionals and hobbyists alike. Its ability to perform a multitude of tasks efficiently ensures that users can take on projects with confidence.