Direct Drain Instructions

AVERTISSEMENT – AVIS IMPORTANTS

Direct Drain Feature:

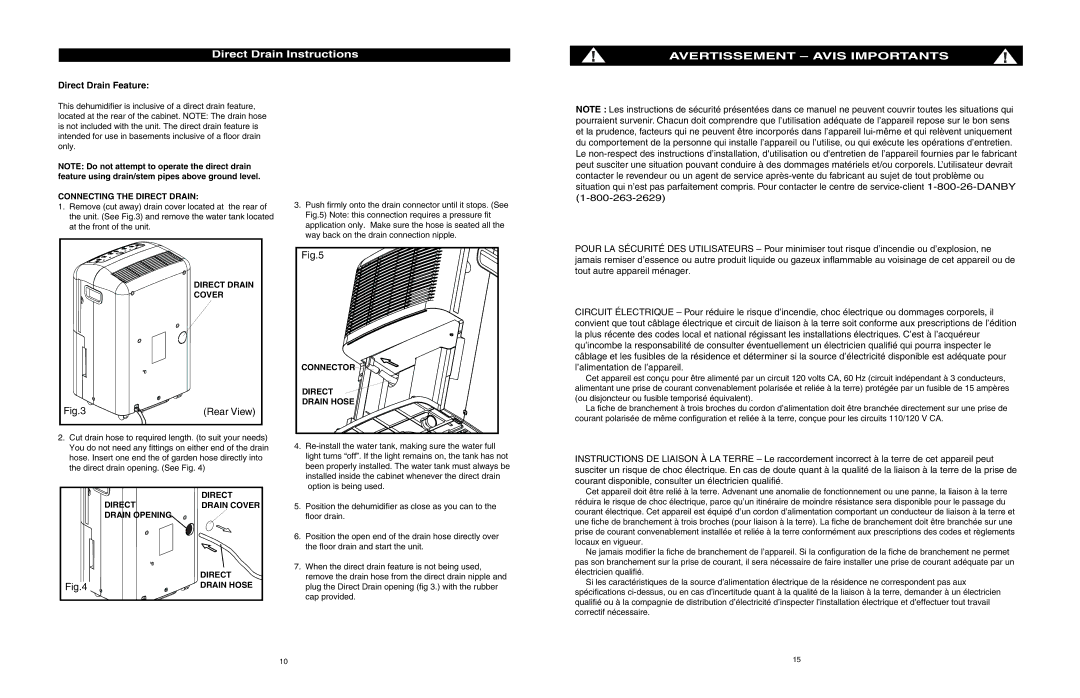
This dehumidifier is inclusive of a direct drain feature, located at the rear of the cabinet. NOTE: The drain hose is not included with the unit. The direct drain feature is intended for use in basements inclusive of a floor drain only.

NOTE: Do not attempt to operate the direct drain feature using drain/stem pipes above ground level.

CONNECTING THE DIRECT DRAIN:

1.Remove (cut away) drain cover located at the rear of the unit. (See Fig.3) and remove the water tank located at the front of the unit.

DIRECT DRAIN

COVER

Fig.3

(Rear View)

3.Push firmly onto the drain connector until it stops. (See Fig.5) Note: this connection requires a pressure fit application only. Make sure the hose is seated all the way back on the drain connection nipple.

Fig.5

CONNECTOR

DIRECT

DRAIN HOSE

NOTE : Les instructions de sécurité présentées dans ce manuel ne peuvent couvrir toutes les situations qui pourraient survenir. Chacun doit comprendre que l’utilisation adéquate de l’appareil repose sur le bon sens et la prudence, facteurs qui ne peuvent être incorporés dans l’appareil lui-même et qui relèvent uniquement du comportement de la personne qui installe l’appareil ou l’utilise, ou qui exécute les opérations d’entretien. Le non-respect des instructions d’installation, d'utilisation ou d'entretien de l’appareil fournies par le fabricant peut susciter une situation pouvant conduire à des dommages matériels et/ou corporels. L’utilisateur devrait contacter le revendeur ou un agent de service après-vente du fabricant au sujet de tout problème ou situation qui n’est pas parfaitement compris. Pour contacter le centre de service-client 1-800-26-DANBY

(1-800-263-2629)

POUR LA SÉCURITÉ DES UTILISATEURS – Pour minimiser tout risque d’incendie ou d’explosion, ne jamais remiser d’essence ou autre produit liquide ou gazeux inflammable au voisinage de cet appareil ou de tout autre appareil ménager.

CIRCUIT ÉLECTRIQUE – Pour réduire le risque d’incendie, choc électrique ou dommages corporels, il convient que tout câblage électrique et circuit de liaison à la terre soit conforme aux prescriptions de l’édition la plus récente des codes local et national régissant les installations électriques. C’est à l’acquéreur qu’incombe la responsabilité de consulter éventuellement un électricien qualifié qui pourra inspecter le câblage et les fusibles de la résidence et déterminer si la source d’électricité disponible est adéquate pour l’alimentation de l’appareil.

Cet appareil est conçu pour être alimenté par un circuit 120 volts CA, 60 Hz (circuit indépendant à 3 conducteurs, alimentant une prise de courant convenablement polarisée et reliée à la terre) protégée par un fusible de 15 ampères (ou disjoncteur ou fusible temporisé équivalent).

La fiche de branchement à trois broches du cordon d’alimentation doit être branchée directement sur une prise de courant polarisée de même configuration et reliée à la terre, conçue pour les circuits 110/120 V CA.

2.Cut drain hose to required length. (to suit your needs) You do not need any fittings on either end of the drain hose. Insert one end the of garden hose directly into the direct drain opening. (See Fig. 4)

DIRECT

DIRECTDRAIN COVER

DRAIN OPENING


DIRECT

Fig.4

DRAIN HOSE

4.Re-install the water tank, making sure the water full light turns “off”. If the light remains on, the tank has not been properly installed. The water tank must always be installed inside the cabinet whenever the direct drain option is being used.

5.Position the dehumidifier as close as you can to the floor drain.

6.Position the open end of the drain hose directly over the floor drain and start the unit.

7.When the direct drain feature is not being used, remove the drain hose from the direct drain nipple and plug the Direct Drain opening (fig 3.) with the rubber cap provided.

INSTRUCTIONS DE LIAISON À LA TERRE – Le raccordement incorrect à la terre de cet appareil peut susciter un risque de choc électrique. En cas de doute quant à la qualité de la liaison à la terre de la prise de courant disponible, consulter un électricien qualifié.

Cet appareil doit être relié à la terre. Advenant une anomalie de fonctionnement ou une panne, la liaison à la terre réduira le risque de choc électrique, parce qu’un itinéraire de moindre résistance sera disponible pour le passage du courant électrique. Cet appareil est équipé d’un cordon d’alimentation comportant un conducteur de liaison à la terre et une fiche de branchement à trois broches (pour liaison à la terre). La fiche de branchement doit être branchée sur une prise de courant convenablement installée et reliée à la terre conformément aux prescriptions des codes et règlements locaux en vigueur.

Ne jamais modifier la fiche de branchement de l’appareil. Si la configuration de la fiche de branchement ne permet pas son branchement sur la prise de courant, il sera nécessaire de faire installer une prise de courant adéquate par un électricien qualifié.

Si les caractéristiques de la source d’alimentation électrique de la résidence ne correspondent pas aux spécifications ci-dessus, ou en cas d’incertitude quant à la qualité de la liaison à la terre, demander à un électricien qualifié ou à la compagnie de distribution d’électricité d’inspecter l’installation électrique et d’effectuer tout travail correctif nécessaire.

10

15

Page 12
Image 12
Danby ADR4066, ADR3006 owner manual Direct Drain Instructions, Direct Drain Feature

ADR3006, ADR4066 specifications

The Danby ADR4066 and ADR3006 are two exemplary models from Danby’s line of portable air conditioners designed to offer efficient cooling solutions for residential and small commercial spaces. These units represent a blend of advanced technology, user-friendly features, and energy efficiency, making them ideal choices for comfortable living environments.

The Danby ADR4066 has a powerful cooling capacity of 14,000 BTU, which is suitable for spaces up to 700 square feet. This model incorporates modern technologies such as a high-efficiency compressor and an eco-friendly refrigerant, which not only provides effective cooling but also minimizes environmental impact. The ADR4066 features three cooling and fan speeds, allowing users to customize their cooling experience according to their personal preferences. Another standout feature of this model is its programmable thermostat, which enables precise temperature control and contributes to better energy management by allowing users to set specific cooling times and temperatures.

On the other hand, the Danby ADR3006 caters to slightly smaller spaces with a cooling capacity of 10,000 BTU, ideal for areas up to approximately 450 square feet. This model also showcases a compact design, making it easy to install and transport, especially for users who may need to relocate the unit frequently. Just like the ADR4066, the ADR3006 employs an eco-friendly refrigerant and features a digital control panel that simplifies operation.

Both models boast a 24-hour programmable timer, allowing users to set the air conditioner to turn on or off at their convenience, which not only boosts comfort levels but also save on energy costs. Moreover, both units come with a dehumidifier function that effectively removes excess moisture from the air, contributing to a healthier indoor environment and preventing mold growth.

In terms of ease of maintenance, both the ADR4066 and ADR3006 feature washable and reusable air filters, ensuring that the units run efficiently over their lifespan. The user-friendly design is complemented by a sleek appearance that fits seamlessly into any decor.

In conclusion, the Danby ADR4066 and ADR3006 portable air conditioners offer robust cooling solutions with advanced features that ensure user convenience and energy efficiency. With their modern technologies and excellent performance, these models stand out in the market for anyone looking to enhance indoor comfort during hot weather.