Conexión
 CONEXIÓN DE LA ESTUFA A LA LÍNEA DE GAS
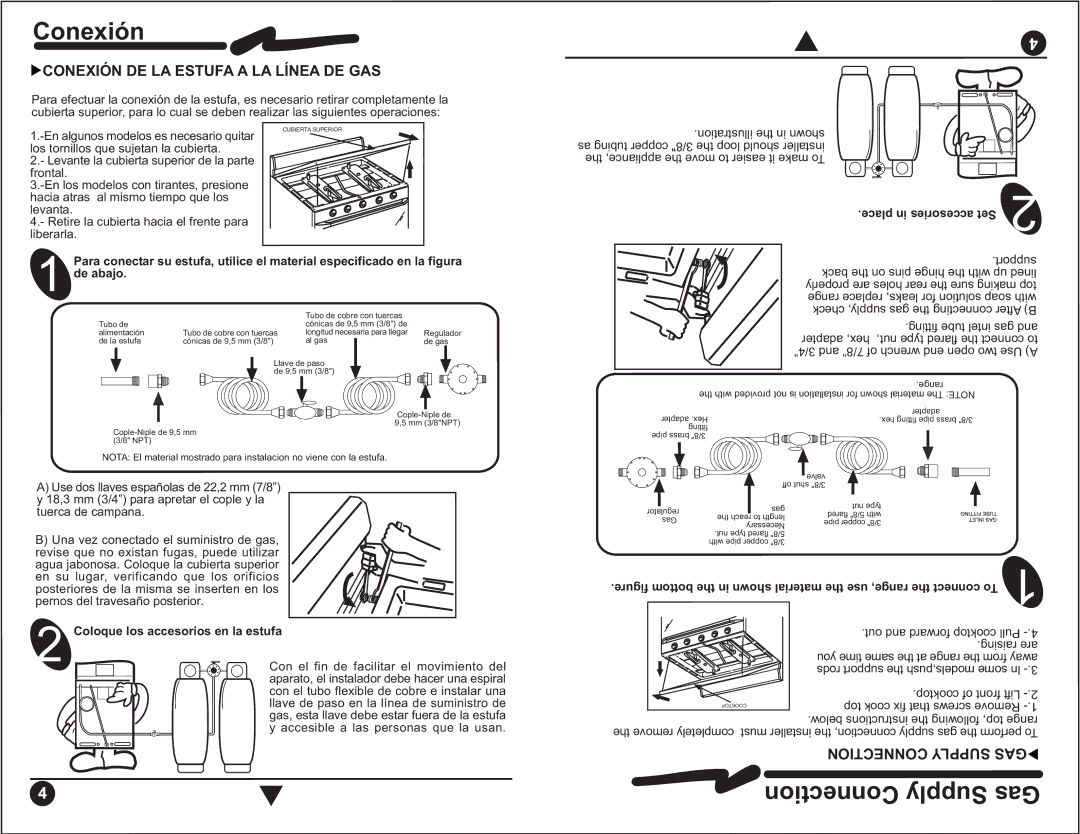
Para efectuar la conexión de la estufa, es necesario retirar completamente la cubierta superior, para lo cual se deben realizar las siguientes operaciones:
4
CUBIERTA SUPERIOR
.illustration the in shown as bingtu copper 3/8" the loop should installer the appliance, the move to easier it make To
.place in accesories Set | 2 |
|
1 | Para conectar su estufa, utilice el material especificado en la figura | |||
| de abajo. |
|
|
|
|
|
| Tubo de cobre con tuercas |
|
| Tubo de |
| cónicas de 9,5 mm (3/8") de |
|
| alimentación | Tubo de cobre con tuercas | longitud necesaria para llegar | Regulador |
| de la estufa | cónicas de 9,5 mm (3/8") | al gas | de gas |
|
| Llave de paso |
| |
|
| de 9,5 mm (3/8") |
| |
|
|
| ||
| 9,5 mm (3/8"NPT) | |||
|
|
| ||
| (3/8" NPT) |
|
|
|
| NOTA: El material mostrado para instalacion no viene con la estufa. |
| ||
A)Use dos llaves españolas de 22,2 mm (7/8”) y 18,3 mm (3/4”) para apretar el cople y la tuerca de campana.
B)Una vez conectado el suministro de gas, revise que no existan fugas, puede utilizar agua jabonosa. Coloque la cubierta superior en su lugar, verificando que los orificios posteriores de la misma se inserten en los pernos del travesaño posterior.
2 | Coloque los accesorios en la estufa |
| |
| Con el fin de facilitar el movimiento del |
| aparato, el instalador debe hacer una espiral |
| con el tubo flexible de cobre e instalar una |
| llave de paso en la línea de suministro de |
| gas, esta llave debe estar fuera de la estufa |
| y accesible a las personas que la usan. |
4 |
|
|
|
| .support | |
|
|
| back the on pins hinge the with up lined | |
|
|
| properly are holes rear the sure making top | |
|
|
| range replace leaks, for solution soap with | |
|
|
| check supply, gas the connecting After B) | |
|
|
| .fitting betu intel gas and | |
|
|
| adapter hex, nut, type flared the connect to | |
|
|
| 3/4” and 7/8” of wrench end open two Use A) | |
|
|
| .range |
|
the with provided not is installation for shown aterialm The NOTE: |
| |||
adapter .Hex |
|
| adapter |
|
|
| .hex fitting pipe brass 3/8" |
| |
fitting |
|
|
|
|
pipe brass 3/8" |
|
|
|
|
|
|
| valve |
|
|
| off shut 3/8" |
| |
regulator |
| gas | nut type |
|
| flared 5/8" with |
| ||
the reach to length |
| |||
asG |
| |||
pipe copper 3/8" |
| |||
| Necessary |
| ||
|
|
| ||
|
|
|
| |
| .nut type flared 5/8" |
|
| |
| with pipe copper 3/8" |
|
| |
.figure bottom the in shown material the use range, the connect To | 1 | |||
|
|
|
| |
|
|
| .out and forward cooktop | Pull |
|
|
| .raising are | |
|
|
| you time same the at range the from away | |
|
|
| rods support the models,push some In | |
|
|
| .cooktop of front Lift | |
| PKTOOCO | top cook fix that screws Remove | ||
|
|
| ||
|
|
| .below instructions the following top, range | |
the remove completely | must installer the connection, supply gas the perform To | |||
|
|
| CONNECTION SUPPLY GAS | |
|
| Connection Supply Gas | ||
