*NOTE* Measure Twice

Make sure the speaker clears the ceiling, adjacent walls, corners, beams, lighting fixtures and door/window frames. Leave at least 1" (25mm) above or to the side of the speaker location to allow the speaker to slide onto the screws. Make sure the center of the template is centered with the TV screen’s center points.

*NOTA* Mida dos veces

*REMARQUE* Prenez vos mesures deux fois

11

Vérifiez que les haut-parleurs ne toucheront pas

le plafond, les murs adjacents, les coins, poutres, luminaires ou cadres de porte et fenêtres. Prévoyez au moins 25mm (1 po) autour des haut-parleurs afin de pouvoir les faire coulisser sur les vis. Vérifiez que le centre du modèle est aligné sur le centre de l'écran de votre téléviseur.

Asegúrese de que la bocina no esté demasiado cerca del techo, paredes adyacentes, esquinas, vigas de techo, luces ni marcos de puertas o ventanas. Deje al menos un espacio de 1" (25mm) por encima de la ubicación de la bocina para que pueda deslizarse sobre los tornillos. Asegúrese de que el centro de la plantilla esté alineado con los puntos centrales de la pantalla del televisor.

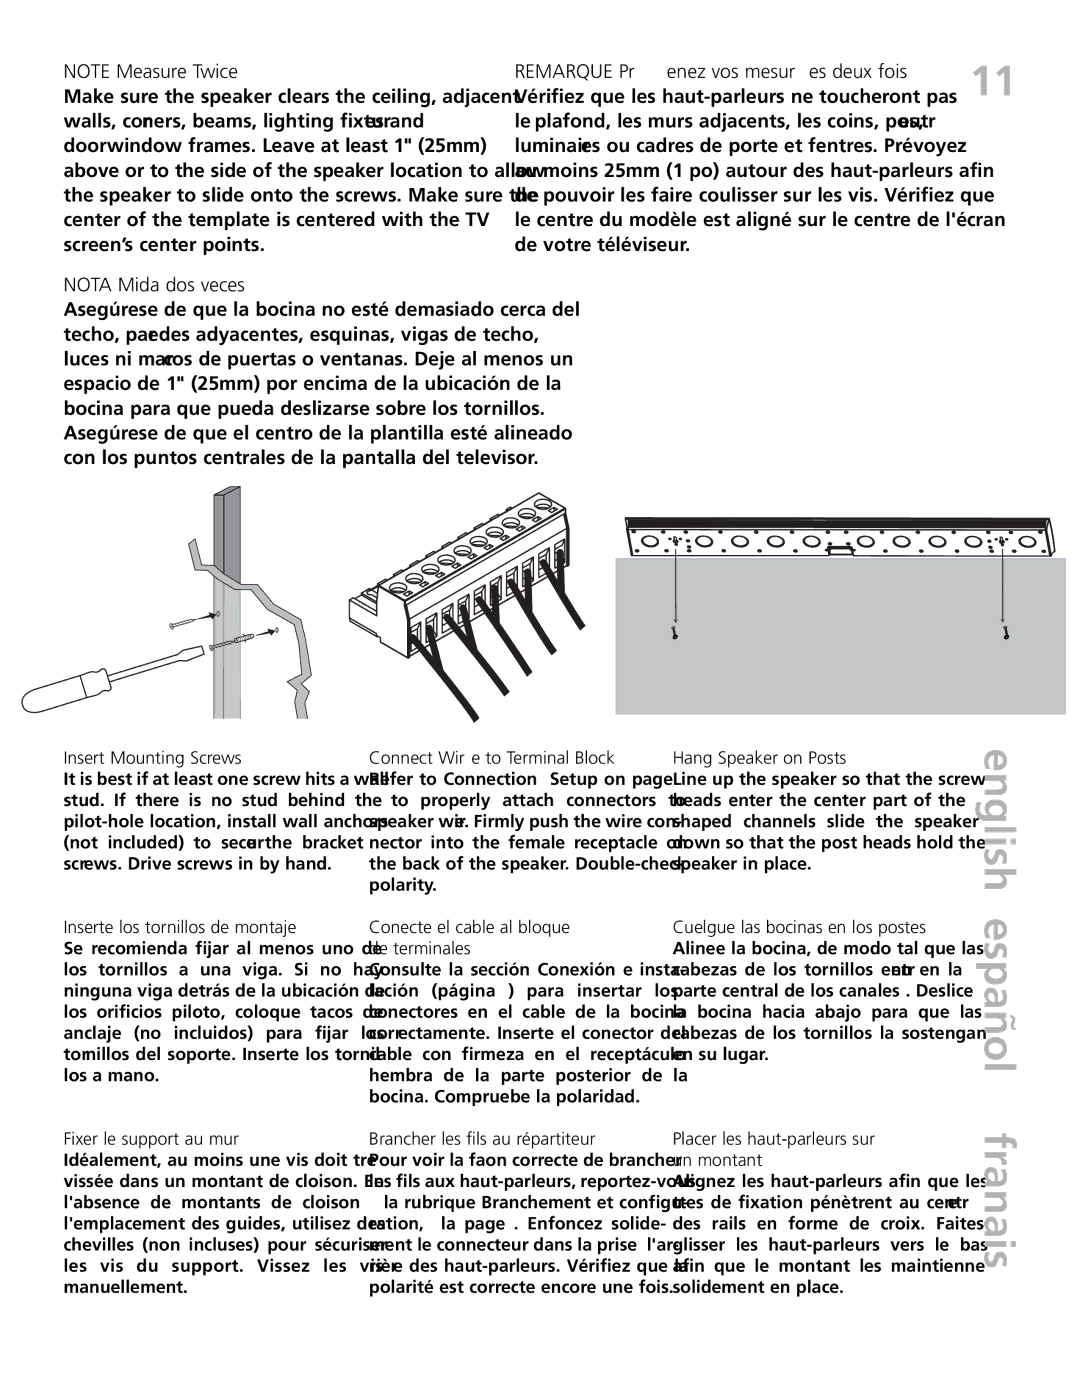
Insert Mounting Screws

It is best if at least one screw hits a wall stud. If there is no stud behind the pilot-hole location, install wall anchors (not included) to secure the bracket screws. Drive screws in by hand.

Inserte los tornillos de montaje

Se recomienda fijar al menos uno de los tornillos a una viga. Si no hay ninguna viga detrás de la ubicación de los orificios piloto, coloque tacos de anclaje (no incluidos) para fijar los tornillos del soporte. Inserte los tornil- los a mano.

Fixer le support au mur Idéalement, au moins une vis doit être vissée dans un montant de cloison. En l'absence de montants de cloison à l'emplacement des guides, utilisez des chevilles (non incluses) pour sécuriser les vis du support. Vissez les vis manuellement.

Connect Wire to Terminal Block

Hang Speaker on Posts

Refer to Connection & Setup on page

Line up the speaker so that the screw

6to properly attach connectors to heads enter the center part of the + speaker wire. Firmly push the wire con- shaped channels; slide the speaker nector into the female receptacle on down so that the post heads hold the the back of the speaker. Double-check speaker in place.

polarity.

Conecte el cable al bloque

Cuelgue las bocinas en los postes

de terminales

Alinee la bocina, de modo tal que las

Consulte la sección Conexión e insta-

cabezas de los tornillos entren en la

lación (página 6) para insertar los

parte central de los canales +. Deslice

conectores en el cable de la bocina

la bocina hacia abajo para que las

correctamente. Inserte el conector del

cabezas de los tornillos la sostengan

cable con firmeza en el receptáculo

en su lugar.

hembra de la parte posterior de la


bocina. Compruebe la polaridad.


Brancher les fils au répartiteur

Placer les haut-parleurs sur

Pour voir la façon correcte de brancher

un montant

les fils aux haut-parleurs, reportez-vous

Alignez les haut-parleurs afin que les

àla rubrique Branchement et configu- têtes de fixation pénètrent au centre ration, à la page 6. Enfoncez solide- des rails en forme de croix. Faites ment le connecteur dans la prise à l'ar- glisser les haut-parleurs vers le bas rière des haut-parleurs. Vérifiez que la afin que le montant les maintienne polarité est correcte encore une fois. solidement en place.

english español français

Page 11
Image 11
Definitive Technology XTR-SSA5 owner manual Insert Mounting Screws, Inserte los tornillos de montaje, Un montant

XTR-SSA5 specifications

The Definitive Technology XTR-SSA5 is a sleek and innovative soundbar designed to enhance your home audio experience. With its impressive design and advanced technologies, it stands out as a premium option for consumers seeking high-quality sound without compromising on aesthetics. One of the defining characteristics of the XTR-SSA5 is its ultra-slim profile, measuring just over 3 inches in height. This low-profile design allows it to seamlessly integrate with modern flat-screen TVs, ensuring that it blends beautifully into any living space while delivering exceptional audio performance.

One of the main features of the XTR-SSA5 is its proprietary Balanced Double Surround System technology. This feature allows the soundbar to create an expansive soundstage, providing an immersive listening experience. The technology utilizes specially designed drivers to deliver clear and dynamic sound across a wide frequency range, making it suitable for various audio content, from movies to music. The soundbar is equipped with multiple built-in speakers, including upward-firing drivers that enhance the surround sound effect, ensuring that audio feels enveloping and realistic.

Another key aspect of the XTR-SSA5 is its compatibility with various audio formats, including Dolby Digital and DTS, which adds to its versatility. Users can enjoy a cinematic audio experience at home, thanks to its ability to decode high-definition sound formats. Additionally, the XTR-SSA5 features Bluetooth connectivity, allowing users to easily stream music from their smartphones or tablets, greatly enhancing its functionality as an audio hub.

The soundbar is designed with flexibility in mind. It can be mounted on the wall or placed on a shelf, ensuring that it can fit into various room configurations without sacrificing sound quality. Beyond its performance, the XTR-SSA5 is built with high-quality materials, providing durability along with a premium finish that complements any decor.

Overall, the Definitive Technology XTR-SSA5 is an excellent choice for those seeking a high-performance soundbar that combines modern design with advanced audio technologies. With its immersive sound capabilities, versatile connectivity options, and elegant appearance, the XTR-SSA5 delivers a remarkable audio experience that enhances any home entertainment setup.