Set Up Other Devices Last
Sluit andere apparaten als laatste aan Puis, configurez les autres périphériques Andere Geräte zuletzt einrichten Installare le altre periferiche per ultime A continuación, configure los demás dispositivos
6
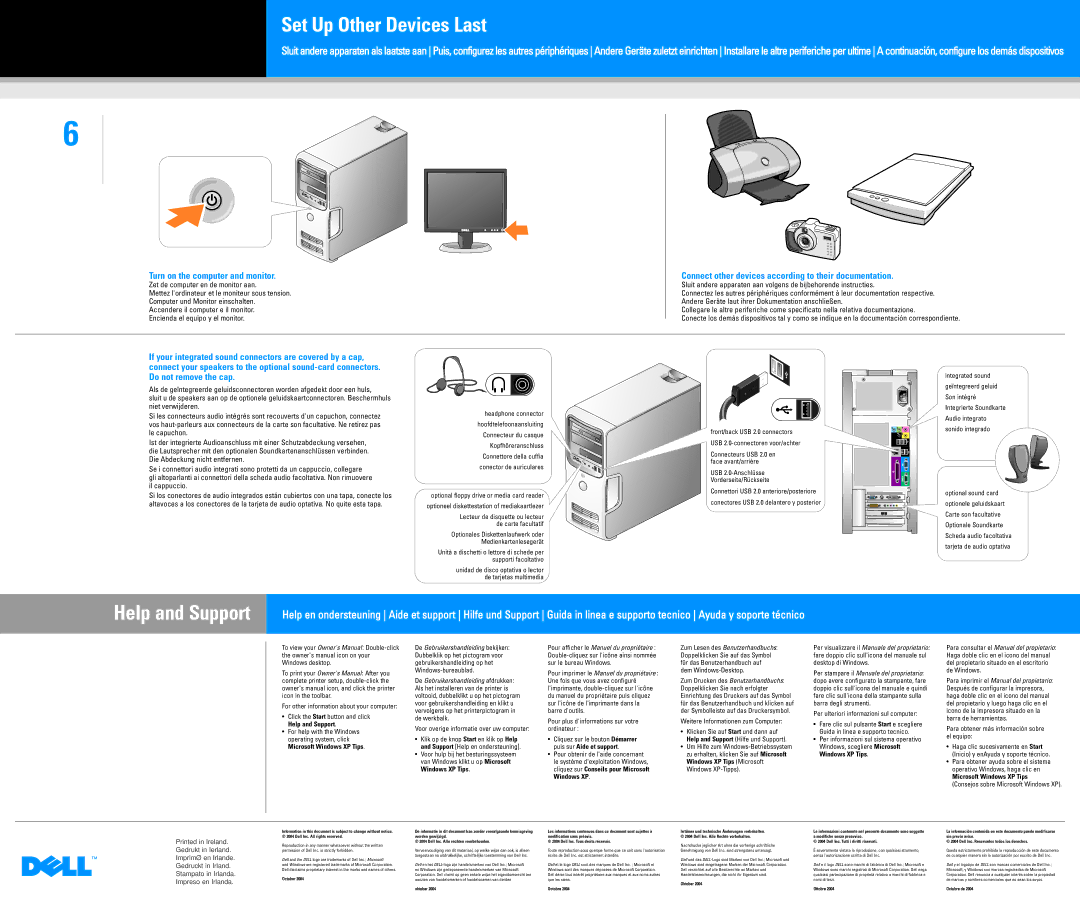
Turn on the computer and monitor.
Zet de computer en de monitor aan.
Mettez l'ordinateur et le moniteur sous tension.
Computer und Monitor einschalten.
Accendere il computer e il monitor.
Encienda el equipo y el monitor.
Connect other devices according to their documentation.
Sluit andere apparaten aan volgens de bijbehorende instructies.
Connectez les autres périphériques conformément à leur documentation respective. Andere Geräte laut ihrer Dokumentation anschließen.
Collegare le altre periferiche come specificato nella relativa documentazione.
Conecte los demás dispositivos tal y como se indique en la documentación correspondiente.
If your integrated sound connectors are covered by a cap, connect your speakers to the optional sound-card connectors. Do not remove the cap.
Als de geïntegreerde geluidsconnectoren worden afgedekt door een huls,
sluit u de speakers aan op de optionele geluidskaartconnectoren. Beschermhuls niet verwijderen.
Si les connecteurs audio intégrés sont recouverts d'un capuchon, connectez vos haut-parleurs aux connecteurs de la carte son facultative. Ne retirez pas le capuchon.
Ist der integrierte Audioanschluss mit einer Schutzabdeckung versehen, die Lautsprecher mit den optionalen Soundkartenanschlüssen verbinden. Die Abdeckung nicht entfernen.
Se i connettori audio integrati sono protetti da un cappuccio, collegare gli altoparlanti ai connettori della scheda audio facoltativa. Non rimuovere il cappuccio.
Si los conectores de audio integrados están cubiertos con una tapa, conecte los altavoces a los conectores de la tarjeta de audio optativa. No quite esta tapa.
headphone connector
hoofdtelefoonaansluiting
Connecteur du casque
Kopfhöreranschluss
Connettore della cuffia
conector de auriculares
optional floppy drive or media card reader
optioneel diskettestation of mediakaartlezer
Lecteur de disquette ou lecteur de carte facultatif
Optionales Diskettenlaufwerk oder Medienkartenlesegerät
Unità a dischetti o lettore di schede per supporti facoltativo
unidad de disco optativa o lector de tarjetas multimedia
front/back USB 2.0 connectors
USB 2.0-connectoren voor/achter
Connecteurs USB 2.0 en face avant/arrière
USB 2.0-Anschlüsse
Vorderseite/Rückseite
Connettori USB 2.0 anteriore/posteriore
conectores USB 2.0 delantero y posterior
integrated sound
geïntegreerd geluid
Son intégré
Integrierte Soundkarte
Audio integrato
sonido integrado
optional sound card
optionele geluidskaart
Carte son facultative
Optionale Soundkarte
Scheda audio facoltativa
tarjeta de audio optativa
To view your Owner's Manual: Double-click the owner's manual icon on your Windows desktop.
To print your Owner's Manual: After you complete printer setup, double-click the owner's manual icon, and click the printer icon in the toolbar.
For other information about your computer:
•Click the Start button and click Help and Support.
•For help with the Windows operating system, click Microsoft Windows XP Tips.
De Gebruikershandleiding bekijken: Dubbelklik op het pictogram voor gebruikershandleiding op het Windows-bureaublad.
De Gebruikershandleiding afdrukken: Als het installeren van de printer is voltooid, dubbelklikt u op het pictogram voor gebruikershandleiding en klikt u vervolgens op het printerpictogram in de werkbalk.
Voor overige informatie over uw computer:
•Klik op de knop Start en klik op Help and Support [Help en ondersteuning].
•Voor hulp bij het besturingssysteem van Windows klikt u op Microsoft Windows XP Tips.
Pour afficher le Manuel du propriétaire : Double-cliquez sur l'icône ainsi nommée sur le bureau Windows.
Pour imprimer le Manuel du propriétaire : Une fois que vous avez configuré l'imprimante, double-cliquez sur l'icône du manuel du propriétaire puis cliquez sur l'icône de l'imprimante dans la barre d'outils.
Pour plus d'informations sur votre ordinateur :
•Cliquez sur le bouton Démarrer puis sur Aide et support.
•Pour obtenir de l'aide concernant le système d'exploitation Windows, cliquez sur Conseils pour Microsoft Windows XP.
Zum Lesen des Benutzerhandbuchs: Doppelklicken Sie auf das Symbol für das Benutzerhandbuch auf dem Windows-Desktop.
Zum Drucken des Benutzerhandbuchs: Doppelklicken Sie nach erfolgter Einrichtung des Druckers auf das Symbol für das Benutzerhandbuch und klicken auf der Symbolleiste auf das Druckersymbol.
Weitere Informationen zum Computer:
•Klicken Sie auf Start und dann auf Help and Support (Hilfe und Support).
•Um Hilfe zum Windows-Betriebssystem zu erhalten, klicken Sie auf Microsoft Windows XP Tips (Microsoft Windows XP-Tipps).
Per visualizzare il Manuale del proprietario: fare doppio clic sull'icona del manuale sul desktop di Windows.
Per stampare il Manuale del proprietario: dopo avere configurato la stampante, fare doppio clic sull'icona del manuale e quindi fare clic sull'icona della stampante sulla barra degli strumenti.
Per ulteriori informazioni sul computer:
•Fare clic sul pulsante Start e scegliere Guida in linea e supporto tecnico.
•Per informazioni sul sistema operativo Windows, scegliere Microsoft Windows XP Tips.
Para consultar el Manual del propietario: Haga doble clic en el icono del manual del propietario situado en el escritorio de Windows.
Para imprimir el Manual del propietario: Después de configurar la impresora, haga doble clic en el icono del manual del propietario y luego haga clic en el icono de la impresora situado en la barra de herramientas.
Para obtener más información sobre el equipo:
•Haga clic sucesivamente en Start (Inicio) y enAyuda y soporte técnico.
•Para obtener ayuda sobre el sistema operativo Windows, haga clic en Microsoft Windows XP Tips (Consejos sobre Microsoft Windows XP).
Printed in Ireland. Gedrukt in Ierland. Imprimé en Irlande. Gedruckt in Irland.
Stampato in Irlanda. Impreso en Irlanda.
Information in this document is subject to change without notice. © 2004 Dell Inc. All rights reserved.
Reproduction in any manner whatsoever without the written permission of Dell Inc. is strictly forbidden.
Dell and the DELL logo are trademarks of Dell Inc.; Microsoft
and Windows are registered trademarks of Microsoft Corporation. Dell disclaims proprietary interest in the marks and names of others.
October 2004
De informatie in dit document kan zonder voorafgaande kennisgeving worden gewijzigd.
© 2004 Dell Inc. Alle rechten voorbehouden.
Verveelvoudiging van dit materiaal, op welke wijze dan ook, is alleen toegestaan na uitdrukkelijke, schriftelijke toestemming van Dell Inc.
Dell en het DELL-logo zijn handelsmerken van Dell Inc.; Microsoft en Windows zijn gedeponeerde handelsmerken van Microsoft Corporation. Dell claimt op geen enkele wijze het eigendomsrecht ten aanzien van handelsmerken of handelsnamen van derden
oktober 2004
Les informations contenues dans ce document sont sujettes à modification sans préavis.
© 2004 Dell Inc. Tous droits réservés.
Toute reproduction sous quelque forme que ce soit sans l'autorisation écrite de Dell Inc. est strictement interdite.
Dell et le logo DELL sont des marques de Dell Inc. ; Microsoft et Windows sont des marques déposées de Microsoft Corporation. Dell dénie tout intérêt propriétaire aux marques et aux noms autres que les siens.
Octobre 2004
Irrtümer und technische Änderungen vorbehalten. © 2004 Dell Inc. Alle Rechte vorbehalten.
Nachdrucke jeglicher Art ohne die vorherige schriftliche Genehmigung von Dell Inc. sind strengstens untersagt.
Dell und das DELL-Logo sind Marken von Dell Inc.; Microsoft und Windows sind eingetragene Marken der Microsoft Corporation. Dell verzichtet auf alle Besitzrechte an Marken und Handelsbezeichnungen, die nicht ihr Eigentum sind.
Oktober 2004
Le informazioni contenute nel presente documento sono soggette a modifiche senza preavviso.
© 2004 Dell Inc. Tutti i diritti riservati.
Èseveramente vietata la riproduzione, con qualsiasi strumento, senza l'autorizzazione scritta di Dell Inc.
Dell e il logo DELL sono marchi di fabbrica di Dell Inc.; Microsoft e Windows sono marchi registrati di Microsoft Corporation. Dell nega qualsiasi partecipazione di proprietà relativa a marchi di fabbrica e nomi di terzi.
Ottobre 2004
La información contenida en este documento puede modificarse sin previo aviso.
© 2004 Dell Inc. Reservados todos los derechos.
Queda estrictamente prohibida la reproducción de este documento de cualquier manera sin la autorización por escrito de Dell Inc.
Dell y el logotipo de DELL son marcas comerciales de Dell Inc.; Microsoft, y Windows son marcas registradas de Microsoft Corporation. Dell renuncia a cualquier interés sobre la propiedad de marcas y nombres comerciales que no sean los suyos.
Octubre de 2004