Dell 2400MP Projector
March 2006 Rev. A00
Contents
Troubleshooting Your Projector
Package Contents
Your Dell Projector
Package Contents
About Your Projector
Your Dell Projector
Connecting Your Projector
Connecting to a Computer
Connecting to a DVD Player
Connecting a DVD Player with an S-video Cable
Connecting a DVD Player with a Composite Cable
Connecting a DVD Player with a Component Cable
Professional Installation Options
Connecting a Computer with a RS232 cable
Turning Your Projector On
Using Your Projector
Turning Your Projector Off
Raising the Projector Height
Adjusting the Projected Image
Lowering the Projector Height
Adjusting the Projector Zoom and Focus
Adjusting Projection Image Size
Using the Control Panel
Screen
OSD
Using the Remote Control
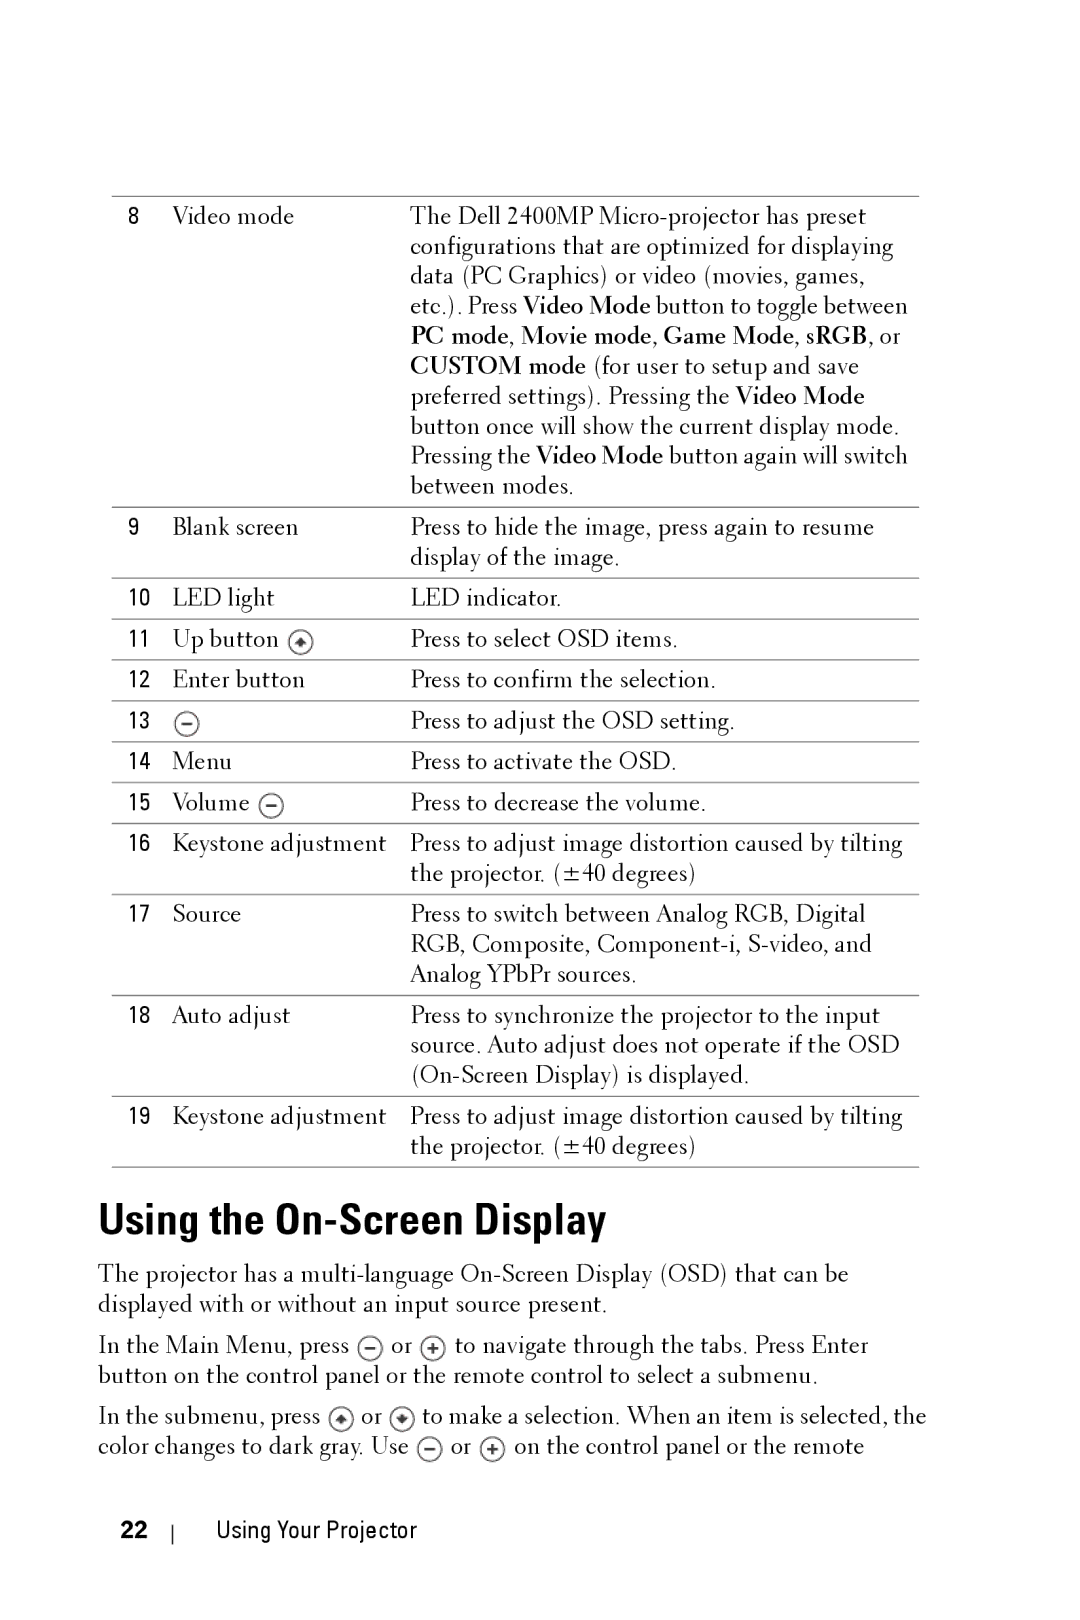
Using the On-Screen Display
PC mode , Movie mode , Game Mode , sRGB , or
Set Up
Auto-Adjust
Main Menu Input Select
Using Your Projector
Picture in PC Mode
Picture in Video Mode
To decrease the sharpness and to increase
Display in Video Mode
Lamp
Language
Preferences
Using Your Projector
Using Your Projector
Using Your Projector
Troubleshooting Your Projector
Problem
Problem
Problem
Problem
Self-diagnostic for Video
Changing the Lamp
Troubleshooting Your Projector
Specifications
Specifications
CCC, PSB, NOM, IRAM, Sabs
Command types
RS232 Pin Assignment RS232 Protocol
Firmware version Response
Control Commands List
Compatibility Modes
Analog
Anguilla
Contacting Dell
Antigua and Barbuda
Aruba
Argentina Buenos Aires
Australia Sydney
Bahamas
Austria Vienna Website support.euro.dell.com
Barbados
Bolivia
Belgium Brussels
Bermuda
Brazil
Canada North York
Brunei
Ontario
China Xiamen
Cayman Islands
Chile Santiago
Support.dell.com.cn
Colombia
Costa Rica
Dominica
Czech Republic Prague Website support.euro.dell.com
Denmark Copenhagen Website support.euro.dell.com
Dominican Republic
Finland Helsinki Website support.euro.dell.com
Corporate
Grenada
Germany Langen
Greece Website support.euro.dell.com
Guatemala
Hong Kong Website support.ap.dell.com
Guyana
India
Ireland Cherrywood Website support.euro.dell.com
Jamaica
Italy Milan Website support.euro.dell.com
Japan Kawasaki Website support.jp.dell.com
Switchboard
Latin America
Korea Seoul
Luxembourg Website support.euro.dell.com
Macao
Malaysia Penang Website support.ap.dell.com
Netherlands Antilles
Mexico
Montserrat
Netherlands Amsterdam
Norway Lysaker Website support.euro.dell.com
New Zealand Website support.ap.dell.com
Nicaragua
Panama
St. Kitts and Nevis
Portugal Website support.euro.dell.com
Puerto Rico
St. Lucia
Singapore Singapore Website support.ap.dell.com
Slovakia Prague Website support.euro.dell.com
Southeast Asian
South Africa Website support.euro.dell.com Johannesburg
09/091
Pacific Countries
Sweden Upplands Vasby
Switzerland Geneva
Taiwan Website support.ap.dell.com
Thailand Website support.ap.dell.com
Turks and Caicos Islands
Trinidad/Tobago
Bracknell Website support.euro.dell.com
Uruguay
A. Austin, Texas
Business
Virgin Islands General Support Venezuela 8001-3605
FCC Notices U.S. Only
Appendix Regulatory Notices
Class a Class B
NOM Information Mexico Only
FCC Identification Information
Glossary
Glossary
Glossary
Glossary
Glossary
Index
Lamp Language
Manuel de lutilisateur
Remarques, Notices, et Avertissements
Restrictions et limites de responsabilité
Table des matières
Connexion de votre projecteur
Dépanner votre projecteur
Votre projecteur Dell
Contenu de lemballage
Contenu de lemballage suite
Propos de votre projecteur
Votre projecteur Dell
Connexion de votre projecteur
Connexion à un ordinateur
Connexion à un lecteur DVD
Connexion dun lecteur DVD à laide dun câble S-vidéo
Connexion dun lecteur DVD à laide dun câble composite
Connexion d’un lecteur DVD à laide dun câble composant
Options dinstallation professionnelles
Connexion dun ordinateur avec un câble RS232
Allumer votre projecteur
Utilisation de votre projecteur
Extinction de votre projecteur
Réglage de la hauteur du projecteur
Réglage de limage projetée
Baisser le projecteur
Réglage du zoom et de la mise au point du projecteur
Réglage de la taille de limage projetée
Utilisation du panneau de contrôle
Ecran
Lampe
Utilisation de la télécommande
Le mode Jeu, le mode sRVB ou le mode Perso
Utilisation de laffichage à lécran
Menu Principal Sélection dentrée
Réglage auto
Régler
Image en Mode PC
Image en Mode Vidéo
Affichage en Mode PC
Affichage en Mode Vidéo
Lampe
Langue
Préférences
Utilisation de votre projecteur
Utilisation de votre projecteur
Utilisation de votre projecteur
Utilisation de votre projecteur
Problème Solution possible
Dépanner votre projecteur
Problème suite
Problème suite
Solution possible suite
Auto-diagnostic pour vidéo
Remplacer la lampe
Soulevez la lampe en la tenant par sa partie métallique
Spécifications
Spécifications
CCC, PSB, NOM, IRAM, Sabs
Affectation des broches RS232 Protocole RS232
Tableau de messages de réponses du projecteur 0x00 Succès
Réponse de version du microprogramme
Liste de commandes de contrôle
Modes de compatibilité
Analogique
Contacter Dell
Antigua et Barbuda
Argentine Buenos Aires
Australie Sydney
Support.euro.dell.com
Autriche Vienne
Barbade La
Bolivie
Belgique Bruxelles
Bermudes
Brésil
Numéro local, et
Iles Caïmans
Chine Xiamen
Chili Santiago
Et garantie support.dell.com.cn
GCP
Prague Support.euro.dell.com
Colombie
République Tchèque
Danemark
Salvador
Dominique
République Dominicaine Assistance générale Équateur
Finlande Helsinki
Particulier et petite entreprise
France Paris
Montpellier Support.euro.dell.com
Entreprise
Allemagne Langen
Grèce
Guyane
Grenade
Guatémala
Hong Kong Site Web support.ap.dell.com
Inde
Irlande Cherrywood
Jamaïque
Italie Milan
Japon Kawasaki Site Web support.jp.dell.com
Menu général
Amérique latine
Corée Séoul
Luxembourg
Malaisie Penang Site Web support.ap.dell.com
Mexique
Antilles néerlandaises
Pays-Bas Amsterdam
Nouvelle-Zélande Site Web support.ap.dell.com
Pérou
Norvège Lysaker
Pologne Varsovie
St. Kitts et Nevis
Portugal
Porto Rico
Ste Lucie
Singapour Singapour Site Web support.ap.dell.com
Slovaquie Prague
Pays dAsie du Sud-Est et
Afrique du Sud
Johannesburg Support.euro.dell.com
Du Pacifique
Suède Upplands Vasby
Suisse Genève
Taïwan Site Web support.ap.dell.com
Trinité/Tobago
Thaïlande Site Web support.ap.dell.com
Iles Turks et Caïcos
Bracknell
Assistance générale Numéro gratuit 000-413-598-2521
Dell TV, imprimantes, et
Assistance Consommateur
Commerce
Îles Vierges Assistance générale Vénézuéla 8001-3605
Classe a
Appendice notices de réglementation
Classe B
Information NOM Mexique Seulement
Informations didentification de la FCC
Glossaire
Glossaire
Glossaire
Glossaire
Glossaire
Index
Index
Manual del propietario
Notas, avisos y precauciones
Restricciones y negativas
Tabla de contenidos
Conexión a un reproductor de DVD
Solución de problemas del proyector
Su proyector Dell
Contenido del paquete
Contenido del paquete continuación
Acerca de su proyector
Su proyector Dell
Conexión del proyector
Conexión a la computadora
Conexión a un reproductor de DVD
Conexión de un reproductor de DVD con un cable S-video
Conexión de un reproductor con un cable compuesto
Conexión de un reproductor con un cable componente
Opciones de instalación profesional
Conectar una computadora con un cable RS232
Encendido del proyector
Uso del proyector
Apagado del proyector
Aumento de la altura del proyector
Ajuste de la imagen proyectada
Disminución de la altura del proyector
Ajuste del enfoque y zoom del proyector
Ajuste del tamaño de la imagen de proyección
Uso del panel de control
Diagonal
Lámpara. Si la luz Lámpara parpadea en
Uso del control remoto
Video para alternar entre Modo PC, Modo Pelíc
Modo Juego, sRGB o Modo Personal donde
Uso del menú en pantalla
Menú principal Selecc. entrada
Configurar
Ajuste Automático
Imagen en Modo PC
BRILLO-Usey para ajustar el brillo de la imagen
Imagen en Modo Video
Pantalla en Modo PC
Pantalla en Modo Video
Lámpara
Idioma
Preferencias
Aceptar
Uso del proyector
Solución de problemas del proyector
Problema
Problema continuación
Problema continuación
Problema continuación
Autodiagnóstico de video
Cambio de la lámpara
PRECAUCIÓNEliminación de lámparas sólo para EE.UU
Especificaciones
Especificaciones
CCC, PSB, NOM, IRAM, Sabs
Asignación de contactos RS232 Protocolo RS232
Tabla de mensajes de respuesta del proyector 0x00 Éxito
Respuesta de la versión del firmware
Lista de comandos de control
Word Byte
Modos de compatibilidad
Analógico
0031
Cómo ponerse en contacto con Dell
Anguilla Soporte general
Antigua y Barbuda Soporte general
Códigos de área
Austria Viena
Brasil
Bélgica Bruselas
Las Bermudas
Islas Vírgenes Británicas Soporte general
Brunei
Canadá North York
Islas Caimán
Soporte de ventas y al cliente
Pequeñas y micro empresas Sin
República Checa Praga
Dinamarca Copenague
República Dominicana
Finlandia Helsinki
Pequeñas y micro empresas
Francia Paris
Corporativo
Alemania Langen
Grecia
Granada
Hong Kong Sitio web support.ap.dell.com
La India
Irlanda Cherrywood
Empresas
Italia Milán
Particulares y pequeñas
Japón Kawasaki Sitio web support.jp.dell.com
Conmutador
América Latina
Corea Seúl
Luxemburgo
Malasia Penang Sitio web support.ap.dell.com
México
Antillas Holandesas
Holanda Amsterdam
Nueva Zelandia Sitio web support.ap.dell.com
Perú
Noruega Lysaker
Panamá
Polonia Varsovia
San Vicente y Las
San Kitts y Nevis
Santa Lucía
Granadinas
Singapur Singapur Sitio web support.ap.dell.com
Eslovaquia Praga
Johannesburgo Support.euro.dell.com
Sud Africa
El Pacífico
España Madrid
Suecia Upplands Vasby
Suiza Ginebra
Taiwán
Trinidad y Tobago
Tailandia Sitio web support.ap.dell.com
Islas Turks y Caicos
Bracknell
Uruguay
EE.UU. Austin, Texas
Soporte al consumidor
Negocios
Islas Vírgenes de EE.UU. Soporte general Venezuela
Cómo ponerse en contacto con Dell
Clase a
Apéndice Avisos reguladores
Información de la FCC sólo para EE.UU
Clase B
Información de NOM sólo para México
Información de identificación de la FCC
Glosario
Glosario
Glosario
Glosario
Glosario
Índice
88 Índice
Manual do Proprietário
Notas, avisos e precauções
Restrições e renúncias
Conteúdo
Como conectar o projetor
Solução de problemas do projetor
Projetor Dell
Conteúdo da embalagem
Conteúdo da embalagem continua
Sobre seu projetor
Projetor Dell
Como conectar o projetor
Conexão com computador
Conexão com aparelho de DVD
Conexão de aparelho de DVD com cabo S-video
Conexão de aparelho de DVD com cabo composto
Conexão do aparelho de DVD com um cabo de componente
Opções de instalação profissional
Conexão com um computador com um cabo RS232
Como ligar o projetor
Como utilizar o projetor
Como desligar o projetor
Como aumentar a altura do projetor
Como ajustar da imagem projetada
Como ajustar o zoom e o foco do projetor
Como diminuir a altura do projetor
Como utilizar o projetor
Como ajustar o tamanho da imagem na projeção
Como utilizar o painel de controle
Tela
Como utilizar o projetor
Como utilizar o controle remoto
Como utilizar a OSD
Main Menu Menu principal Input Select Inserir seleção
Auto-Adjust Auto-ajuste
Set Up Configurar
Picture Imagem no Modo PC
Color Temp TEMP. DA COR-Ajuste a temperatura da cor
Display Exibição no Modo PC
Para ajustar a posição
Custom PERSON. define suas configurações
Display Exibição no Video Modo Modo de vídeo
Language Idioma
Preferences Preferências
Como utilizar o projetor
Como utilizar o projetor
Como utilizar o projetor
Como utilizar o projetor
Solução de problemas do projetor
Problema continua
Problema continua
Problema continua
Auto-diagnóstico para Vídeo
Troca de lâmpada
Cuidado Descarte de lâmpadas apenas para os Estados Unidos
Especificações
Especificações
CCC, PSB, NOM, IRAM, Sabs
Designação dos pinos RS232 Protocolo RS232
Tabela de Mensagem de Resposta do Projector 0x00 Sucesso
Resposta de Versão de Firmware
Lista dos comandos de controle
VRA Byte Word
Modos de compatibilidade
Entre em contato com a Dell
País Ligação Grátis Código da Cidade
Austrália Sydney
0011
Áustria Viena Website support.euro.dell.com
Bolívia
Bélgica Bruxelas
Bermudas
Ilhas Virgens Britânicas Assistência Geral
Brunei
Ontário
Ilhas Cayman
Atendimento ao Cliente Ligações
Colômbia
República Tcheca Praga Website support.euro.dell.com
Dinamarca Website support.euro.dell.com Copenhagen
Equador
Finlândia Helsinki Website support.euro.dell.com
França Paris Montpellier
Alemanha Langen
Grécia Website support.euro.dell.com
Código Internacional Código do País
Índia
Internacional Código do
Itália Milão Website support.euro.dell.com
Japão Kawasaki
Quadro de Distribuiçao
Coréia Seul
Luxemburgo Website support.euro.dell.com
Macau
Malásia Penang Website support.ap.dell.com
Antilhas Holandesas
Nova Zelândia Website support.ap.dell.com
Holanda Amsterda
Nicarágua
Polônia Varsóvia Website support.euro.dell.com
St. Kitts e Nevis
São Vicente e Granadinas Assistência Geral
Cingapura Cingapura
Eslováquia Praga Website support.euro.dell.com
Pacífico
África do Sul Website support.euro.dell.com Joanesburgo
Países do Sudeste da Ásia
Espanha Madri Website support.euro.dell.com
Suécia Upplands Vasby
Suíça Genebra
Vendas Corporativas Ligações
Tailândia
Ilhas Turks e Caicos
Bracknell Reino Unido
Uruguai
Dell TV, Impressoras e
EUA Austin, Texas
Negócios
Ilhas Virgens EUA
Apêndice Avisos regulamentares
Avisos da FCC apenas para os Estados Unidos
Informação NOM apenas para o México
Informações sobre identificação da FCC
Glossário
Glossário
Glossário
Glossário
Glossário
Índice
Índice
Índice
Índice