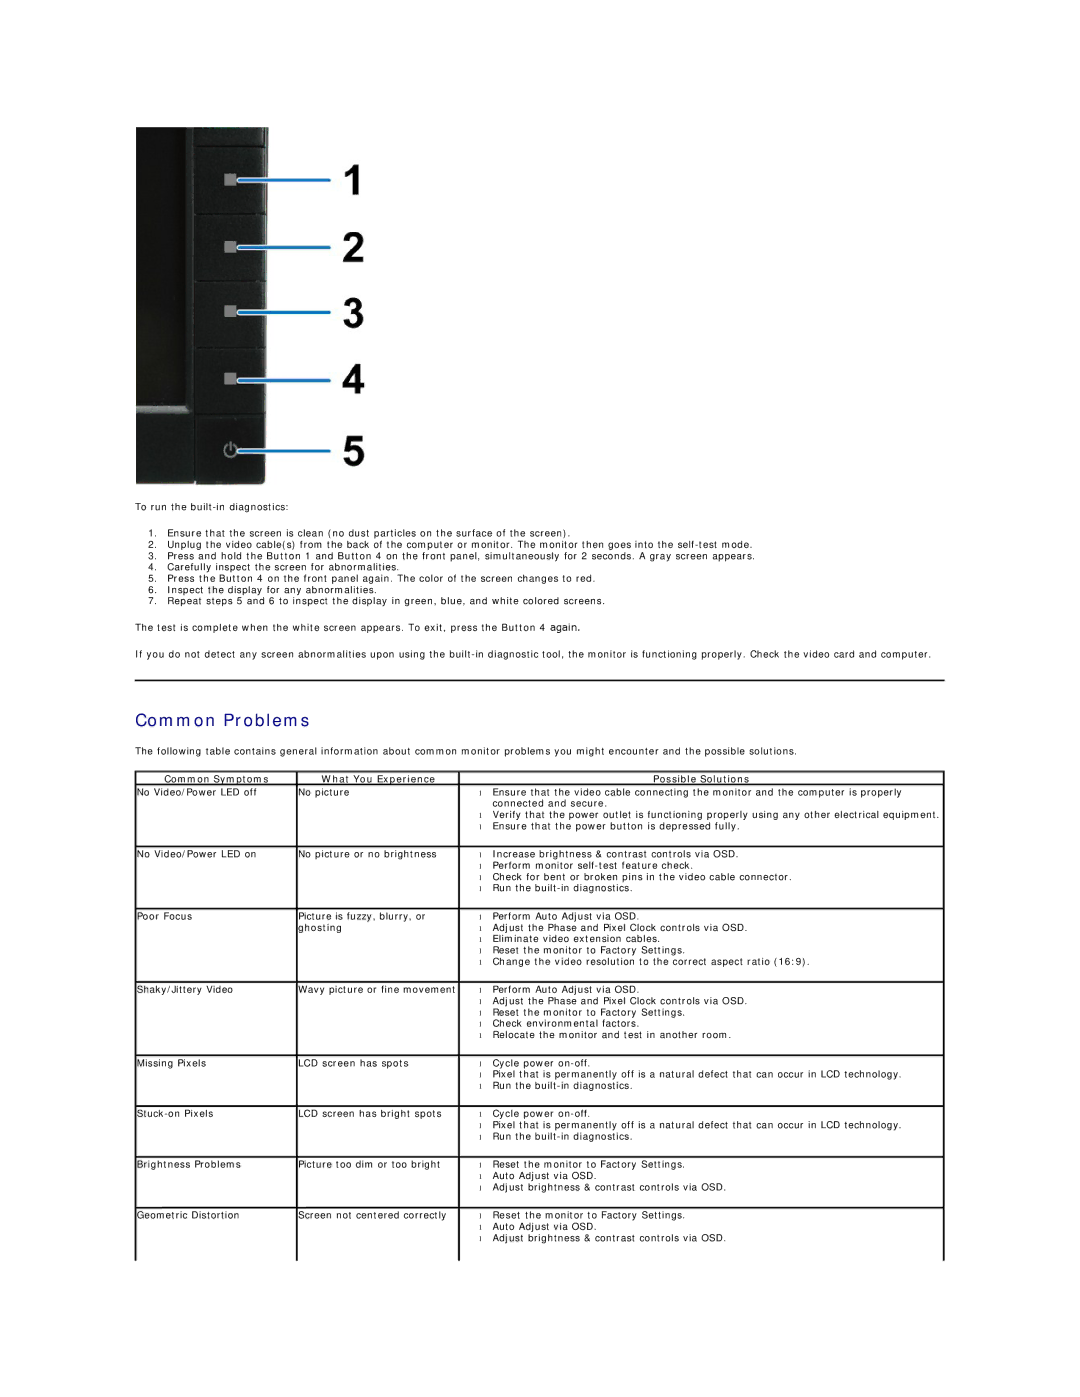
To run the built-in diagnostics:

1.Ensure that the screen is clean (no dust particles on the surface of the screen).

2.Unplug the video cable(s) from the back of the computer or monitor. The monitor then goes into the self-test mode.

3.Press and hold the Button 1 and Button 4 on the front panel, simultaneously for 2 seconds. A gray screen appears.

4.Carefully inspect the screen for abnormalities.

5.Press the Button 4 on the front panel again. The color of the screen changes to red.

6.Inspect the display for any abnormalities.

7.Repeat steps 5 and 6 to inspect the display in green, blue, and white colored screens.

The test is complete when the white screen appears. To exit, press the Button 4 again.

If you do not detect any screen abnormalities upon using the built-in diagnostic tool, the monitor is functioning properly. Check the video card and computer.

Common Problems

The following table contains general information about common monitor problems you might encounter and the possible solutions.

Common Symptoms

What You Experience


Possible Solutions

No Video/Power LED off

No picture

Ensure that the video cable connecting the monitor and the computer is properly


connected and secure.


Verify that the power outlet is functioning properly using any other electrical equipment.


Ensure that the power button is depressed fully.


No Video/Power LED on

No picture or no brightness

Increase brightness & contrast controls via OSD.


Perform monitor self-test feature check.


Check for bent or broken pins in the video cable connector.


Run the built-in diagnostics.


Poor Focus

Picture is fuzzy, blurry, or

Perform Auto Adjust via OSD.


ghosting

Adjust the Phase and Pixel Clock controls via OSD.


Eliminate video extension cables.


Reset the monitor to Factory Settings.


Change the video resolution to the correct aspect ratio (16:9).


Shaky/Jittery Video

Wavy picture or fine movement

Perform Auto Adjust via OSD.


Adjust the Phase and Pixel Clock controls via OSD.


Reset the monitor to Factory Settings.


Check environmental factors.


Relocate the monitor and test in another room.


Missing Pixels

LCD screen has spots

Cycle power on-off.


Pixel that is permanently off is a natural defect that can occur in LCD technology.


Run the built-in diagnostics.


Stuck-on Pixels

LCD screen has bright spots

Cycle power on-off.


Pixel that is permanently off is a natural defect that can occur in LCD technology.


Run the built-in diagnostics.


Brightness Problems

Picture too dim or too bright

Reset the monitor to Factory Settings.


Auto Adjust via OSD.


Adjust brightness & contrast controls via OSD.


Geometric Distortion

Screen not centered correctly

Reset the monitor to Factory Settings.


Auto Adjust via OSD.


Adjust brightness & contrast controls via OSD.


Page 36
Image 36
Dell P2310H, P2210H appendix Common Problems, Common Symptoms What You Experience Possible Solutions

P2310H, P2210H specifications

The Dell P2310H and P2210H are part of Dell's Professional Series monitors, designed specifically for business and office environments where productivity, ergonomics, and display quality are paramount. Both monitors come with a range of features and technologies that cater to the needs of professionals seeking reliable display solutions.

The Dell P2310H features a 23-inch screen with a Full HD resolution of 1920 x 1080 pixels, providing sharp images and vibrant colors that enhance visual clarity. On the other hand, the P2210H comes with a slightly smaller 22-inch display but retains the same Full HD resolution, ensuring that users do not compromise on image quality regardless of the screen size. The use of LED backlighting in both models contributes to energy efficiency, reducing power consumption while providing bright and uniform illumination across the screen.

One key characteristic of both monitors is their ergonomic design. The stands allow for height, tilt, swivel, and pivot adjustments, enabling users to find the most comfortable viewing angles. This flexibility not only enhances comfort during extended periods of use but also supports better posture, thereby reducing the risk of strain or injury.

Connectivity is another crucial aspect of the P2310H and P2210H. They both come equipped with multiple input options, including DisplayPort, DVI-D, VGA, and USB ports, ensuring compatibility with various devices and ease of connectivity without the need for additional adapters. The inclusion of USB hub functionality allows users to easily connect peripherals and charge devices directly from the monitor.

Both models are designed with the environment in mind, featuring Energy Star certification, which indicates low energy consumption without sacrificing performance. Additionally, the use of eco-friendly materials and the ability to recycle components further solidify Dell’s commitment to sustainability.

In terms of color accuracy, these monitors cover a wide color gamut, making them suitable for tasks that require precise color representation, such as graphic design and photo editing. With a 178-degree viewing angle, users can enjoy consistent colors and clarity from different positions, which is particularly beneficial in collaborative work environments.

In summary, the Dell P2310H and P2210H monitors are tailored for professionals seeking reliable performance, ergonomic design, and exceptional image quality, making them ideal choices for any office setup.