3

A.

B.

C.

6

7


3


1


5


2


3


3

1


2


4


4


1


2


4


D.

E.

F.

1


3

1


1

3

2


1


2


4

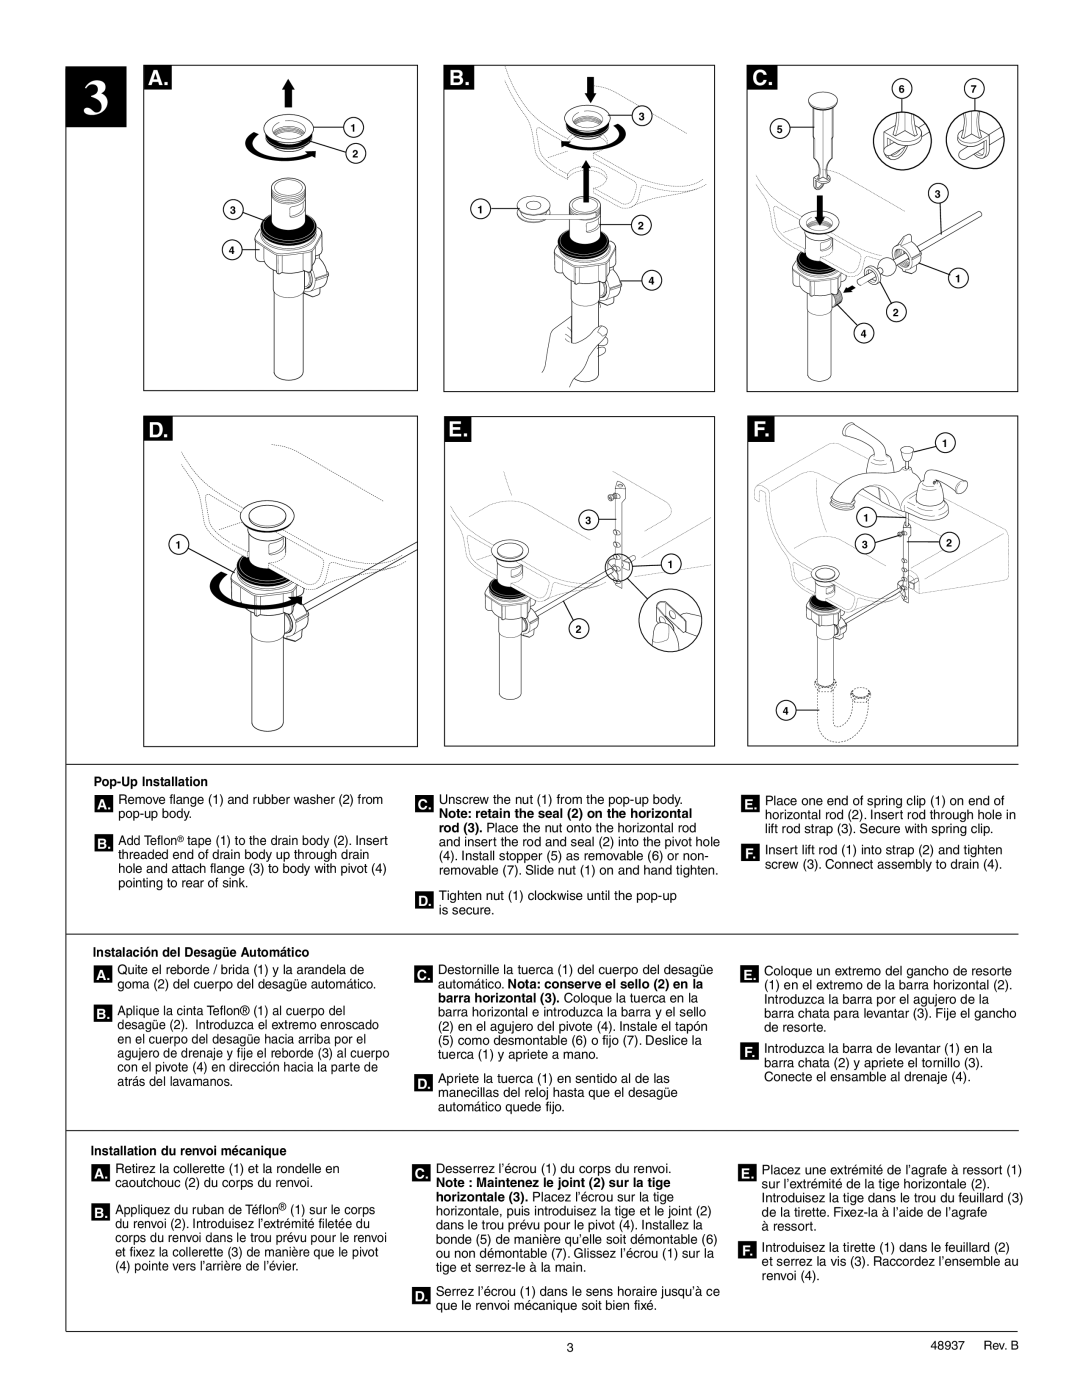
Pop-Up Installation

A.Remove flange (1) and rubber washer (2) from pop-up body.

B.Add Teflon® tape (1) to the drain body (2). Insert threaded end of drain body up through drain hole and attach flange (3) to body with pivot (4) pointing to rear of sink.

C.Unscrew the nut (1) from the pop-up body.

Note: retain the seal (2) on the horizontal rod (3). Place the nut onto the horizontal rod and insert the rod and seal (2) into the pivot hole

(4). Install stopper (5) as removable (6) or non- removable (7). Slide nut (1) on and hand tighten.

D.Tighten nut (1) clockwise until the pop-up is secure.

E.Place one end of spring clip (1) on end of horizontal rod (2). Insert rod through hole in lift rod strap (3). Secure with spring clip.

F.Insert lift rod (1) into strap (2) and tighten screw (3). Connect assembly to drain (4).

Instalación del Desagüe Automático

A.Quite el reborde / brida (1) y la arandela de goma (2) del cuerpo del desagüe automático.

B.Aplique la cinta Teflon® (1) al cuerpo del desagüe (2). Introduzca el extremo enroscado en el cuerpo del desagüe hacia arriba por el agujero de drenaje y fije el reborde (3) al cuerpo con el pivote (4) en dirección hacia la parte de atrás del lavamanos.

C.Destornille la tuerca (1) del cuerpo del desagüe automático. Nota: conserve el sello (2) en la barra horizontal (3). Coloque la tuerca en la barra horizontal e introduzca la barra y el sello

(2)en el agujero del pivote (4). Instale el tapón

(5)como desmontable (6) o fijo (7). Deslice la tuerca (1) y apriete a mano.

D.Apriete la tuerca (1) en sentido al de las manecillas del reloj hasta que el desagüe automático quede fijo.

E.Coloque un extremo del gancho de resorte

(1) en el extremo de la barra horizontal (2). Introduzca la barra por el agujero de la barra chata para levantar (3). Fije el gancho de resorte.

F.Introduzca la barra de levantar (1) en la barra chata (2) y apriete el tornillo (3). Conecte el ensamble al drenaje (4).

Installation du renvoi mécanique

A.Retirez la collerette (1) et la rondelle en caoutchouc (2) du corps du renvoi.

B.Appliquez du ruban de Téflon® (1) sur le corps du renvoi (2). Introduisez l’extrémité filetée du corps du renvoi dans le trou prévu pour le renvoi et fixez la collerette (3) de manière que le pivot

(4) pointe vers l’arrière de l’évier.

C.Desserrez l’écrou (1) du corps du renvoi.

Note : Maintenez le joint (2) sur la tige horizontale (3). Placez l’écrou sur la tige horizontale, puis introduisez la tige et le joint (2) dans le trou prévu pour le pivot (4). Installez la bonde (5) de manière qu’elle soit démontable (6) ou non démontable (7). Glissez l’écrou (1) sur la tige et serrez-le à la main.

D.Serrez l’écrou (1) dans le sens horaire jusqu’à ce que le renvoi mécanique soit bien fixé.

E.Placez une extrémité de l’agrafe à ressort (1) sur l’extrémité de la tige horizontale (2). Introduisez la tige dans le trou du feuillard (3) de la tirette. Fixez-la à l’aide de l’agrafe

à ressort.

F.Introduisez la tirette (1) dans le feuillard (2) et serrez la vis (3). Raccordez l’ensemble au renvoi (4).

3

48937      Rev. B

Page 3
Image 3
Delta 25915 Series manual Pop-Up Installation, Instalación del Desagüe Automático, Installation du renvoi mécanique

25915 Series specifications

The Delta 25915 Series is an innovative and versatile line of smart faucets that exemplify modern design, efficiency, and advanced technology in the kitchen and bathroom. This series is ideal for home owners looking to elevate their space with a blend of functionality and aesthetic appeal.

One of the standout features of the Delta 25915 Series is its Touch2O technology. This intelligent feature allows users to turn the faucet on and off with just a simple touch anywhere on the spout or handle. This not only enhances convenience, especially when hands are full or dirty, but also promotes hygiene by minimizing the need to physically grasp the faucet handles. The Touch2O function helps conserve water, as it can be turned off immediately after use.

The Delta 25915 Series also incorporates a temperature control indicator. This innovative technology uses a color-coded system to indicate whether the water is hot, warm, or cold, helping users avoid accidental burns from hot water. Such a feature is particularly useful in homes with children, making it a safe and practical addition to any bathroom or kitchen.

Another characteristic of the Delta 25915 Series is its exceptional water flow efficiency, achieving a maximum of 1.2 gallons per minute. This is beneficial not only for reducing water bills but also for promoting environmentally friendly practices. The series is compliant with WaterSense standards, reflecting its commitment to sustainability and responsible water usage.

The finish options for the Delta 25915 Series are designed to resist tarnishing and corrosion, ensuring that the faucet maintains its appearance for years to come. Available in various finishes such as chrome, stainless steel, and matte black, these faucets can easily complement any interior décor style, from modern to traditional.

Additionally, the Delta 25915 Series can be paired with other smart home systems, enabling control through smartphones or voice commands. This level of integration enhances the overall user experience, providing convenience at the touch of a button or through simple voice activation.

Overall, the Delta 25915 Series combines cutting-edge technology, elegant design, and water-saving features, making it a top choice for homeowners aiming to enhance their living spaces while enjoying advanced functionality in everyday tasks. Whether you're renovating or building anew, the Delta 25915 Series stands out as a hallmark of modern kitchen and bathroom fixtures.