OWNER’S MANUAL

INSTALLING TO WALL

Continued

Installing Two Mounting Screws

Note: Wall anchors and mounting screws are in hardware package. The hardware pack- age is provided with heater.

Attaching to wall stud method

For attaching mounting screw to wall stud

1.Drill hole at marked location using 9/64" drill bit.

2.Insert mounting screw into wall stud.

3.Tighten screw until 1/16" space (thick- ness of penny) is between screwhead and wall.

Attaching to wall anchor method

Follow instructions below to attach mount- ing screws to hollow walls (wall areas be- tween studs) or solid walls (concrete or masonry).

1.Drill holes at marked locations using 5/16" drill bit. For solid walls (concrete or masonry), drill at least 1 1/4" deep.

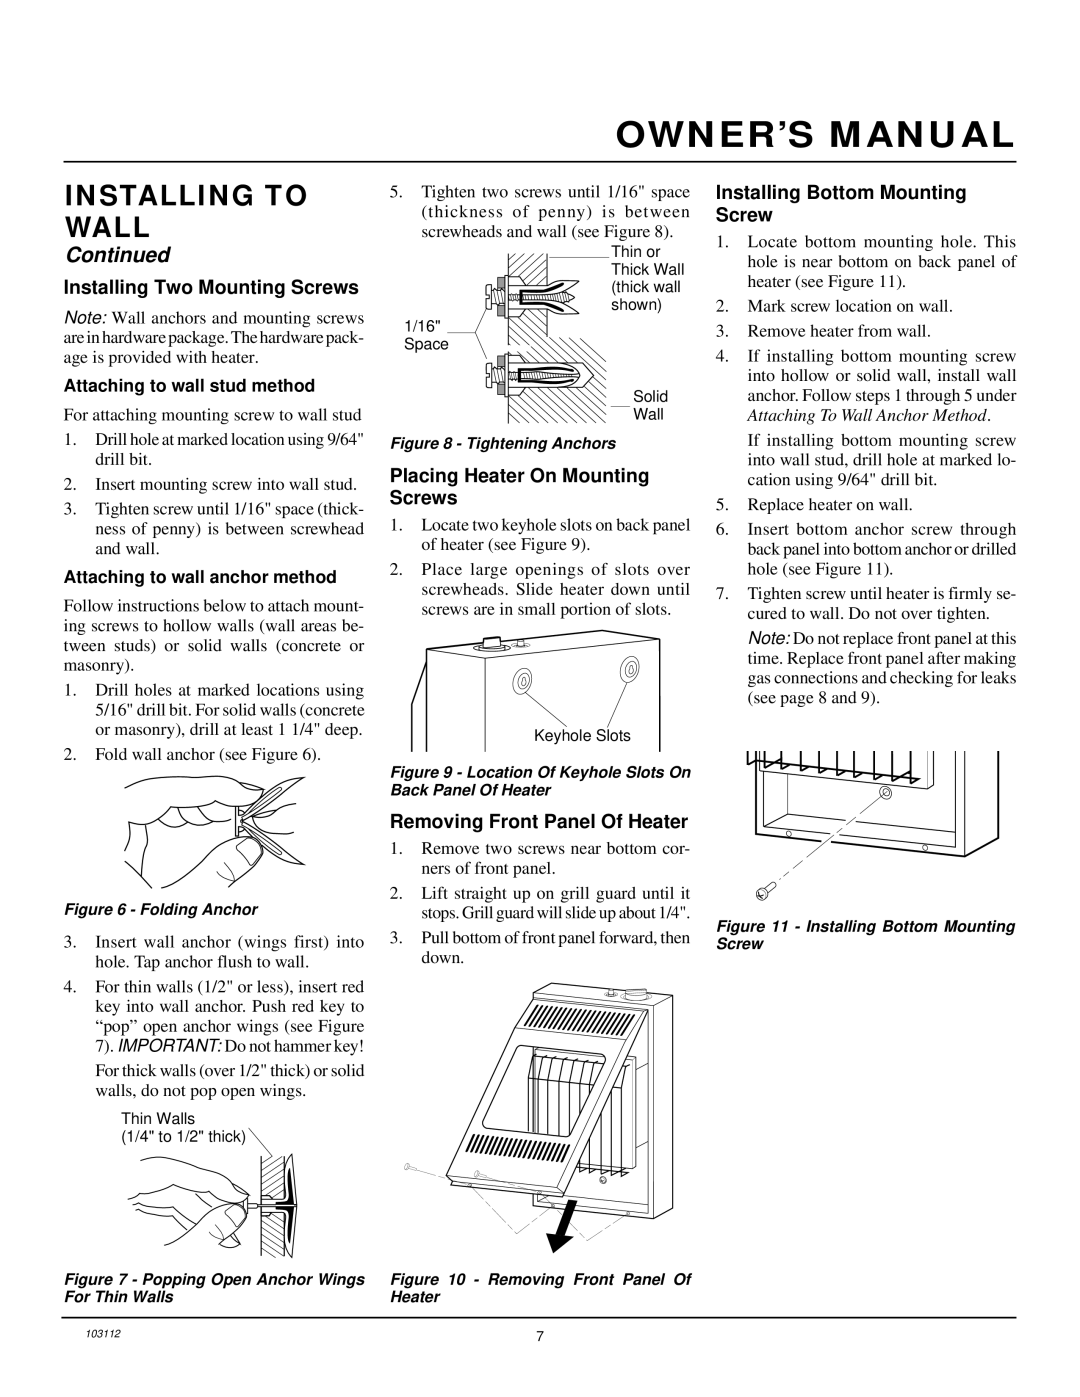
2.Fold wall anchor (see Figure 6).

Figure 6 - Folding Anchor

3.Insert wall anchor (wings first) into hole. Tap anchor flush to wall.

4.For thin walls (1/2" or less), insert red key into wall anchor. Push red key to “pop” open anchor wings (see Figure 7). IMPORTANT: Do not hammer key!

For thick walls (over 1/2" thick) or solid walls, do not pop open wings.

Thin Walls

(1/4" to 1/2" thick)

5.Tighten two screws until 1/16" space (thickness of penny) is between screwheads and wall (see Figure 8).

Thin or Thick Wall

(thick wall

shown)

1/16" Space

Solid

Wall

Figure 8 - Tightening Anchors

Placing Heater On Mounting Screws

1.Locate two keyhole slots on back panel of heater (see Figure 9).

2.Place large openings of slots over screwheads. Slide heater down until screws are in small portion of slots.

Keyhole Slots

Figure 9 - Location Of Keyhole Slots On Back Panel Of Heater

Removing Front Panel Of Heater

1.Remove two screws near bottom cor- ners of front panel.

2.Lift straight up on grill guard until it stops. Grill guard will slide up about 1/4".

3.Pull bottom of front panel forward, then down.

Installing Bottom Mounting Screw

1.Locate bottom mounting hole. This hole is near bottom on back panel of heater (see Figure 11).

2.Mark screw location on wall.

3.Remove heater from wall.

4.If installing bottom mounting screw into hollow or solid wall, install wall anchor. Follow steps 1 through 5 under Attaching To Wall Anchor Method.

If installing bottom mounting screw into wall stud, drill hole at marked lo- cation using 9/64" drill bit.

5.Replace heater on wall.

6.Insert bottom anchor screw through back panel into bottom anchor or drilled hole (see Figure 11).

7.Tighten screw until heater is firmly se- cured to wall. Do not over tighten.

Note: Do not replace front panel at this time. Replace front panel after making gas connections and checking for leaks (see page 8 and 9).

Figure 11 - Installing Bottom Mounting Screw

Figure 7 - Popping Open Anchor Wings

Figure 10 - Removing Front Panel Of

For Thin Walls

Heater

103112

7

Page 7
Image 7
Desa 6000 BTU/HR installation manual Installing to Wall, Installing Two Mounting Screws, Placing Heater On Mounting Screws

6000 BTU/HR specifications

The Desa 6000 BTU/HR air conditioning unit is designed to provide efficient cooling solutions for small to medium-sized spaces. With its sleek design and powerful performance, this unit has become popular among homeowners and small businesses alike. One of the standout features of the Desa 6000 BTU/HR is its ability to cool spaces quickly and effectively, making it ideal for rooms up to 250 square feet.

The unit operates with a cooling capacity of 6000 BTUs per hour, which is sufficient to maintain comfortable temperatures even on the hottest summer days. This capacity ensures that the unit can handle varying humidity levels, making it versatile for different climates. The efficiency of the Desa air conditioner is reflected in its Energy Efficiency Ratio (EER), which often meets or exceeds industry standards, helping users save on energy bills.

Incorporating advanced technology, the Desa 6000 BTU/HR features a user-friendly digital thermostat that allows for precise temperature control. This ensures that users can set their desired comfort levels easily and monitor the current temperature through an intuitive display. Furthermore, the unit comes equipped with a remote control, providing added convenience for operating the air conditioner from a distance.

The Desa air conditioning unit also includes multiple fan speeds, allowing users to customize airflow according to their preferences. This feature is particularly useful for achieving the perfect balance between cooling efficiency and noise reduction. The integrated filter system ensures that the air circulated through the unit is clean, contributing to a healthier indoor environment. The washable filter is easy to maintain, promoting long-term performance.

Another notable characteristic of the Desa 6000 BTU/HR is its portability. The lightweight design and built-in caster wheels allow for easy movement from room to room, giving users flexibility to cool different areas as needed. This feature is especially beneficial for renters or those living in smaller homes where window installations may not be feasible.

With its combination of effective cooling power, advanced features, and user-friendly design, the Desa 6000 BTU/HR air conditioning unit stands out as a practical solution for achieving comfort during warmer months. Whether used in a bedroom, office, or small living space, this unit promises reliable performance and adaptability to meet the cooling needs of its users.