Desa BHDV37N/P, BHDV41N/P installation manual Vent Pipe Connections

Models: BHDV41N/P BHDV37N/P HDV37N/P HDV41N/P

1 44
Download 44 pages 36.67 Kb
Page 9
Image 9

OWNER’S MANUAL

VENTING INSTALLATION

Continued

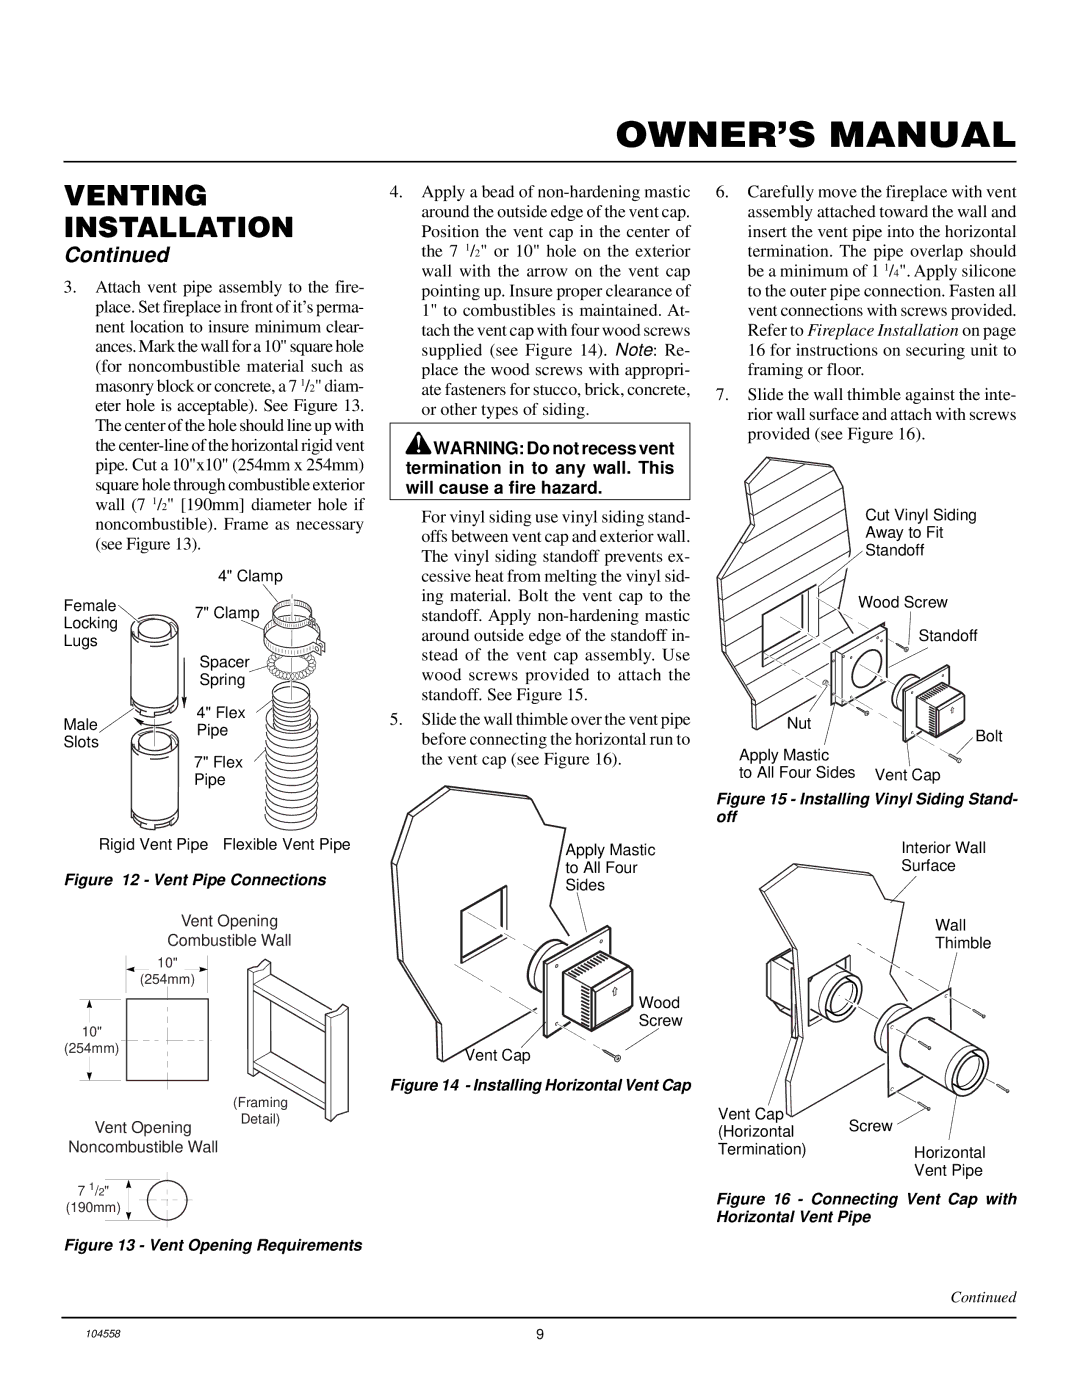
3.Attach vent pipe assembly to the fire- place. Set fireplace in front of it’s perma- nent location to insure minimum clear- ances. Mark the wall for a 10" square hole (for noncombustible material such as masonry block or concrete, a 7 1/2" diam- eter hole is acceptable). See Figure 13. The center of the hole should line up with the center-line of the horizontal rigid vent pipe. Cut a 10"x10" (254mm x 254mm) square hole through combustible exterior wall (7 1/2" [190mm] diameter hole if noncombustible). Frame as necessary (see Figure 13).


4" Clamp

Female

7" Clamp

Locking


Lugs


Spacer


Spring

Male

4" Flex

Pipe

Slots


7" Flex


Pipe

Rigid Vent Pipe Flexible Vent Pipe

Figure 12 - Vent Pipe Connections

Vent Opening

Combustible Wall

10"

(254mm)

10"

(254mm)

(Framing

4.Apply a bead of non-hardening mastic around the outside edge of the vent cap. Position the vent cap in the center of the 7 1/2" or 10" hole on the exterior wall with the arrow on the vent cap pointing up. Insure proper clearance of 1" to combustibles is maintained. At- tach the vent cap with four wood screws supplied (see Figure 14). Note: Re- place the wood screws with appropri- ate fasteners for stucco, brick, concrete, or other types of siding.

WARNING: Do not recess vent termination in to any wall. This will cause a fire hazard.

For vinyl siding use vinyl siding stand- offs between vent cap and exterior wall. The vinyl siding standoff prevents ex- cessive heat from melting the vinyl sid- ing material. Bolt the vent cap to the standoff. Apply non-hardening mastic around outside edge of the standoff in- stead of the vent cap assembly. Use wood screws provided to attach the standoff. See Figure 15.

5.Slide the wall thimble over the vent pipe before connecting the horizontal run to the vent cap (see Figure 16).

Apply Mastic to All Four Sides

Wood

Screw

Vent Cap

Figure 14 - Installing Horizontal Vent Cap

6.Carefully move the fireplace with vent assembly attached toward the wall and insert the vent pipe into the horizontal termination. The pipe overlap should be a minimum of 1 1/4". Apply silicone to the outer pipe connection. Fasten all vent connections with screws provided. Refer to Fireplace Installation on page 16 for instructions on securing unit to framing or floor.

7.Slide the wall thimble against the inte- rior wall surface and attach with screws provided (see Figure 16).

Cut Vinyl Siding

Away to Fit

Standoff

Wood Screw

Standoff

Nut

Bolt

Apply Mastic

to All Four Sides Vent Cap

Figure 15 - Installing Vinyl Siding Stand- off

Interior Wall

Surface

Wall

Thimble

Vent Opening

Detail)

Vent Cap

(Horizontal

Screw


Noncombustible Wall

7 1/2" (190mm)

Figure 13 - Vent Opening Requirements

Termination)

Horizontal


Vent Pipe

Figure 16 - Connecting Vent Cap with Horizontal Vent Pipe

Continued

104558

9

Page 9
Image 9
Desa BHDV37N/P, BHDV41N/P installation manual Vent Pipe Connections

BHDV41N/P, BHDV37N/P, HDV37N/P, HDV41N/P specifications

The Desa HDV41N/P, HDV37N/P, BHDV37N/P, and BHDV41N/P are modern heating units designed to deliver efficient warmth and comfort in various residential and commercial spaces. These models are noted for their advanced features and technologies, which combine functionality and aesthetics.

One of the main features of these units is their energy efficiency. They utilize state-of-the-art technology to provide warmth while minimizing energy consumption. This makes them an environmentally friendly choice, ensuring that homeowners can enjoy a cozy atmosphere without significantly increasing their energy bills.

The design of the Desa series models is characterized by their sleek and attractive appearance. They are available in various finishes, allowing homeowners to choose a design that complements their interior décor. This not only enhances the aesthetic appeal of the room but also ensures that the heating unit blends seamlessly into the space.

Another significant characteristic of the Desa models is their versatile heating capabilities. They can accommodate a variety of room sizes, providing adequate heat regardless of the environment. Whether used in larger living areas or smaller spaces, these units are engineered to maintain a consistent and comfortable temperature.

The units come equipped with user-friendly controls, allowing for easy adjustments and optimal temperature settings. Many of the models feature programmable thermostats, enabling users to schedule heating cycles according to their lifestyles. This contributes to increased comfort and further adds to energy savings.

Safety is also a primary concern with the Desa heating units. They come with built-in safety features, such as automatic shut-off mechanisms and advanced flame sensors. These safety measures ensure peace of mind while using the units, safeguarding against potential hazards.

Additionally, the units are designed for easy installation and maintenance. Their straightforward installation process is complemented by durable construction, which minimizes the likelihood of breakdowns. Regular maintenance is simplified, allowing users to keep their heating systems in excellent working condition without significant effort.

In summary, the Desa HDV41N/P, HDV37N/P, BHDV37N/P, and BHDV41N/P heating units combine sophisticated technology, aesthetic design, versatility, user-friendly controls, safety features, and low maintenance requirements. They stand out as a superior choice for anyone looking to enhance their indoor climate while being mindful of energy consumption and design aesthetics.