18

FIREPLACE INSTALLATION

Installing Optional Blower Accessories (Cont.)

FIREPLACE INSTALLATION

Continued

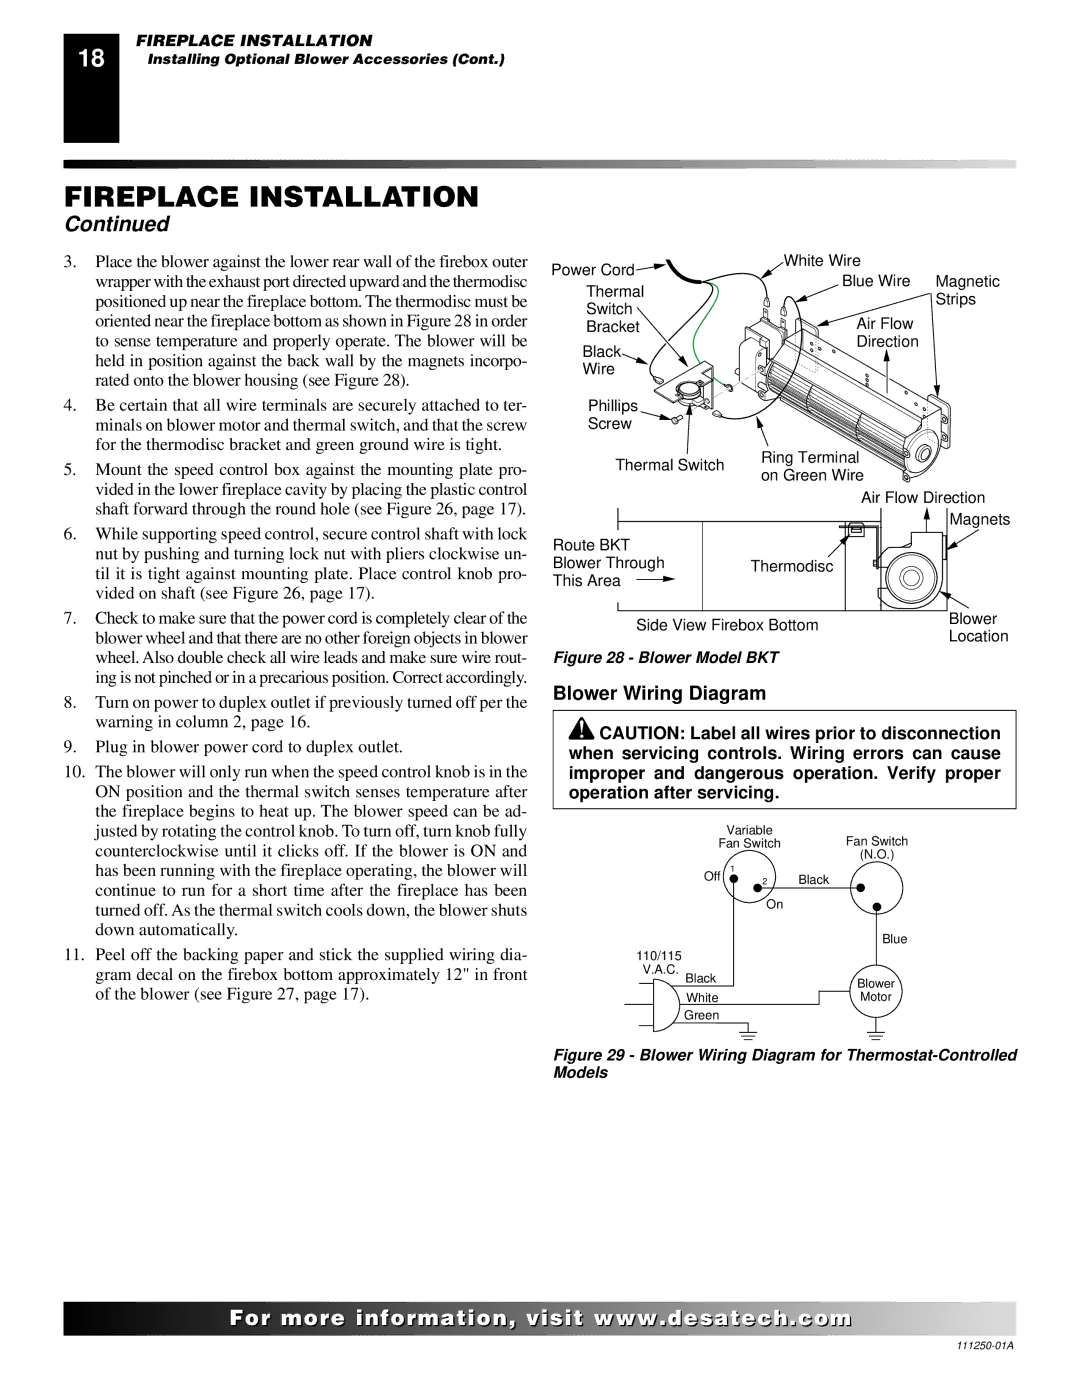
3.Place the blower against the lower rear wall of the firebox outer wrapper with the exhaust port directed upward and the thermodisc positioned up near the fireplace bottom. The thermodisc must be oriented near the fireplace bottom as shown in Figure 28 in order to sense temperature and properly operate. The blower will be held in position against the back wall by the magnets incorpo- rated onto the blower housing (see Figure 28).

4.Be certain that all wire terminals are securely attached to ter- minals on blower motor and thermal switch, and that the screw for the thermodisc bracket and green ground wire is tight.

5.Mount the speed control box against the mounting plate pro- vided in the lower fireplace cavity by placing the plastic control shaft forward through the round hole (see Figure 26, page 17).

6.While supporting speed control, secure control shaft with lock nut by pushing and turning lock nut with pliers clockwise un- til it is tight against mounting plate. Place control knob pro- vided on shaft (see Figure 26, page 17).

7.Check to make sure that the power cord is completely clear of the blower wheel and that there are no other foreign objects in blower wheel. Also double check all wire leads and make sure wire rout- ing is not pinched or in a precarious position. Correct accordingly.

8.Turn on power to duplex outlet if previously turned off per the warning in column 2, page 16.

9.Plug in blower power cord to duplex outlet.

10.The blower will only run when the speed control knob is in the ON position and the thermal switch senses temperature after the fireplace begins to heat up. The blower speed can be ad- justed by rotating the control knob. To turn off, turn knob fully counterclockwise until it clicks off. If the blower is ON and has been running with the fireplace operating, the blower will continue to run for a short time after the fireplace has been turned off. As the thermal switch cools down, the blower shuts down automatically.

11.Peel off the backing paper and stick the supplied wiring dia- gram decal on the firebox bottom approximately 12" in front of the blower (see Figure 27, page 17).

Power Cord

White Wire

Blue Wire Magnetic

Thermal

Strips

Switch

Air Flow

Bracket

Black

Direction


Wire


Phillips


Screw


Thermal Switch

Ring Terminal

on Green Wire


Air Flow Direction


Magnets

Route BKT


Blower Through

Thermodisc

This Area


Side View Firebox Bottom

Blower

Location


Figure 28 - Blower Model BKT


Blower Wiring Diagram

CAUTION: Label all wires prior to disconnection when servicing controls. Wiring errors can cause improper and dangerous operation. Verify proper operation after servicing.

Variable

Fan SwitchFan Switch

(N.O.)

Off 1

2

Black


On


Blue

110/115

V.A.C.

Black

Blower


White

Motor

Green


Figure 29 - Blower Wiring Diagram for Thermostat-Controlled Models

For..com

111250-01A

Page 18
Image 18
Desa CTDV36NRA, VT36PA, VT36NA installation manual Blower Wiring Diagram, Blower Model BKT

VT36PA, CTDV36NRA, VT36NA specifications

The Desa VT36NA, CTDV36NRA, and VT36PA are popular models in the realm of gas fireplaces, providing efficient heating solutions while enhancing the aesthetic appeal of any space. These models are designed to deliver comfort, convenience, and sophisticated design, making them ideal choices for residential and commercial applications.

One of the standout features of these models is their innovative heating technology. Utilizing advanced gas control systems, they offer precise temperature management, allowing users to enjoy consistent warmth with ease. The inclusion of a variable speed blower ensures better air circulation, maximizing the heating efficiency and comfort level throughout the room.

The VT36NA model boasts a direct vent design, which means it draws air for combustion from outside, ensuring that indoor air quality remains untainted. This feature is particularly beneficial in tightly sealed homes where indoor air quality can be compromised. The dual venting option also provides flexibility in installation, allowing for either horizontal or vertical venting, which adds to the model's versatility.

The CTDV36NRA, on the other hand, is designed with a contemporary aesthetic in mind, featuring a sleek and modern front that complements any modern décor. With a variable flame height option, users can easily adjust the fire intensity according to their preferences, providing both ambiance and warmth. The accent lighting feature further enhances the visual appeal, allowing the fireplace to become a focal point in any room.

The VT36PA model is equipped with enhanced safety features, including an automatic shut-off system and flame supervision devices. These safety measures provide peace of mind while operating, ensuring that the fireplace is both effective and secure for regular use. Additionally, the model is capable of using either natural gas or propane, adding versatility to fuel options depending on user preference or availability.

In terms of energy efficiency, all three models meet rigorous standards, making them environmentally friendly options for heating. With their low emissions and high-efficiency ratings, they contribute to reducing overall energy consumption.

Overall, the Desa VT36NA, CTDV36NRA, and VT36PA models offer a blend of functionality, modern technology, and aesthetic appeal. With their range of features and customizable options, they are ideal for those looking to enhance their living spaces with reliable heating solutions that also serve as elegant focal points. Whether for a cozy family gathering or a modern entertainment area, these fireplaces provide both comfort and style, making them excellent additions to any home.