INSTALACIÓN

Continuación

Vista de la parte inferior

Deslice hacia la derecha a la posición REMOTE (CONTROL REMOTO)

Botón LEARN

(APRENDER) (adentro)

F


ROOM SET TEMP


ON


OFF


MODE

Botón de ON

SET

(ENCENDER)

Alambre del receptor

Válvula


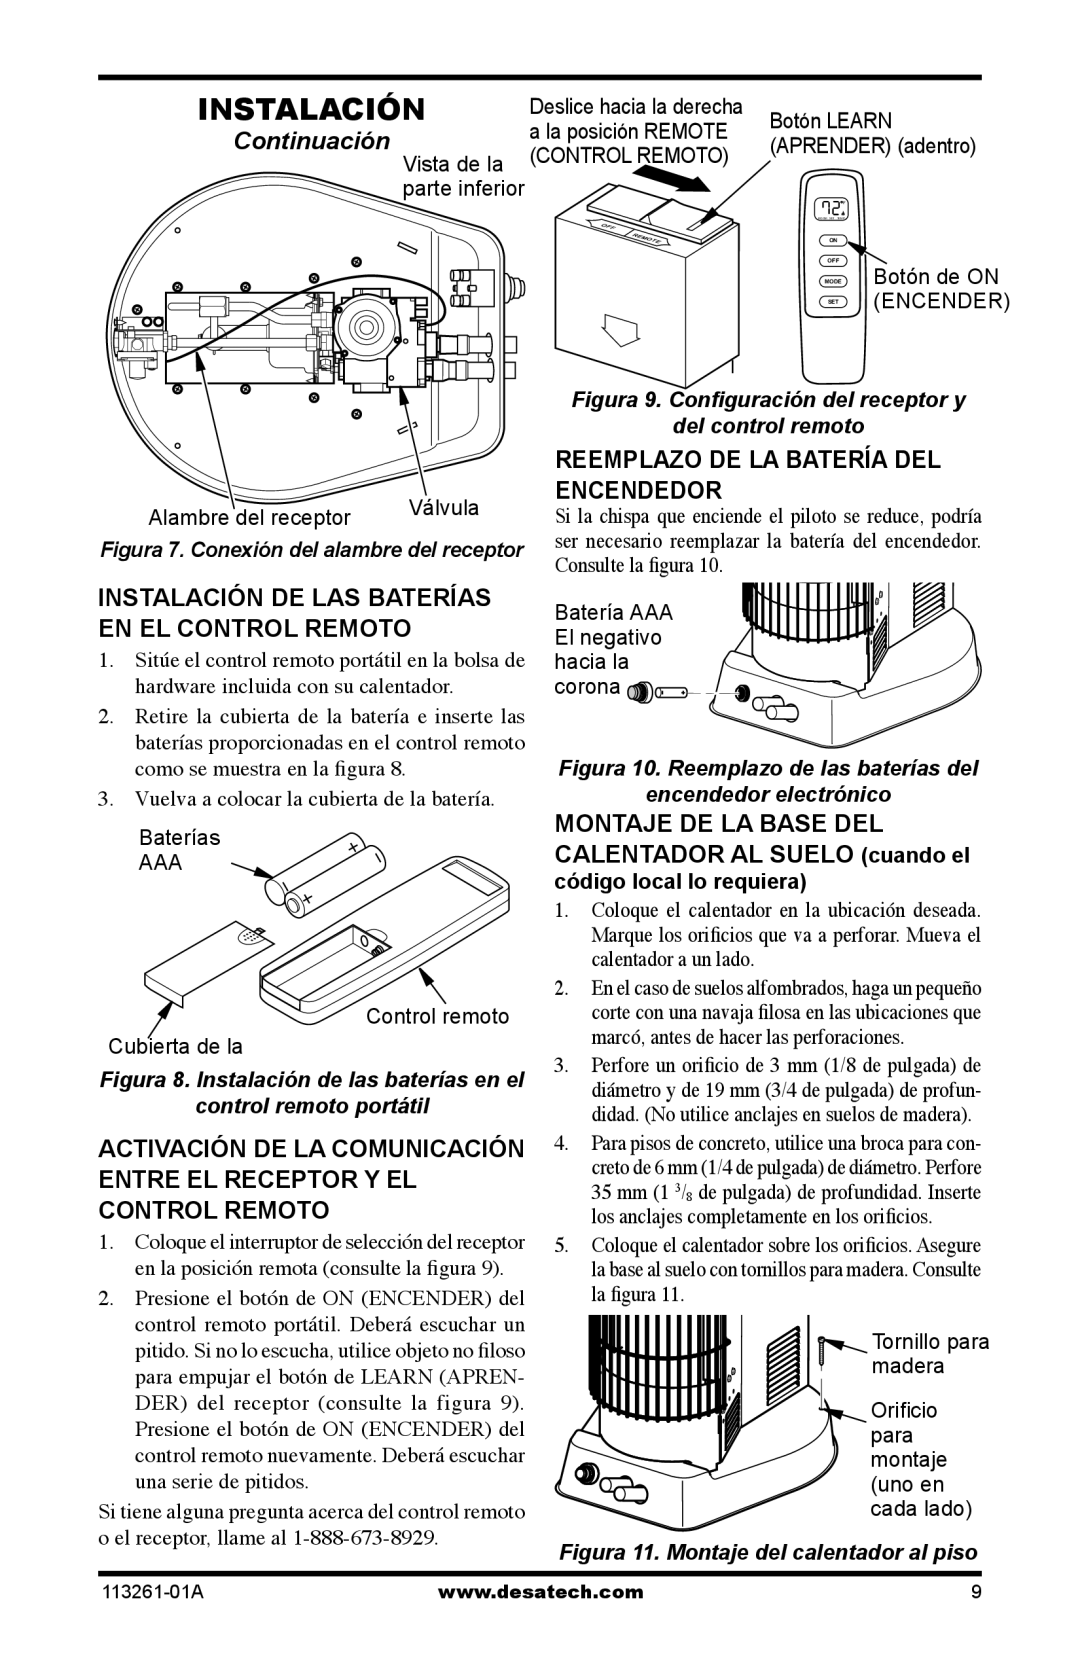
Figura 7. Conexión del alambre del receptor

Figura 9. Configuración del receptor y del control remoto

REEMPLAZO DE LA BATERÍA DEL ENCENDEDOR

Si la chispa que enciende el piloto se reduce, podría ser necesario reemplazar la batería del encendedor. Consulte la figura 10.

INSTALACIÓN DE LAS BATERÍAS EN EL CONTROL REMOTO

1.Sitúe el control remoto portátil en la bolsa de hardware incluida con su calentador.

2.Retire la cubierta de la batería e inserte las baterías proporcionadas en el control remoto como se muestra en la figura 8.

3.Vuelva a colocar la cubierta de la batería.

Baterías

AAA

Control remoto Cubierta de la

Figura 8. Instalación de las baterías en el control remoto portátil

ACTIVACIÓN DE LA COMUNICACIÓN ENTRE EL RECEPTOR Y EL CONTROL REMOTO

1.Coloque el interruptor de selección del receptor en la posición remota (consulte la figura 9).

2.Presione el botón de ON (ENCENDER) del control remoto portátil. Deberá escuchar un pitido. Si no lo escucha, utilice objeto no filoso para empujar el botón de LEARN (APREN- DER) del receptor (consulte la figura 9). Presione el botón de ON (ENCENDER) del control remoto nuevamente. Deberá escuchar una serie de pitidos.

Si tiene alguna pregunta acerca del control remoto o el receptor, llame al 1-888-673-8929.

Batería AAA El negativo hacia la corona

Figura 10. Reemplazo de las baterías del encendedor electrónico MONTAJE DE LA BASE DEL CALENTADOR AL SUELO (cuando el código local lo requiera)

1.Coloque el calentador en la ubicación deseada. Marque los orificios que va a perforar. Mueva el calentador a un lado.

2.En el caso de suelos alfombrados, haga un pequeño corte con una navaja filosa en las ubicaciones que marcó, antes de hacer las perforaciones.

3.Perfore un orificio de 3 mm (1/8 de pulgada) de diámetro y de 19 mm (3/4 de pulgada) de profun- didad. (No utilice anclajes en suelos de madera).

4.Para pisos de concreto, utilice una broca para con- creto de 6 mm (1/4 de pulgada) de diámetro. Perfore 35 mm (1 3/8 de pulgada) de profundidad. Inserte los anclajes completamente en los orificios.

5.Coloque el calentador sobre los orificios. Asegure la base al suelo con tornillos para madera. Consulte la figura 11.

Tornillo para madera

Orificio para montaje (uno en cada lado)

Figura 11. Montaje del calentador al piso

113261-01A

www.desatech.com

9

Page 33
Image 33
Desa CTR22PR, CTR25NR Reemplazo DE LA Batería DEL Encendedor, Instalación DE LAS Baterías EN EL Control Remoto

CTR25NR, CTR22PR, VTN25R, VTP22R specifications

Desa VTN25R, VTP22R, CTR22PR, and CTR25NR are renowned models in the landscape of power generation and energy efficiency solutions. These products cater to varying needs, providing reliable performance for both residential and commercial applications.

The Desa VTN25R is distinguished by its robust design and high fuel efficiency, making it an ideal choice for users looking to balance power output with energy conservation. This model features a state-of-the-art EcoThrottle technology, which adjusts engine speed according to load, significantly reducing fuel consumption and noise levels. With a maximum output of 2500 watts, the VTN25R ensures that users can power a variety of appliances and equipment without concern for overloading.

Next in line, the Desa VTP22R model stands out for its versatility and compact form factor. Weighing in at just 45 pounds, this generator is incredibly portable, making it an excellent choice for outdoor enthusiasts and those needing backup power in emergency situations. It also incorporates a user-friendly digital display, allowing users to monitor fuel levels, output wattage, and engine performance at a glance. Its quiet operation and low emissions are additional highlights that make the VTP22R an environmentally conscious option.

Turning to the CTR22PR, this generator is designed with advanced inverter technology, supplying clean and stable power suitable for sensitive electronics. Its dual fuel capability allows it to run on both gasoline and propane, offering flexibility and convenience for users in diverse situations. The ergonomic handle and lightweight design facilitate easy transport, while the safety features, including overload protection and automatic shutoff, ensure peace of mind during operation.

Lastly, the CTR25NR model boasts higher wattage capacity coupled with enhanced durability. This unit features heavy-duty components, ensuring it can withstand rigorous usage over time. With features like an LED indicators panel and advanced cooling systems, the CTR25NR promises extended run times and operational efficiency. Users appreciate its ease of maintenance and serviceability, which translate into a longer lifespan.

In summary, the Desa VTN25R, VTP22R, CTR22PR, and CTR25NR generators offer a range of features and technologies tailored to meet the needs of different users. Whether it’s fuel efficiency, portability, clean power supply, or heavy-duty performance, these models demonstrate a commitment to reliability and innovation in the power generation market.