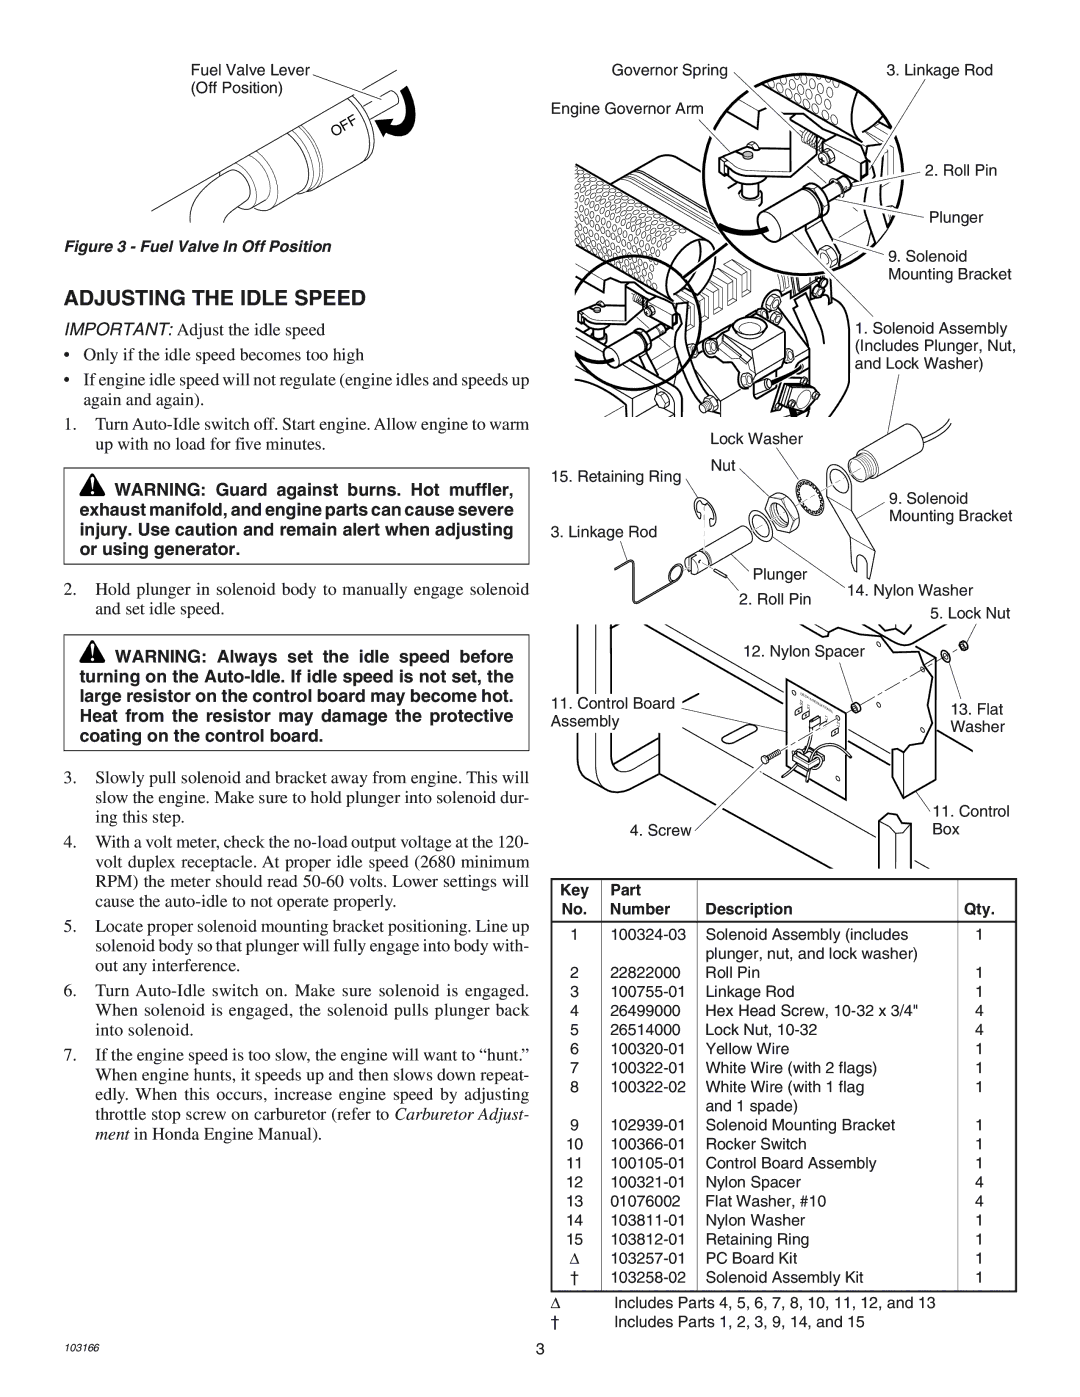
Fuel Valve Lever

(Off Position)

OFF

Figure 3 - Fuel Valve In Off Position

ADJUSTING THE IDLE SPEED

IMPORTANT: Adjust the idle speed

Only if the idle speed becomes too high

If engine idle speed will not regulate (engine idles and speeds up again and again).

1.Turn Auto-Idle switch off. Start engine. Allow engine to warm up with no load for five minutes.

Governor Spring

3. Linkage Rod

Engine Governor Arm

2. Roll Pin

Plunger

9. Solenoid

Mounting Bracket

1. Solenoid Assembly

(Includes Plunger, Nut,

and Lock Washer)

Lock Washer

WARNING: Guard against burns. Hot muffler, exhaust manifold, and engine parts can cause severe injury. Use caution and remain alert when adjusting or using generator.

2.Hold plunger in solenoid body to manually engage solenoid and set idle speed.

15. Retaining Ring

3. Linkage Rod

Nut

Plunger

2. Roll Pin

9. Solenoid Mounting Bracket

14. Nylon Washer

5. Lock Nut

WARNING: Always set the idle speed before turning on the Auto-Idle. If idle speed is not set, the large resistor on the control board may become hot. Heat from the resistor may damage the protective coating on the control board.

11.Control Board Assembly

12. Nylon Spacer

D

ESA


INTE


S2


RNA

S1


TION


AL


L1

L2

13.Flat Washer

3.Slowly pull solenoid and bracket away from engine. This will slow the engine. Make sure to hold plunger into solenoid dur- ing this step.

4.With a volt meter, check the no-load output voltage at the 120- volt duplex receptacle. At proper idle speed (2680 minimum RPM) the meter should read 50-60 volts. Lower settings will cause the auto-idle to not operate properly.

5.Locate proper solenoid mounting bracket positioning. Line up solenoid body so that plunger will fully engage into body with- out any interference.

6.Turn Auto-Idle switch on. Make sure solenoid is engaged. When solenoid is engaged, the solenoid pulls plunger back into solenoid.

7.If the engine speed is too slow, the engine will want to “hunt.” When engine hunts, it speeds up and then slows down repeat- edly. When this occurs, increase engine speed by adjusting throttle stop screw on carburetor (refer to Carburetor Adjust- ment in Honda Engine Manual).


11. Control


4. Screw


Box


Key

Part


No.

Number

Description


Qty.


1

100324-03

Solenoid Assembly (includes


1


plunger, nut, and lock washer)


2

22822000

Roll Pin


1

3

100755-01

Linkage Rod


1

4

26499000

Hex Head Screw, 10-32 x 3/4"


4

5

26514000

Lock Nut, 10-32


4

6

100320-01

Yellow Wire


1

7

100322-01

White Wire (with 2 flags)


1

8

100322-02

White Wire (with 1 flag


1


and 1 spade)


9

102939-01

Solenoid Mounting Bracket


1

10

100366-01

Rocker Switch


1

11

100105-01

Control Board Assembly


1

12

100321-01

Nylon Spacer


4

13

01076002

Flat Washer, #10


4

14

103811-01

Nylon Washer


1

15

103812-01

Retaining Ring


1

103257-01

PC Board Kit


1

103258-02

Solenoid Assembly Kit


1


Includes Parts 4, 5, 6, 7, 8, 10, 11, 12, and 13

† Includes Parts 1, 2, 3, 9, 14, and 15

103166

3

Page 3
Image 3
Desa GENERATOR owner manual Adjusting the Idle Speed, Key Part Number Description Qty

GENERATOR specifications

Desa Generator is a leading name in the generator manufacturing industry, known for its innovation, reliability, and cutting-edge technology. With an emphasis on providing power solutions for both residential and commercial use, Desa generators stand out for their impressive performance, durability, and user-friendly designs.

One of the standout features of Desa generators is their advanced engine technology. Utilizing high-efficiency engines that are designed to minimize fuel consumption while maximizing power output, these generators can deliver reliable performance even in the most demanding conditions. The generators are equipped with a robust cooling system, ensuring that the engine operates within optimal temperatures, thereby enhancing its longevity and reliability.

Another significant characteristic of Desa generators is their compact and portable design. Many models come with built-in wheels and handles, making them easy to transport, which is ideal for outdoor events, camping trips, or emergency power needs. These generators are also designed to be user-friendly, featuring intuitive control panels that allow users to start and operate the generator with minimal effort.

Desa generators also prioritize safety, integrating numerous protective features such as automatic shutdown systems, circuit breakers, and low oil shutdown to prevent damage and ensure safe operation. Additionally, many models are equipped with noise-reducing technology that allows for quieter operation, making them suitable for use in residential areas or where noise restrictions are in place.

Power output is another highlight, with options ranging from small portable generators suitable for home use to larger units capable of powering commercial operations. Desa offers various fuel types, including gasoline, propane, and dual-fuel options, providing flexibility based on user preference and availability.

In terms of technology, Desa has incorporated digital displays in many of their models, giving users real-time information about power output, fuel levels, and maintenance intervals. This level of monitoring aids in proactive maintenance and ensures the generator is always ready for use when needed.

Overall, Desa Generators encapsulate a blend of quality craftsmanship, innovative engineering, and user-oriented design, making them a top choice for anyone in need of a reliable power solution. Whether for home backup, outdoor adventures, or industrial applications, Desa generators deliver performance and peace of mind.