Manuals
/
Desa
/
Household Appliance
/
Electric Heater
Desa
GVB50N, GVB35N Heater, Installing, Continued, Repeat steps 4 through 7 for all glass panels
Models:
GVB35N
GVB50N
1
15
40
40
Download
40 pages
47.56 Kb
12
13
14
15
16
17
18
19
Specification
Install
Parts list
Connecting To Gas Supply
Warranty
Maintenance
Accessories
Manual Lighting Procedure
Cleaning And Maintenance
Replacement
Page 15
Image 15
Page 14
Page 16
Page 15
Image 15
Page 14
Page 16
Contents
Save this manual for future reference
OWNER’S OPERATION AND INSTALLATION MANUAL
VENTED NATURAL GAS HEATERS
Models GVB35N and GVB50N
CONTENTS
SECTION
PAGE
DANGER
SAFETY
INFORMATION
WARNINGS
SAFETY INFORMATION
WARNINGS Continued
Continued
100353
PRODUCT IDENTIFICATION
Figure 1 - Vented Natural Gas Heater
Figure 2 - Vented Natural Gas Heater, Rear View
UNPACKING
FEATURES
INSTALLING
LOCAL CODES
If you install the heater in a home garage
INSTALLING HEATER
Never install the heater
For convenience and efficiency, install heater
INSTALLING HEATER
Continued
VENTING HEATER
Figure 4 - Improper Venting Systems
INSTALLING HEATER
Continued
VENTING HEATER continued
Vent Types
INSTALLING HEATER
Continued
VENTING HEATER continued Proper Size Vent
Continued
INSTALLING
CONNECTING TO GAS SUPPLY
HEATER
INSTALLING HEATER
For purposes of input adjustment
Continued
HEATER
INSTALLING
Pressure Testing Gas Supply Piping System
Pressure Testing Heater Gas Connections
Continued
INSTALLING HEATER
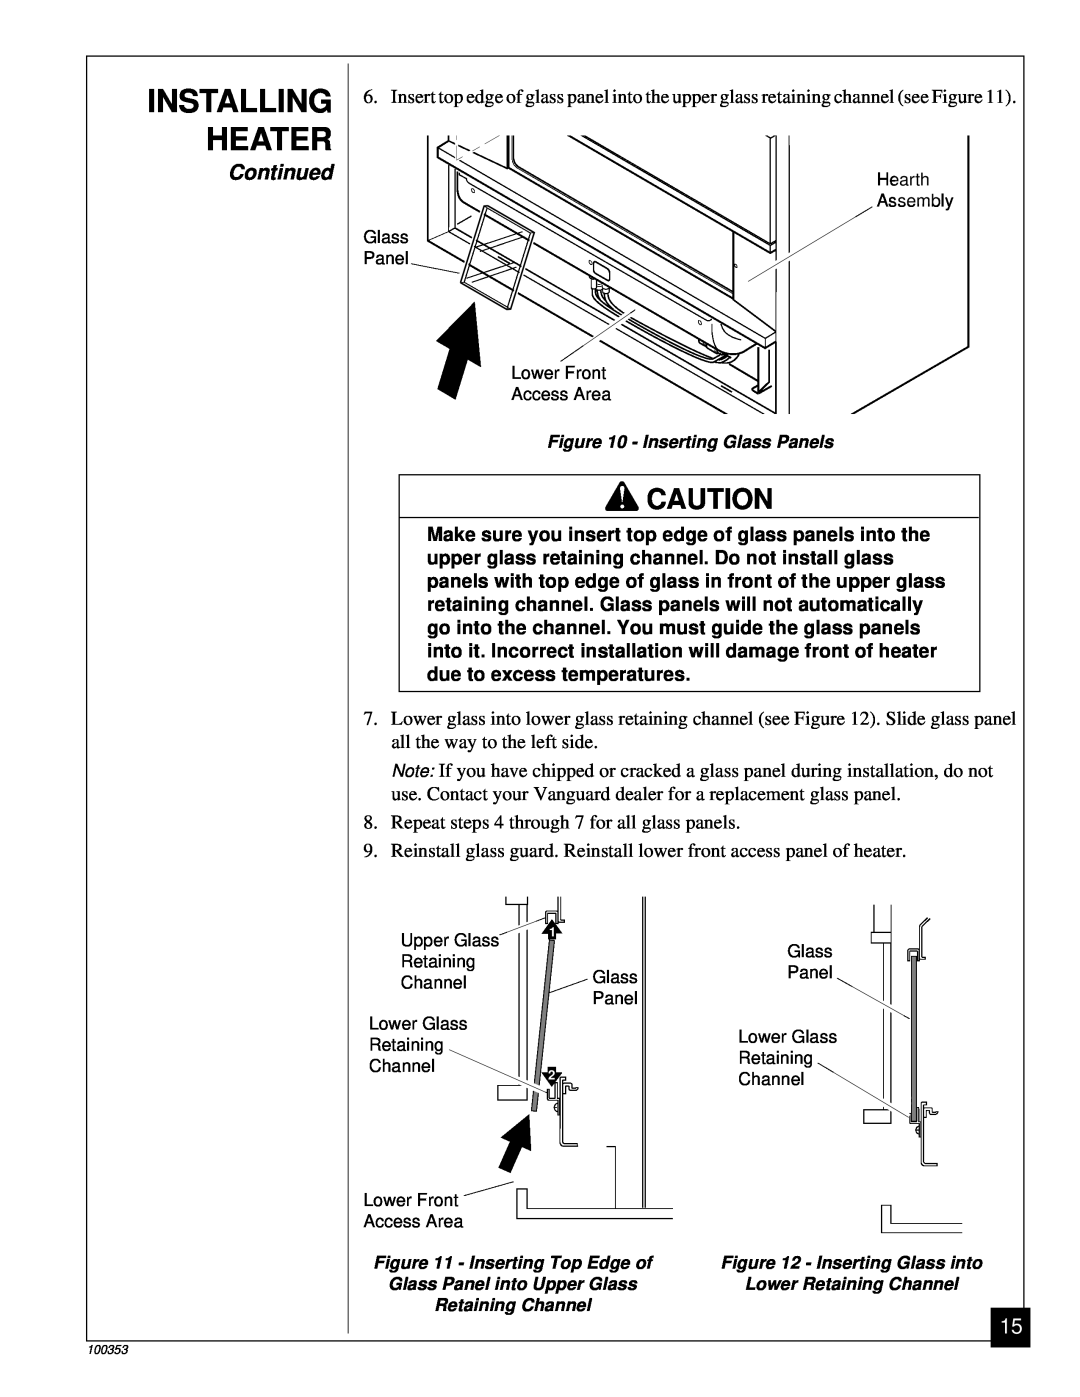
INSTALLING GLASS PANEL
Figure 9 - Removing Lower Front Access Panel
8.Repeat steps 4 through 7 for all glass panels
INSTALLING
HEATER
Continued
FRESH AIR FOR COMBUSTION AND VENTILATION
DANGER
Carbon monoxide poisoning may lead to death
Continued
COMBUSTION
VENTILATION
FRESH AIR FOR
DANGER
FRESH AIR FOR
COMBUSTION
VENTILATION
Continued
COMBUSTION
VENTILATION
FRESH AIR FOR
OPERATING HEATER
FOR YOUR SAFETY READ BEFORE LIGHTING
LIGHTING INSTRUCTIONS
Figure 17 - Viewing Pilot
OPERATING HEATER
Continued
Continued
TO TURN OFF GAS TO APPLIANCE
MANUAL LIGHTING PROCEDURE
OPERATING HEATER
Continued
Continued
INSPECTING PILOT AND BURNER FLAME
PILOT FLAME PATTERN
BURNER FLAME PATTERN
Continued
INSPECTING PILOT AND BURNER FLAME
PILOT
CLEANING AND MAINTENANCE
CABINET
COMBUSTION CHAMBER AND BURNER
TROUBLE
SHOOTING
and Maintenance, page
TROUBLE
Cleaning and Mainte
ing and Maintenance
Cleaning and Mainte
Cleaning
TROUBLE- SHOOTING
ing and Maintenance
Maintenance, page
Continued
ing and Maintenance
TROUBLE
SHOOTING
Removing Control Valve and Burner Tube
SERVICE PROCEDURES
Continued
SERVICE PROCEDURES
Continued
Removing Burner
SERVICE PROCEDURES
Continued
Changing Burner Orifice
TECHNICAL SERVICE
SERVICE HINTS
SPECIFICATIONS
CENTRALS
REPLACEMENT
ORDERING
PARTS
ACCESSORIES
BLOWER KIT - PART NUMBER GA6010
MANUAL SHUTOFF VALVE - GA5010
Burner
PARTS LIST
Assembly
ILLUSTRATED
GVB35N
PARTS LIST Burner Assembly
PART NUMBER FOR
GVB50N
manual
ILLUSTRATED PARTS LIST Cabinet Assembly
Page
DESA
WARRANTY INFORMATION
Top
Page
Image
Contents