Manuals
/
Desa
/
Household Appliance
/
Electric Heater
Desa
RCLP50-F
owner manual
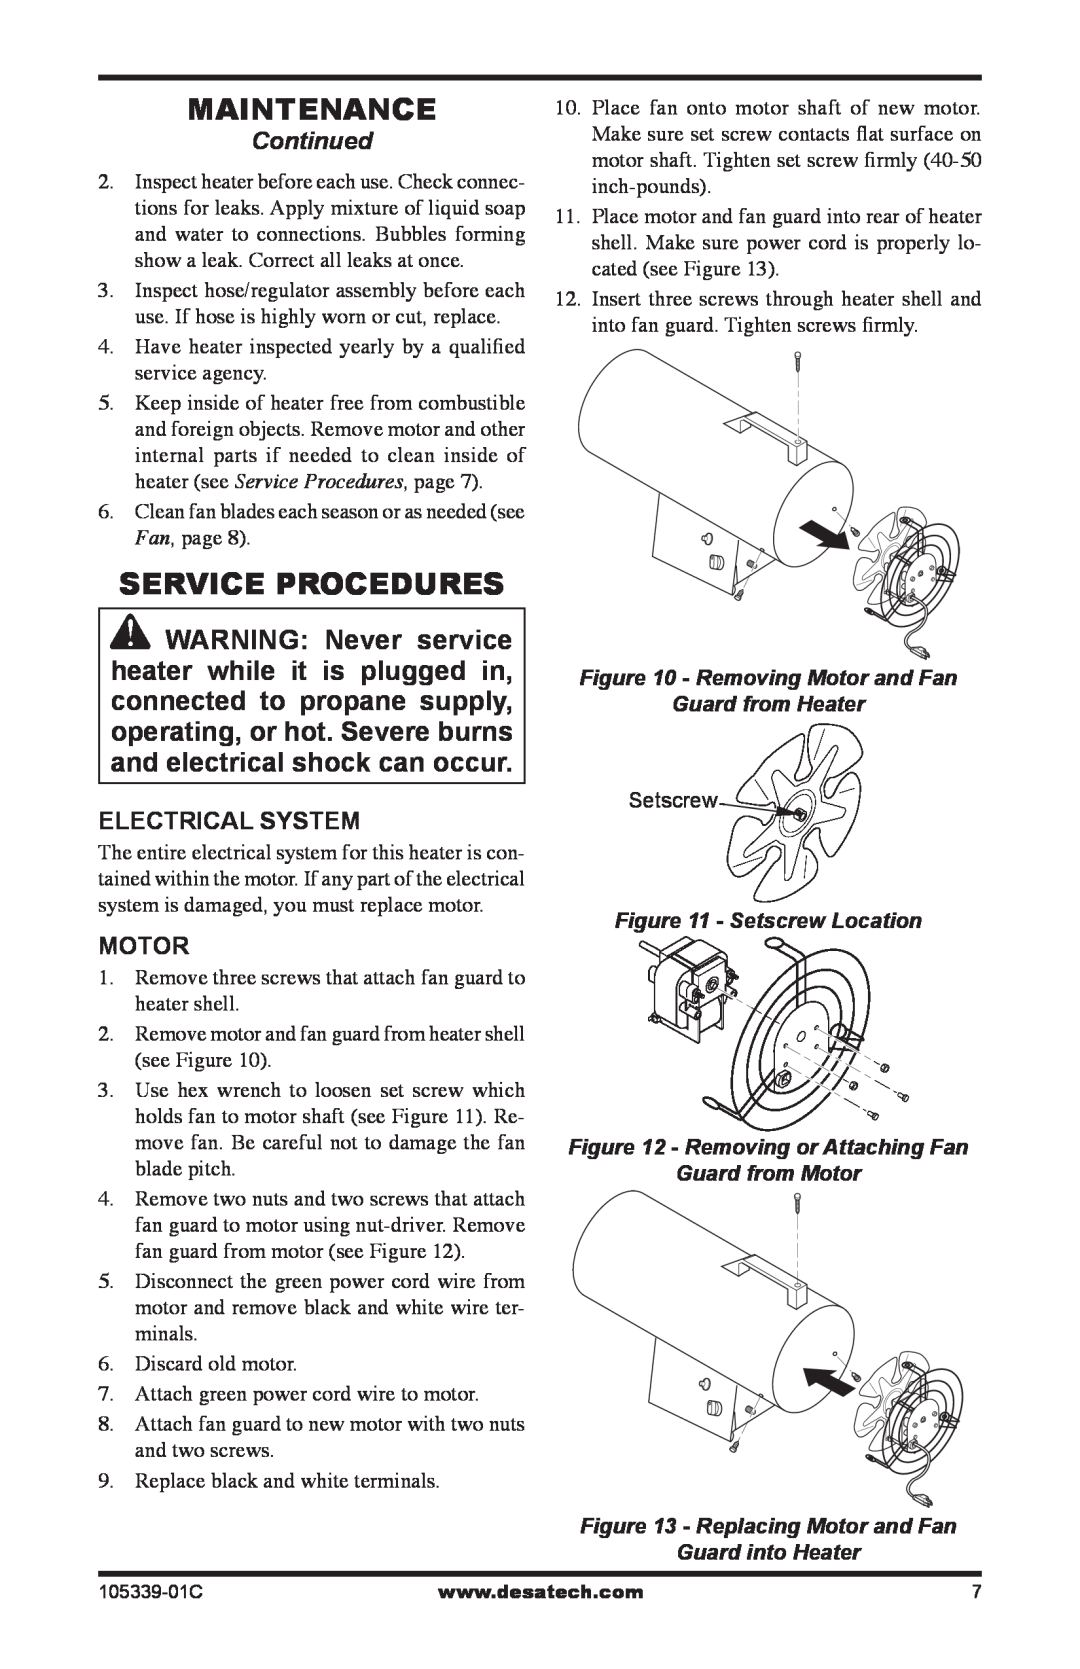
Maintenance, Service Procedures, Continued, Electrical System, Motor
Models:
RCLP50-F
1
7
44
44
Download
44 pages
39.32 Kb
4
5
6
7
8
9
10
11
Troubleshooting
Specs
Install
Parts list
Warranty
Maintenance
Solución De Problemas
Accessoire
Assembly
Safety
Page 7
Image 7
Page 6
Page 8
Page 7
Image 7
Page 6
Page 8
Contents
GENERAL HAZARD WARNING
WARNING Not for home or recreational vehicle use
SAFETY INFORMATION
PROPANE SUPPLY
SAFETY INFORMATION
UNPACKING
PRODUCT IDENTIFICATION
THEORY OF OPERATION
ASSEMBLY
VENTILATION
OPERATION
INSTALLATION
OPERATION
MAINTENANCE
STORAGE
ELECTRICAL SYSTEM
MAINTENANCE
SERVICE PROCEDURES
Continued
IGNITOR
SERVICE PROCEDURES
Figure 14 - Removing Ignitor Wire from
Continued
REMEDY
TROUBLESHOOTING
OBSERVED FAULT
POSSIBLE CAUSE
29 4
ILLUSTRATED PARTS BREAKDOWN
MODELS RCLP50VA AND 50-F
1 2 3 2 2 19 21 22 24
MODELS RCLP50VA AND 50-F
PARTS LIST
ACCESSORY
SPECIFICATIONS
TECHNICAL SERVICE
REPLACEMENT PARTS
105339-01C
WARRANTY SERVICE
WARRANTY AND REPAIR SERVICE
KEEP THIS WARRANTY
LIMITED WARRANTY
TABLA DE CONTENIDO
ADVERTENCIA GENERAL DE PELIGRO
INFORMACIÓN DE SEGURIDAD
Continuación
DESEMPAQUE
IDENTIFICACIÓN DEL PRODUCTO
SUMINISTRO DE PROPANO
tener un espacio abierto al aire
TEORÍA DE FUNCIONAMIENTO
VENTILACIÓN
ENSAMBLAJE
FUNCIONAMIENTO
INSTALACIÓN
PARA ENCENDER EL CALENTADOR
Continuación
FUNCIONAMIENTO
ALMACENAMIENTO
MANTENIMIENTO
SISTEMA ELÉCTRICO
MANTENIMIENTO
PROCEDIMIENTOS DE SERVICIO
Continuación
ENCENDEDOR
PROCEDIMIENTOS DE
SERVICIO Continuación
VENTILADOR
REMEDIO
SOLUCIÓN DE PROBLEMAS
FALLA OBSERVADA
CAUSA POSIBLE
29 4 16 20
CLASIFICACIÓN ILUSTRADA DE PIEZAS
MODELOS RCLP50VA Y 50-F
1 2 3 2 2 19
MODELOS RCLP50VA Y 50-F
LISTA DE PIEZAS
Cámara de combustión
ACCESORIOS
ESPECIFICACIONES
SERVICIO TÉCNICO
PIEZAS DE REPUESTO
NOTAS
SERVICIO DE GARANTÍA
GARANTÍA Y SERVICIO DE REPARACIÓN
GUARDE ESTA GARANTÍA
GARANTÍA LIMITADA
TABLE DES MATIÈRES
AVERTISSEMENT DE RISQUE GÉNÉRAL
INFORMATION RELATIVE À LA SÉCURITÉ
Figure 1 - Modèle à 50 000 BTU/h
INFORMATION RELATIVE ÀLA SÉCURITÉ Suite
DÉBALLAGE
IDENTIFICATION DU PRODUIT
ASSEMBLAGE
APPROVISIONNEMENT EN PROPANE
THÉORIE DE FONCTIONNEMENT
VENTILATION
Figure 3 - Retrait de la vis sur le dessus
INSTALLATION
ASSEMBLAGE
Suite
POUR ALLUMER LAPPAREIL DE CHAUFFAGE
INSTALLATION
FONCTIONNEMENT
Suite
ENTREPOSAGE
FONCTIONNEMENT
ENTRETIEN
CIRCUIT ÉLECTRIQUE
Figure 11 - Emplacement de la vis darrêt
Figure 12 - Retrait ou installation de la
PROCÉDURES DENTRETIEN
Figure 14 - Retrait du fil de lallumeur de
Suite
VENTILATEUR
ALLUMEUR
CAUSE POSSIBLE
SOLUTION
DÉPANNAGE
PROBLÈME OBSERVÉ
PIÈCES DE RECHANGE
SERVICE TECHNIQUE
ACCESSOIRE
SPÉCIFICATIONS
29 4
VUE DÉTAILLÉE DES PIÈCES
MODÈLES RCLP50VA ET 50-F
1 2 3 2 2 19 21
MODÈLES RCLP50VA ET 50-F
LISTE DES PIÈCES
Page
105339-01C
GARANTIE LIMITÉE
SERVICE DE GARANTIE ET DE RÉPARATION
SERVICE DE RÉPARATION
CONSERVEZ CETTE GARANTIE
Top
Page
Image
Contents