OPERATING HEATER (NON-THERMOSTAT MODELS)

For Your Safety Read Before Lighting

Lighting Instructions

13

OPERATING HEATER

NON-THERMOSTAT MODELS

FOR YOUR SAFETY READ

BEFORE LIGHTING

WARNING: If you do not follow these instructions exactly, a fire or explosion may result causing prop- erty damage, personal injury or loss of life.

A.This appliance has a pilot which must be lighted by hand. When lighting the pilot, follow these instructions exactly.

B.BEFORE LIGHTING smell all around the appliance area for gas. Be sure to smell next to the floor because some gas is heavier than air and will settle on the floor.

WHAT TO DO IF YOU SMELL GAS

Do not try to light any appliance.

Do not touch any electric switch; do not use any phone in your building.

Immediately call your gas supplier from a neighbor’s phone. Follow the gas supplier’s instructions.

If you cannot reach your gas supplier, call the fire de- partment.

C.Use only your hand to push in or turn the gas control knob. Never use tools. If the knob will not push in or turn by hand, don’t try to repair it, call a qualified service techni- cian or gas supplier. Force or attempted repair may result in a fire or explosion.

D.Do not use this appliance if any part has been under water. Immediately call a qualified service technician to inspect the appliance and to replace any part of the control system and any gas control which has been under water.

LIGHTING

INSTRUCTIONS

1.STOP! Read the safety information above.

2.Make sure equipment shutoff valve is fully open.

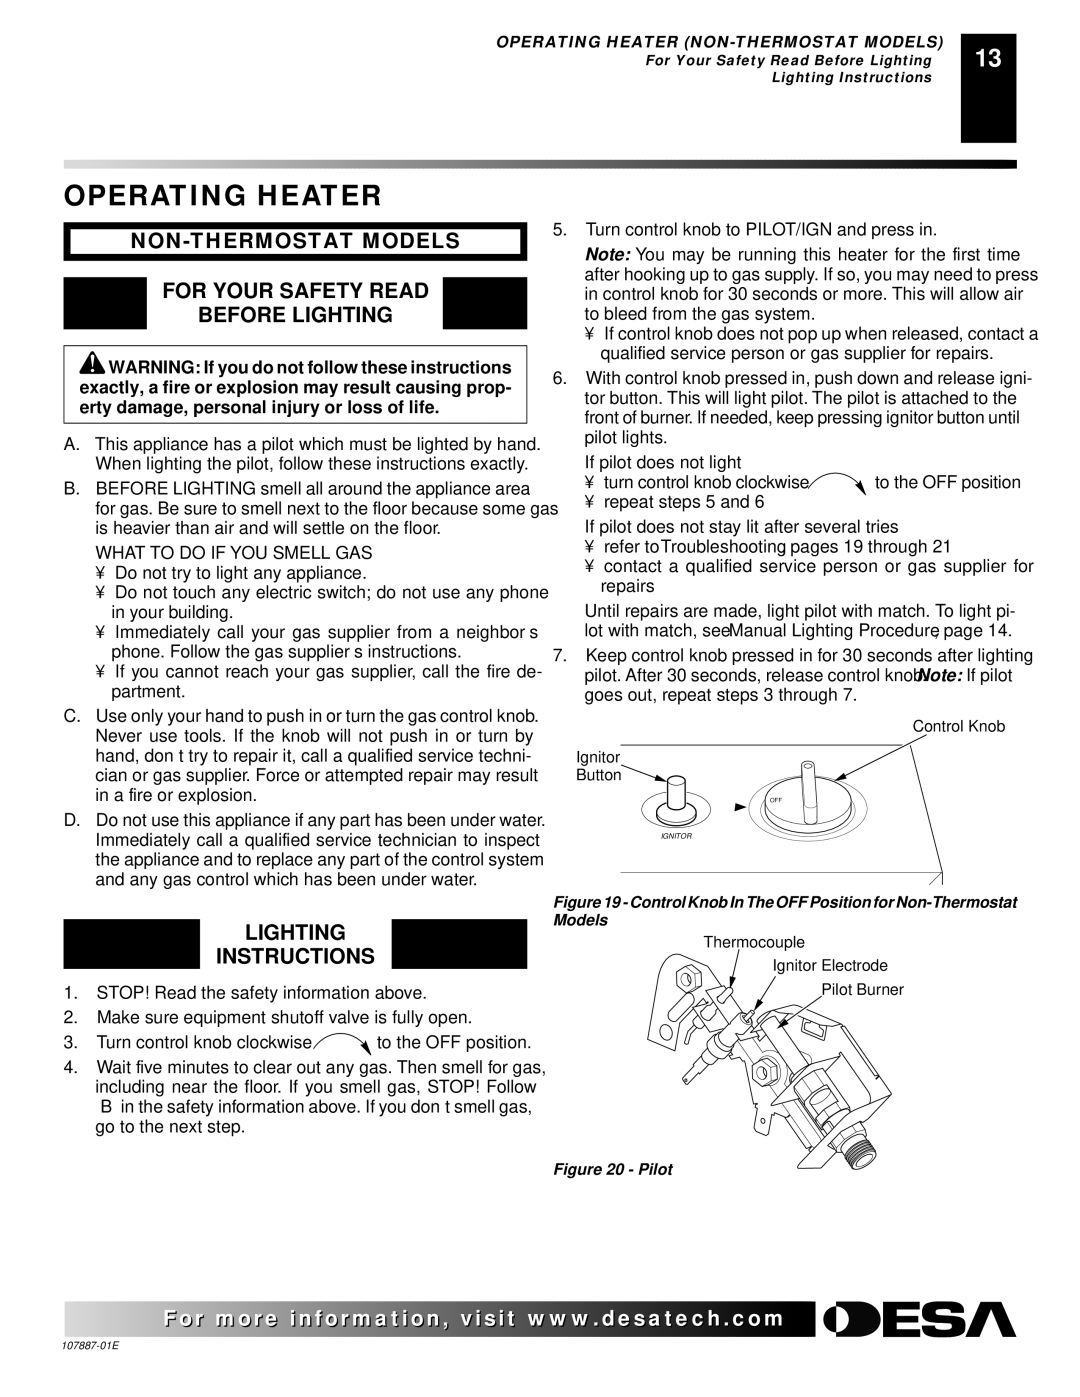
3.Turn control knob clockwise to the OFF position.

4.Wait five minutes to clear out any gas. Then smell for gas, including near the floor. If you smell gas, STOP! Follow “B” in the safety information above. If you don’t smell gas, go to the next step.

5.Turn control knob to PILOT/IGN and press in.

Note: You may be running this heater for the first time after hooking up to gas supply. If so, you may need to press in control knob for 30 seconds or more. This will allow air to bleed from the gas system.

If control knob does not pop up when released, contact a qualified service person or gas supplier for repairs.

6.With control knob pressed in, push down and release igni- tor button. This will light pilot. The pilot is attached to the front of burner. If needed, keep pressing ignitor button until pilot lights.

If pilot does not light

turn control knob clockwise to the OFF position

repeat steps 5 and 6

If pilot does not stay lit after several tries

refer to Troubleshooting, pages 19 through 21

contact a qualified service person or gas supplier for repairs

Until repairs are made, light pilot with match. To light pi- lot with match, see Manual Lighting Procedure, page 14.

7.Keep control knob pressed in for 30 seconds after lighting pilot. After 30 seconds, release control knob. Note: If pilot goes out, repeat steps 3 through 7.

Control Knob

Ignitor

Button

OFF

IGNITOR

Figure 19 - Control Knob In The OFF Position for Non-Thermostat Models

Thermocouple

Ignitor Electrode

Pilot Burner

Figure 20 - Pilot

For morevisit www..com

107887-01E

Page 13
Image 13
Desa VP26, VN18, VN30T Operating Heater, NON-THERMOSTAT Models For Your Safety Read Before Lighting, Lighting Instructions

VN18, VP16, VN18T, VN25IT, VP22IT specifications

Desa VN18, VN30T, VP16, VP26T, and VP16T are a series of innovative devices tailored to meet diverse needs in various applications, ranging from industrial to consumer markets. Each model embodies distinct features, technologies, and characteristics that enhance performance and usability.

The Desa VN18 is renowned for its compact structure and lightweight design, making it ideal for small-scale applications. It integrates a sophisticated energy-efficient system that minimizes power consumption while maximizing output. This model supports various connectivity options, ensuring seamless integration with existing systems. Additionally, the VN18 is equipped with an intuitive user interface that simplifies operation, making it accessible even for those with limited technical experience.

In contrast, the VN30T offers enhanced capabilities suitable for medium to large-scale operations. This model boasts an impressive processing power, enabling it to handle more complex tasks with ease. The VN30T features advanced cooling technologies that keep the unit operating optimally, even under heavy workloads. Furthermore, its durable construction ensures longevity and reliability, making it a preferred choice for industrial environments.

The VP16, designed with versatility in mind, excels in adaptability across multiple applications. It offers interchangeable components, allowing users to customize setup based on specific needs. The technology embedded within the VP16 includes smart sensors that provide real-time feedback, helping users to monitor performance and adjust settings accordingly. This level of adaptability makes the VP16 an invaluable asset in dynamic working conditions.

Next in the lineup is the VP26T, which stands out for its robust performance under demanding conditions. With a focus on safety features, this model includes multiple fail-safes and redundancy systems that ensure consistent operation, even in emergencies. The VP26T is designed for heavy-duty applications, featuring enhanced materials that resist wear and tear, thereby prolonging its lifespan.

Finally, the VP16T combines the best aspects of its predecessors while introducing new technological advancements. It utilizes cutting-edge automation technologies that enable remote control and monitoring, enhancing user convenience. The VP16T's power management system optimizes energy use based on operational demands, contributing to both cost savings and sustainability.

Overall, Desa VN18, VN30T, VP16, VP26T, and VP16T represent a forward-thinking approach to design and functionality, addressing the evolving needs of users across various sectors. With their unique features and robust technologies, these models are set to redefine standards in their respective categories.