12

INSTALLATION

Installing Variable Speed Blower Accessory (Cont.)

INSTALLATION

Continued

5.Be certain that all wire terminals are securely attached to ter- minals on blower motor and that the screw retaining the green ground wire is tight.

6.Place control knob provided on plastic control shaft of speed control.

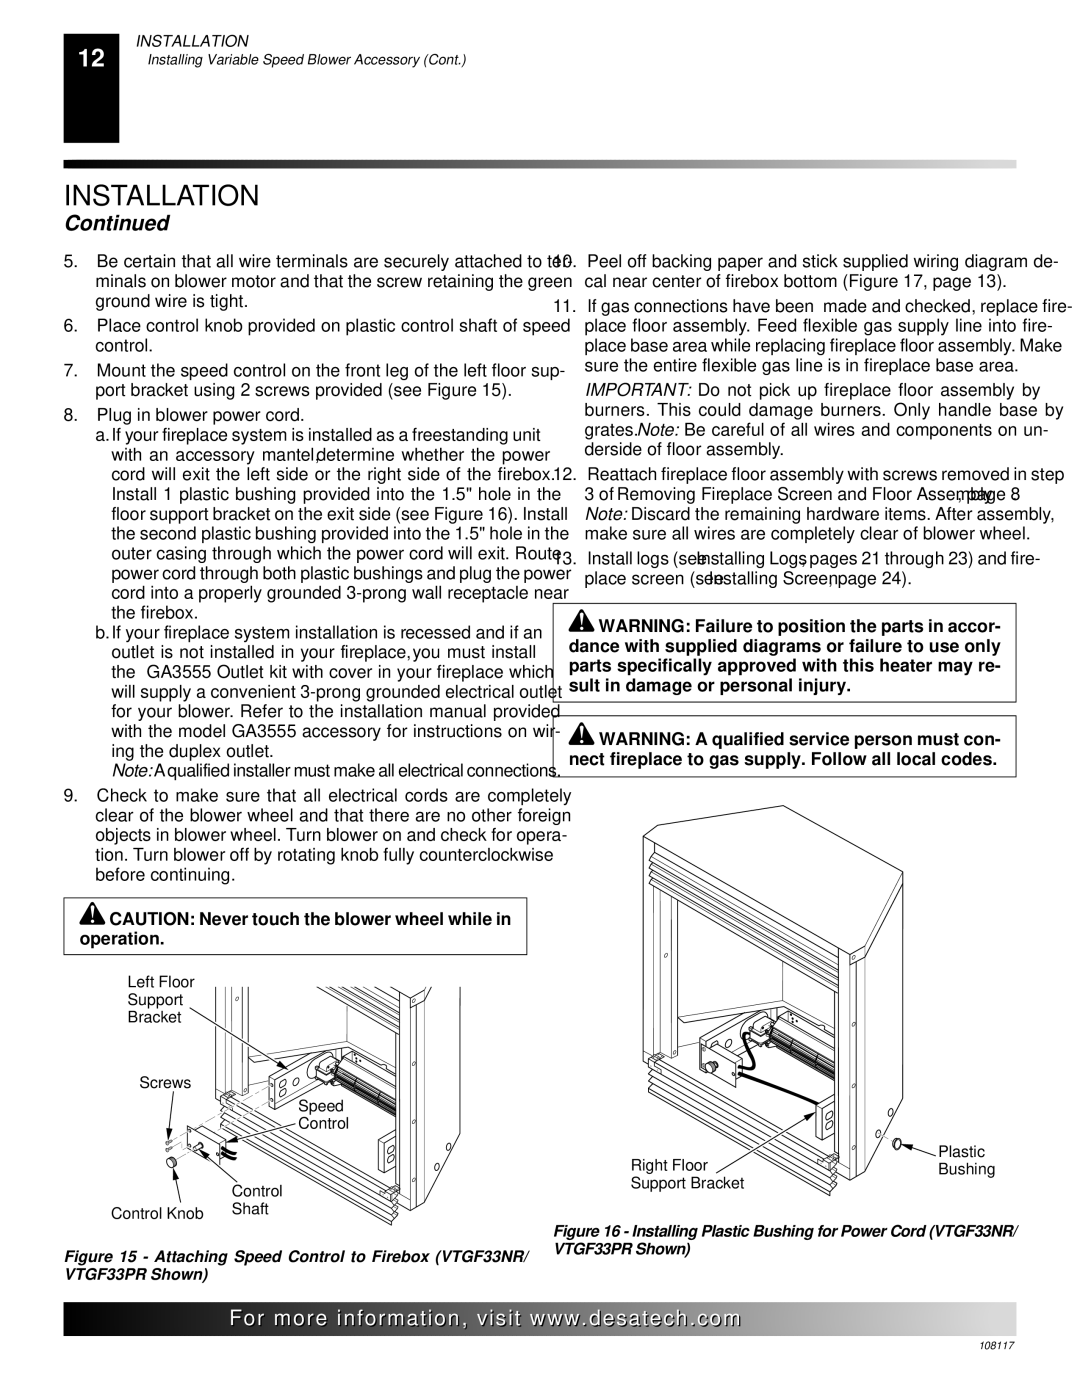
7.Mount the speed control on the front leg of the left floor sup- port bracket using 2 screws provided (see Figure 15).

8.Plug in blower power cord.

a.If your fireplace system is installed as a freestanding unit with an accessory mantel, determine whether the power cord will exit the left side or the right side of the firebox. Install 1 plastic bushing provided into the 1.5" hole in the floor support bracket on the exit side (see Figure 16). Install the second plastic bushing provided into the 1.5" hole in the outer casing through which the power cord will exit. Route power cord through both plastic bushings and plug the power cord into a properly grounded 3-prong wall receptacle near the firebox.

b.If your fireplace system installation is recessed and if an outlet is not installed in your fireplace, you must install the GA3555 Outlet kit with cover in your fireplace which will supply a convenient 3-prong grounded electrical outlet for your blower. Refer to the installation manual provided with the model GA3555 accessory for instructions on wir- ing the duplex outlet.

Note:A qualified installer must make all electrical connections.

9.Check to make sure that all electrical cords are completely clear of the blower wheel and that there are no other foreign objects in blower wheel. Turn blower on and check for opera- tion. Turn blower off by rotating knob fully counterclockwise before continuing.

CAUTION: Never touch the blower wheel while in operation.

Left Floor

Support

Bracket

Screws

Speed

Control


Control

Control Knob

Shaft


Figure 15 - Attaching Speed Control to Firebox (VTGF33NR/ VTGF33PR Shown)

10.Peel off backing paper and stick supplied wiring diagram de- cal near center of firebox bottom (Figure 17, page 13).

11.If gas connections have been made and checked, replace fire- place floor assembly. Feed flexible gas supply line into fire- place base area while replacing fireplace floor assembly. Make sure the entire flexible gas line is in fireplace base area.

IMPORTANT: Do not pick up fireplace floor assembly by burners. This could damage burners. Only handle base by grates. Note: Be careful of all wires and components on un- derside of floor assembly.

12.Reattach fireplace floor assembly with screws removed in step 3 of Removing Fireplace Screen and Floor Assembly, page 8.

Note: Discard the remaining hardware items. After assembly, make sure all wires are completely clear of blower wheel.

13.Install logs (see Installing Logs, pages 21 through 23) and fire- place screen (see Installing Screen, page 24).

WARNING: Failure to position the parts in accor- dance with supplied diagrams or failure to use only parts specifically approved with this heater may re- sult in damage or personal injury.

WARNING: A qualified service person must con- nect fireplace to gas supply. Follow all local codes.

Plastic

Right FloorBushing

Support Bracket

Figure 16 - Installing Plastic Bushing for Power Cord (VTGF33NR/ VTGF33PR Shown)

For..com

108117

Page 12
Image 12
Desa CGEFP33PR installation manual Attaching Speed Control to Firebox VTGF33NR/ VTGF33PR Shown

VTGF33NR, CGEFP33PR, VTGF33PR specifications

Desa VTGF33PR, CGEFP33PR, and VTGF33NR are innovative heating solutions designed to enhance comfort and provide efficient warmth in various living spaces. These products are particularly popular for their advanced features, energy efficiency, and usability.

The Desa VTGF33PR is a natural gas vent-free infrared heater that showcases a sleek design and powerful performance. One of its standout features is its infrared technology, which allows for direct heating by warming surfaces in the room rather than just the air. This results in faster warmth and efficient energy use. The VTGF33PR also comes equipped with a thermostat, ensuring optimal temperature regulation and control over heating preferences. With a heating capacity of 33,000 BTUs, it is suitable for larger areas, providing consistent and reliable warmth even in larger spaces.

Moving on to the CGEFP33PR, this model operates on propane and combines both elegance and efficiency. This direct vent fireplace offers a unique balance between aesthetics and performance. The CGEFP33PR features a contemporary design, making it a stylish addition to modern homes. With its high-efficiency venting system, it ensures that combustion gases are safely expelled outside while maximizing heat output into the living space. It also showcases an adjustable flame feature, allowing users to set their desired ambiance while maintaining energy efficiency. Like the VTGF33PR, it includes a thermostat control for precise temperature adjustments.

Finally, the VTGF33NR is another noteworthy entry in Desa’s lineup. It operates similarly to the VTGF33PR, with a focus on infrared heating. However, the VTGF33NR distinguishes itself with its impressive portability and versatility. It is designed to be easy to install and relocate, making it a perfect choice for both homeowners and renters. Its space-saving design allows it to fit seamlessly into various room setups. This model also boasts a robust safety feature set, including an oxygen depletion sensor and an automatic shut-off mechanism, ensuring safe operation in any environment.

In summary, Desa’s VTGF33PR, CGEFP33PR, and VTGF33NR present a range of heating solutions that prioritize energy efficiency, safety, and user comfort. With advanced technologies such as infrared heating and sleek designs, these models stand out as practical solutions for any home looking to enhance its heating capabilities while maintaining modern aesthetics.