•Keep hands and body parts clear of immediate work area. Hold workpiece with clamps when necessary to keep hands and body out of potential harm. Be sure the workpiece is properly secured before pressing the stapler against the material. The contact trip may cause the work material to shift unexpectedly. (Fig. Q)
•Do not use tool in the presence of flammable dust, gases or fumes. The tool may produce a spark that could ignite gases causing a fire. Driving a fastener into another fastener may also cause a spark. (Fig. R)
•Keep face and body parts away from back of the tool cap when working in restricted areas. Sudden recoil can result in impact to the body, especially when fastening into hard or dense material. (Fig. S)
•Grip tool firmly to maintain control while allow- ing tool to recoil away from work surface as fastener is driven. In “Contact Actuation Mode” if contact trip is allowed to recontact work surface before trigger is released an unwanted fastener will be fired.
•Choice of triggering method is important. Check the manual for triggering options.
BUMP ACTION TRIGGER
•When using the bump action trigger, be careful of unintentional double fires result- ing from tool recoil. Unwanted fasteners may be driven if the contact trip is allowed to accidentally
TO AVOID DOUBLE FIRES (Fig. T):
•Do not engage the tool against the work surface with a strong force.
•Allow the tool to recoil fully after each actuation.
•Use sequential action trigger.
•When “bump” actuating the stapler, always keep tool in control. Inaccurate placement of tool can result in misdirected discharge of a fastener.
SEQUENTIAL ACTION TRIGGER
•When using the sequential action trigger, do not actuate the tool unless the tool is placed firmly against the workpiece.
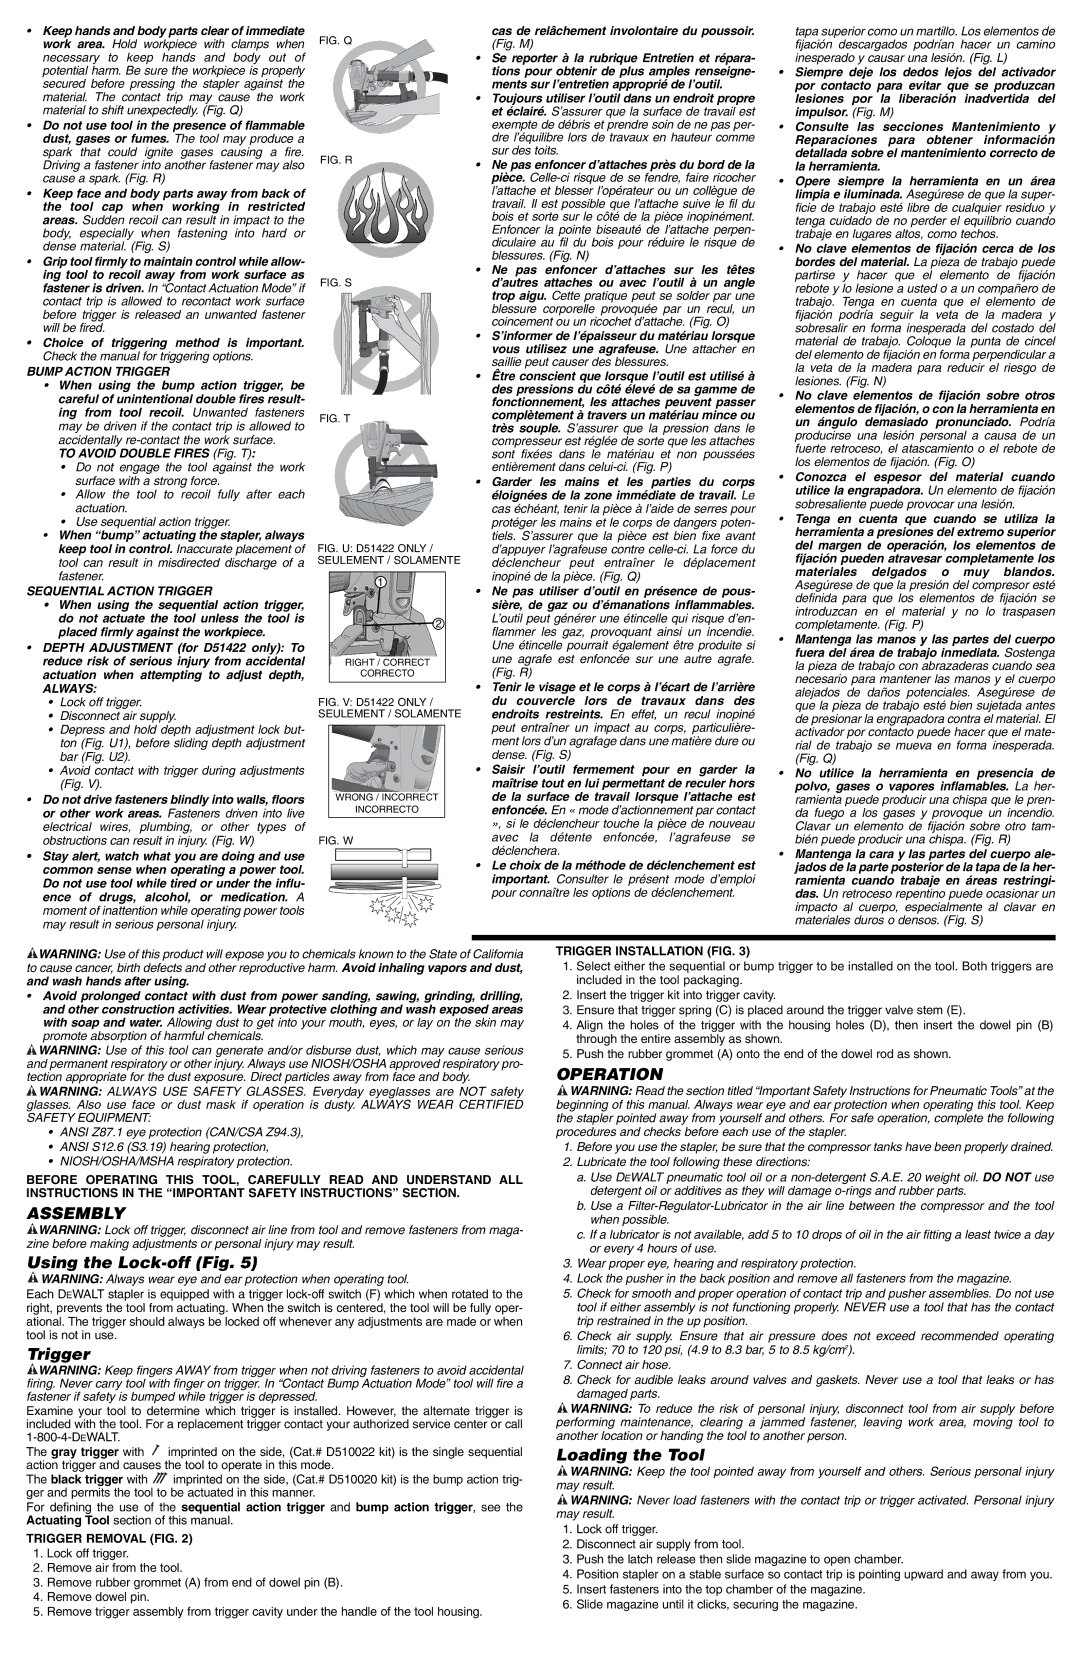
•DEPTH ADJUSTMENT (for D51422 only): To reduce risk of serious injury from accidental actuation when attempting to adjust depth,
ALWAYS:
•Lock off trigger.
•Disconnect air supply.
•Depress and hold depth adjustment lock but- ton (Fig. U1), before sliding depth adjustment bar (Fig. U2).
•Avoid contact with trigger during adjustments (Fig. V).
•Do not drive fasteners blindly into walls, floors or other work areas. Fasteners driven into live electrical wires, plumbing, or other types of obstructions can result in injury. (Fig. W)
•Stay alert, watch what you are doing and use common sense when operating a power tool. Do not use tool while tired or under the influ- ence of drugs, alcohol, or medication. A moment of inattention while operating power tools may result in serious personal injury.
FIG. Q
FIG. R
FIG. S
FIG. T
FIG. U: D51422 ONLY /
SEULEMENT / SOLAMENTE
1 |
2 |
RIGHT / CORRECT |
CORRECTO |
FIG. V: D51422 ONLY /
SEULEMENT / SOLAMENTE
WRONG / INCORRECT |
INCORRECTO |
FIG. W
cas de relâchement involontaire du poussoir.
(Fig. M)
•Se reporter à la rubrique Entretien et répara- tions pour obtenir de plus amples renseigne- ments sur l’entretien approprié de l’outil.
•Toujours utiliser l’outil dans un endroit propre et éclairé. S’assurer que la surface de travail est exempte de débris et prendre soin de ne pas per- dre l’équilibre lors de travaux en hauteur comme sur des toits.
•Ne pas enfoncer d’attaches près du bord de la pièce.
•Ne pas enfoncer d’attaches sur les têtes d’autres attaches ou avec l’outil à un angle trop aigu. Cette pratique peut se solder par une blessure corporelle provoquée par un recul, un coincement ou un ricochet d’attache. (Fig. O)
•S’informer de l’épaisseur du matériau lorsque vous utilisez une agrafeuse. Une attacher en saillie peut causer des blessures.
•Être conscient que lorsque l’outil est utilisé à des pressions du côté élevé de sa gamme de fonctionnement, les attaches peuvent passer complètement à travers un matériau mince ou très souple. S’assurer que la pression dans le compresseur est réglée de sorte que les attaches sont fixées dans le matériau et non poussées entièrement dans
•Garder les mains et les parties du corps éloignées de la zone immédiate de travail. Le cas échéant, tenir la pièce à l’aide de serres pour protéger les mains et le corps de dangers poten- tiels. S’assurer que la pièce est bien fixe avant d’appuyer l’agrafeuse contre
•Ne pas utiliser d’outil en présence de pous- sière, de gaz ou d’émanations inflammables. L’outil peut générer une étincelle qui risque d’en- flammer les gaz, provoquant ainsi un incendie. Une étincelle pourrait également être produite si une agrafe est enfoncée sur une autre agrafe. (Fig. R)
•Tenir le visage et le corps à l’écart de l’arrière du couvercle lors de travaux dans des endroits restreints. En effet, un recul inopiné peut entraîner un impact au corps, particulière- ment lors d’un agrafage dans une matière dure ou dense. (Fig. S)
•Saisir l’outil fermement pour en garder la maîtrise tout en lui permettant de reculer hors de la surface de travail lorsque l’attache est enfoncée. En « mode d’actionnement par contact », si le déclencheur touche la pièce de nouveau avec la détente enfoncée, l’agrafeuse se déclenchera.
•Le choix de la méthode de déclenchement est important. Consulter le présent mode d’emploi pour connaître les options de déclenchement.
tapa superior como un martillo. Los elementos de fijación descargados podrían hacer un camino inesperado y causar una lesión. (Fig. L)
•Siempre deje los dedos lejos del activador por contacto para evitar que se produzcan lesiones por la liberación inadvertida del impulsor. (Fig. M)
•Consulte las secciones Mantenimiento y Reparaciones para obtener información detallada sobre el mantenimiento correcto de la herramienta.
•Opere siempre la herramienta en un área limpia e iluminada. Asegúrese de que la super- ficie de trabajo esté libre de cualquier residuo y tenga cuidado de no perder el equilibrio cuando trabaje en lugares altos, como techos.
•No clave elementos de fijación cerca de los bordes del material. La pieza de trabajo puede partirse y hacer que el elemento de fijación rebote y lo lesione a usted o a un compañero de trabajo. Tenga en cuenta que el elemento de fijación podría seguir la veta de la madera y sobresalir en forma inesperada del costado del material de trabajo. Coloque la punta de cincel del elemento de fijación en forma perpendicular a la veta de la madera para reducir el riesgo de lesiones. (Fig. N)
•No clave elementos de fijación sobre otros elementos de fijación, o con la herramienta en un ángulo demasiado pronunciado. Podría producirse una lesión personal a causa de un fuerte retroceso, el atascamiento o el rebote de los elementos de fijación. (Fig. O)
•Conozca el espesor del material cuando utilice la engrapadora. Un elemento de fijación sobresaliente puede provocar una lesión.
•Tenga en cuenta que cuando se utiliza la herramienta a presiones del extremo superior del margen de operación, los elementos de fijación pueden atravesar completamente los materiales delgados o muy blandos. Asegúrese de que la presión del compresor esté definida para que los elementos de fijación se introduzcan en el material y no lo traspasen completamente. (Fig. P)
•Mantenga las manos y las partes del cuerpo fuera del área de trabajo inmediata. Sostenga la pieza de trabajo con abrazaderas cuando sea necesario para mantener las manos y el cuerpo alejados de daños potenciales. Asegúrese de que la pieza de trabajo esté bien sujetada antes de presionar la engrapadora contra el material. El activador por contacto puede hacer que el mate- rial de trabajo se mueva en forma inesperada. (Fig. Q)
•No utilice la herramienta en presencia de polvo, gases o vapores inflamables. La her- ramienta puede producir una chispa que le pren- da fuego a los gases y provoque un incendio. Clavar un elemento de fijación sobre otro tam- bién puede producir una chispa. (Fig. R)
•Mantenga la cara y las partes del cuerpo ale- jados de la parte posterior de la tapa de la her- ramienta cuando trabaje en áreas restringi- das. Un retroceso repentino puede ocasionar un impacto al cuerpo, especialmente al clavar en materiales duros o densos. (Fig. S)
![]() WARNING: Use of this product will expose you to chemicals known to the State of California to cause cancer, birth defects and other reproductive harm. Avoid inhaling vapors and dust,
WARNING: Use of this product will expose you to chemicals known to the State of California to cause cancer, birth defects and other reproductive harm. Avoid inhaling vapors and dust,
and wash hands after using.
•Avoid prolonged contact with dust from power sanding, sawing, grinding, drilling, and other construction activities. Wear protective clothing and wash exposed areas with soap and water. Allowing dust to get into your mouth, eyes, or lay on the skin may promote absorption of harmful chemicals.
![]() WARNING: Use of this tool can generate and/or disburse dust, which may cause serious and permanent respiratory or other injury. Always use NIOSH/OSHA approved respiratory pro- tection appropriate for the dust exposure. Direct particles away from face and body.
WARNING: Use of this tool can generate and/or disburse dust, which may cause serious and permanent respiratory or other injury. Always use NIOSH/OSHA approved respiratory pro- tection appropriate for the dust exposure. Direct particles away from face and body.
![]() WARNING: ALWAYS USE SAFETY GLASSES. Everyday eyeglasses are NOT safety glasses. Also use face or dust mask if operation is dusty. ALWAYS WEAR CERTIFIED SAFETY EQUIPMENT:
WARNING: ALWAYS USE SAFETY GLASSES. Everyday eyeglasses are NOT safety glasses. Also use face or dust mask if operation is dusty. ALWAYS WEAR CERTIFIED SAFETY EQUIPMENT:
•ANSI Z87.1 eye protection (CAN/CSA Z94.3),
•ANSI S12.6 (S3.19) hearing protection,
•NIOSH/OSHA/MSHA respiratory protection.
BEFORE OPERATING THIS TOOL, CAREFULLY READ AND UNDERSTAND ALL INSTRUCTIONS IN THE “IMPORTANT SAFETY INSTRUCTIONS” SECTION.
ASSEMBLY
![]() WARNING: Lock off trigger, disconnect air line from tool and remove fasteners from maga- zine before making adjustments or personal injury may result.
WARNING: Lock off trigger, disconnect air line from tool and remove fasteners from maga- zine before making adjustments or personal injury may result.
Using the Lock-off (Fig. 5)
![]() WARNING: Always wear eye and ear protection when operating tool.
WARNING: Always wear eye and ear protection when operating tool.
Each DEWALT stapler is equipped with a trigger
Trigger
![]() WARNING: Keep fingers AWAY from trigger when not driving fasteners to avoid accidental firing. Never carry tool with finger on trigger. In “Contact Bump Actuation Mode” tool will fire a fastener if safety is bumped while trigger is depressed.
WARNING: Keep fingers AWAY from trigger when not driving fasteners to avoid accidental firing. Never carry tool with finger on trigger. In “Contact Bump Actuation Mode” tool will fire a fastener if safety is bumped while trigger is depressed.
Examine your tool to determine which trigger is installed. However, the alternate trigger is included with the tool. For a replacement trigger contact your authorized service center or call
The gray trigger with ![]() imprinted on the side, (Cat.# D510022 kit) is the single sequential action trigger and causes the tool to operate in this mode.
imprinted on the side, (Cat.# D510022 kit) is the single sequential action trigger and causes the tool to operate in this mode.
The black trigger with ![]() imprinted on the side, (Cat.# D510020 kit) is the bump action trig- ger and permits the tool to be actuated in this manner.
imprinted on the side, (Cat.# D510020 kit) is the bump action trig- ger and permits the tool to be actuated in this manner.
For defining the use of the sequential action trigger and bump action trigger, see the Actuating Tool section of this manual.
TRIGGER REMOVAL (FIG. 2)
1.Lock off trigger.
2.Remove air from the tool.
3.Remove rubber grommet (A) from end of dowel pin (B).
4.Remove dowel pin.
5.Remove trigger assembly from trigger cavity under the handle of the tool housing.
TRIGGER INSTALLATION (FIG. 3)
1.Select either the sequential or bump trigger to be installed on the tool. Both triggers are included in the tool packaging.
2.Insert the trigger kit into trigger cavity.
3.Ensure that trigger spring (C) is placed around the trigger valve stem (E).
4.Align the holes of the trigger with the housing holes (D), then insert the dowel pin (B) through the entire assembly as shown.
5.Push the rubber grommet (A) onto the end of the dowel rod as shown.
OPERATION
![]() WARNING: Read the section titled “Important Safety Instructions for Pneumatic Tools” at the beginning of this manual. Always wear eye and ear protection when operating this tool. Keep the stapler pointed away from yourself and others. For safe operation, complete the following procedures and checks before each use of the stapler.
WARNING: Read the section titled “Important Safety Instructions for Pneumatic Tools” at the beginning of this manual. Always wear eye and ear protection when operating this tool. Keep the stapler pointed away from yourself and others. For safe operation, complete the following procedures and checks before each use of the stapler.
1.Before you use the stapler, be sure that the compressor tanks have been properly drained.
2.Lubricate the tool following these directions:
a.Use DEWALT pneumatic tool oil or a
b.Use a
c.If a lubricator is not available, add 5 to 10 drops of oil in the air fitting a least twice a day or every 4 hours of use.
3.Wear proper eye, hearing and respiratory protection.
4.Lock the pusher in the back position and remove all fasteners from the magazine.
5.Check for smooth and proper operation of contact trip and pusher assemblies. Do not use tool if either assembly is not functioning properly. NEVER use a tool that has the contact trip restrained in the up position.
6.Check air supply. Ensure that air pressure does not exceed recommended operating limits; 70 to 120 psi, (4.9 to 8.3 bar, 5 to 8.5 kg/cm2).
7.Connect air hose.
8.Check for audible leaks around valves and gaskets. Never use a tool that leaks or has damaged parts.
![]() WARNING: To reduce the risk of personal injury, disconnect tool from air supply before performing maintenance, clearing a jammed fastener, leaving work area, moving tool to another location or handing the tool to another person.
WARNING: To reduce the risk of personal injury, disconnect tool from air supply before performing maintenance, clearing a jammed fastener, leaving work area, moving tool to another location or handing the tool to another person.
Loading the Tool
![]() WARNING: Keep the tool pointed away from yourself and others. Serious personal injury may result.
WARNING: Keep the tool pointed away from yourself and others. Serious personal injury may result.
![]() WARNING: Never load fasteners with the contact trip or trigger activated. Personal injury may result.
WARNING: Never load fasteners with the contact trip or trigger activated. Personal injury may result.
1.Lock off trigger.
2.Disconnect air supply from tool.
3.Push the latch release then slide magazine to open chamber.
4.Position stapler on a stable surface so contact trip is pointing upward and away from you.
5.Insert fasteners into the top chamber of the magazine.
6.Slide magazine until it clicks, securing the magazine.