and will prevent serious damage to the battery pack.
2.The charger and battery pack may become warm to touch while charging. This is a normal condition, and does not indicate a problem.
3.If the battery pack does not charge properly — (1) Check current at receptacle by plugging in a lamp or other appliance, (2) Check to see if receptacle is connected to a light switch which turns power off when you turn out the lights. (3) Move charger and battery pack to a location where the surrounding air temperature is approximately 65°F - 75°F (18°- 24°C).
(4)If charging problems persist, take or send the tool, battery pack and charger to your local service center.
4.The battery pack should be recharged when it fails to produce sufficient power on jobs which were easily done previously. DO NOT CONTINUE to use under these conditions. Follow the charging procedure. You may also charge a partially used pack whenever you desire with no adverse affect on the battery pack.
5.Under certain conditions, with the charger plugged into the power supply, the exposed charging contacts inside the charger can be shorted by foreign material. Foreign materials of a conductive nature such as, but not limited to, steel wool, aluminum foil, or any buildup of metallic particles should be kept away from charger cavities. Always unplug the charg- er from the power supply when there is no battery pack in the cavity. Unplug charger before attempting to clean.
6.Do not freeze or immerse charger in water or any other liquid.
![]() WARNING: Don't allow any liquid to get inside charger. Electric shock may result. To facilitate the cooling of the battery pack after use, avoid placing the charger or battery pack in a warm environment such as in a metal shed, or an uninsulated trailer.
WARNING: Don't allow any liquid to get inside charger. Electric shock may result. To facilitate the cooling of the battery pack after use, avoid placing the charger or battery pack in a warm environment such as in a metal shed, or an uninsulated trailer.
![]() CAUTION: Never attempt to open the battery pack for any reason. If the plastic hous- ing of the battery pack breaks or cracks, return to a service center for recycling.
CAUTION: Never attempt to open the battery pack for any reason. If the plastic hous- ing of the battery pack breaks or cracks, return to a service center for recycling.
IMPORTANT: This product is not user servicable. There are no user servicable parts inside the charger. Servicing at an authorized service center is required to avoid damage to static sensitive internal components.
READ ALL OF THE INSTRUCTIONS IN THE BATTERY CHARGER MANUAL BEFORE ATTEMPTING TO CHARGE THE BATTERY PACK FOR YOUR TOOL.
Always use correct battery pack (pack supplied with tool or replacement pack exactly like it.) Never install any other battery pack. It will ruin your tool and may create a hazardous condi- tion.
Additional Safety Rules for Rotary Hammers
•Hold tool by insulated gripping surfaces when performing an operation where the cutting tool may contact hidden wiring or its own cord. Contact with a “live” wire will make exposed metal parts of the tool “live” and shock the operator.
•Wear safety goggles or other eye protection. Hammering and drilling operations cause chips to fly. Flying particles can cause permanent eye damage.
•Wear ear protectors when hammering for extented periods of time. Temporary hear- ing loss or serious ear drum damage may result from high sound levels generated by ham- mer drilling.
•Always use the side handle supplied with the tool. Keep a firm grip on the tool at all times. Do not attempt to operate this tool without holding it with both hands.
•Do not overreach while operating the tool. Maintain a balanced working stance at all times. When necessary, use only properly postioned, safe, platforms and scaffolding.
WORK SAFE.
•Hammer bits and tools get hot during operation. Wear gloves when touching them.
•![]() caution:DO NOT TOUCH ANY METAL PARTS OF THE TOOL when drilling or driving into walls, floors or wherever live electrical wires may be encountered! Hold the tool only by insulated grasping surfaces to prevent electric shock if you drill or drive into a live wire.
caution:DO NOT TOUCH ANY METAL PARTS OF THE TOOL when drilling or driving into walls, floors or wherever live electrical wires may be encountered! Hold the tool only by insulated grasping surfaces to prevent electric shock if you drill or drive into a live wire.
Motor
Your DEWALT tool is powered by a
Voltage decrease of more than 10% will cause loss of power and overheating. All DEWALT tools are factory tested; if this tool does not operate, check your battery pack.
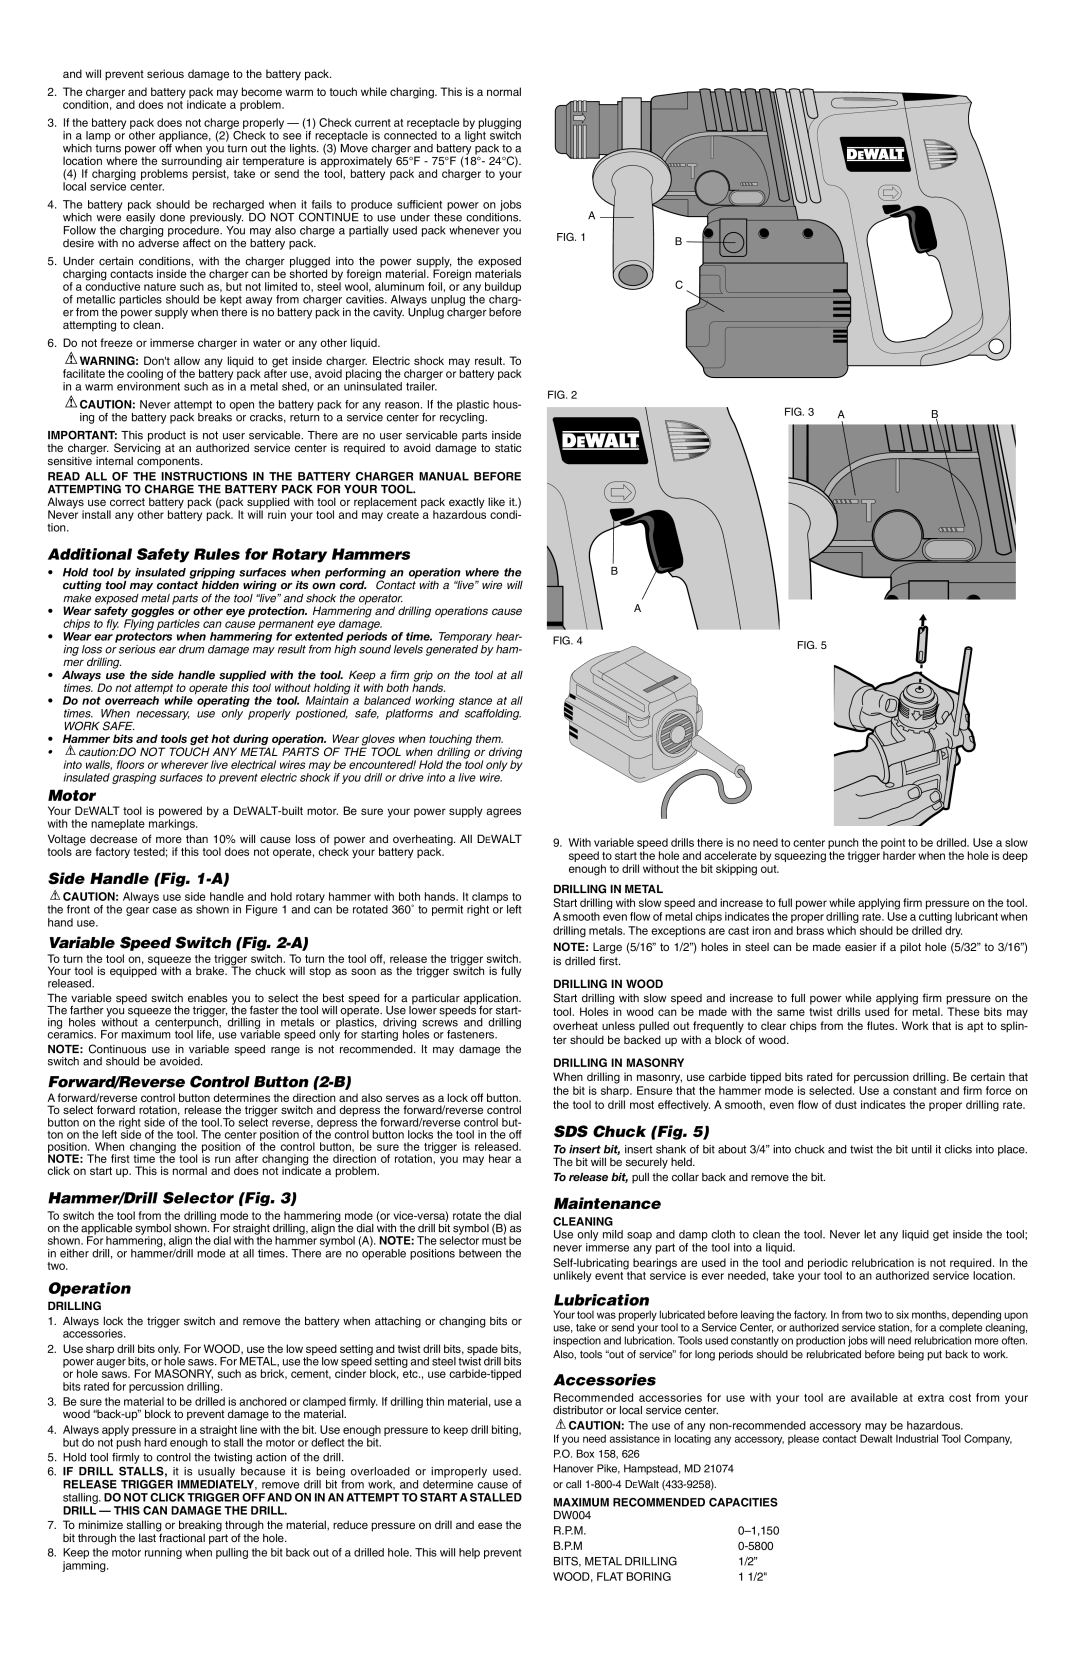
Side Handle (Fig. 1-A)
![]() CAUTION: Always use side handle and hold rotary hammer with both hands. It clamps to the front of the gear case as shown in Figure 1 and can be rotated 360˚ to permit right or left hand use.
CAUTION: Always use side handle and hold rotary hammer with both hands. It clamps to the front of the gear case as shown in Figure 1 and can be rotated 360˚ to permit right or left hand use.
Variable Speed Switch (Fig. 2-A)
To turn the tool on, squeeze the trigger switch. To turn the tool off, release the trigger switch. Your tool is equipped with a brake. The chuck will stop as soon as the trigger switch is fully released.
The variable speed switch enables you to select the best speed for a particular application. The farther you squeeze the trigger, the faster the tool will operate. Use lower speeds for start- ing holes without a centerpunch, drilling in metals or plastics, driving screws and drilling ceramics. For maximum tool life, use variable speed only for starting holes or fasteners.
NOTE: Continuous use in variable speed range is not recommended. It may damage the switch and should be avoided.
Forward/Reverse Control Button (2-B)
A forward/reverse control button determines the direction and also serves as a lock off button. To select forward rotation, release the trigger switch and depress the forward/reverse control button on the right side of the tool.To select reverse, depress the forward/reverse control but- ton on the left side of the tool. The center position of the control button locks the tool in the off position. When changing the position of the control button, be sure the trigger is released. NOTE: The first time the tool is run after changing the direction of rotation, you may hear a click on start up. This is normal and does not indicate a problem.
Hammer/Drill Selector (Fig. 3)
To switch the tool from the drilling mode to the hammering mode (or
Operation
DRILLING
1.Always lock the trigger switch and remove the battery when attaching or changing bits or accessories.
2.Use sharp drill bits only. For WOOD, use the low speed setting and twist drill bits, spade bits, power auger bits, or hole saws. For METAL, use the low speed setting and steel twist drill bits or hole saws. For MASONRY, such as brick, cement, cinder block, etc., use
3.Be sure the material to be drilled is anchored or clamped firmly. If drilling thin material, use a wood
4.Always apply pressure in a straight line with the bit. Use enough pressure to keep drill biting, but do not push hard enough to stall the motor or deflect the bit.
5.Hold tool firmly to control the twisting action of the drill.
6.IF DRILL STALLS, it is usually because it is being overloaded or improperly used. RELEASE TRIGGER IMMEDIATELY, remove drill bit from work, and determine cause of stalling. DO NOT CLICK TRIGGER OFF AND ON IN AN ATTEMPT TO START A STALLED
DRILL — THIS CAN DAMAGE THE DRILL.
7.To minimize stalling or breaking through the material, reduce pressure on drill and ease the bit through the last fractional part of the hole.
8.Keep the motor running when pulling the bit back out of a drilled hole. This will help prevent jamming.
A
FIG. 1 | B |
| |
| C |
FIG. 2
FIG. 3 | A | B |
| B |
| A |
FIG. 4 | FIG. 5 |
|
9.With variable speed drills there is no need to center punch the point to be drilled. Use a slow speed to start the hole and accelerate by squeezing the trigger harder when the hole is deep enough to drill without the bit skipping out.
DRILLING IN METAL
Start drilling with slow speed and increase to full power while applying firm pressure on the tool. A smooth even flow of metal chips indicates the proper drilling rate. Use a cutting lubricant when drilling metals. The exceptions are cast iron and brass which should be drilled dry.
NOTE: Large (5/16” to 1/2”) holes in steel can be made easier if a pilot hole (5/32” to 3/16”) is drilled first.
DRILLING IN WOOD
Start drilling with slow speed and increase to full power while applying firm pressure on the tool. Holes in wood can be made with the same twist drills used for metal. These bits may overheat unless pulled out frequently to clear chips from the flutes. Work that is apt to splin- ter should be backed up with a block of wood.
DRILLING IN MASONRY
When drilling in masonry, use carbide tipped bits rated for percussion drilling. Be certain that the bit is sharp. Ensure that the hammer mode is selected. Use a constant and firm force on the tool to drill most effectively. A smooth, even flow of dust indicates the proper drilling rate.
SDS Chuck (Fig. 5)
To insert bit, insert shank of bit about 3/4” into chuck and twist the bit until it clicks into place. The bit will be securely held.
To release bit, pull the collar back and remove the bit.
Maintenance
CLEANING
Use only mild soap and damp cloth to clean the tool. Never let any liquid get inside the tool; never immerse any part of the tool into a liquid.
Lubrication
Your tool was properly lubricated before leaving the factory. In from two to six months, depending upon use, take or send your tool to a Service Center, or authorized service station, for a complete cleaning, inspection and lubrication. Tools used constantly on production jobs will need relubrication more often. Also, tools “out of service” for long periods should be relubricated before being put back to work.
Accessories
Recommended accessories for use with your tool are available at extra cost from your distributor or local service center.
![]() CAUTION: The use of any
CAUTION: The use of any
If you need assistance in locating any accessory, please contact Dewalt Industrial Tool Company, P.O. Box 158, 626
Hanover Pike, Hampstead, MD 21074 or call
MAXIMUM RECOMMENDED CAPACITIES
DW004
R.P.M. | |
B.P.M | |
BITS, METAL DRILLING | 1/2” |
WOOD, FLAT BORING | 1 1/2" |