withdrawing the blade from the material. When starting each new cut, repeat as above. Never tie the blade guard in a raised position.
KICKBACK
When the saw blade becomes pinched or twisted in the cut, kickback can occur. The saw is thrust rapidly back toward the operator. When the blade is pinched or bound tightly by the kerf closing down, the blade stalls and the motor reaction drives the unit backward. When the blade becomes twisted or misaligned in the cut, the teeth at the back edge of the blade can dig into the top surface of the wood causing the blade to climb out of the kerf and jump back toward the operator. Kickback is more likely to occur when any of the following conditions exist.
1.IMPROPER WORKPIECE SUPPORT
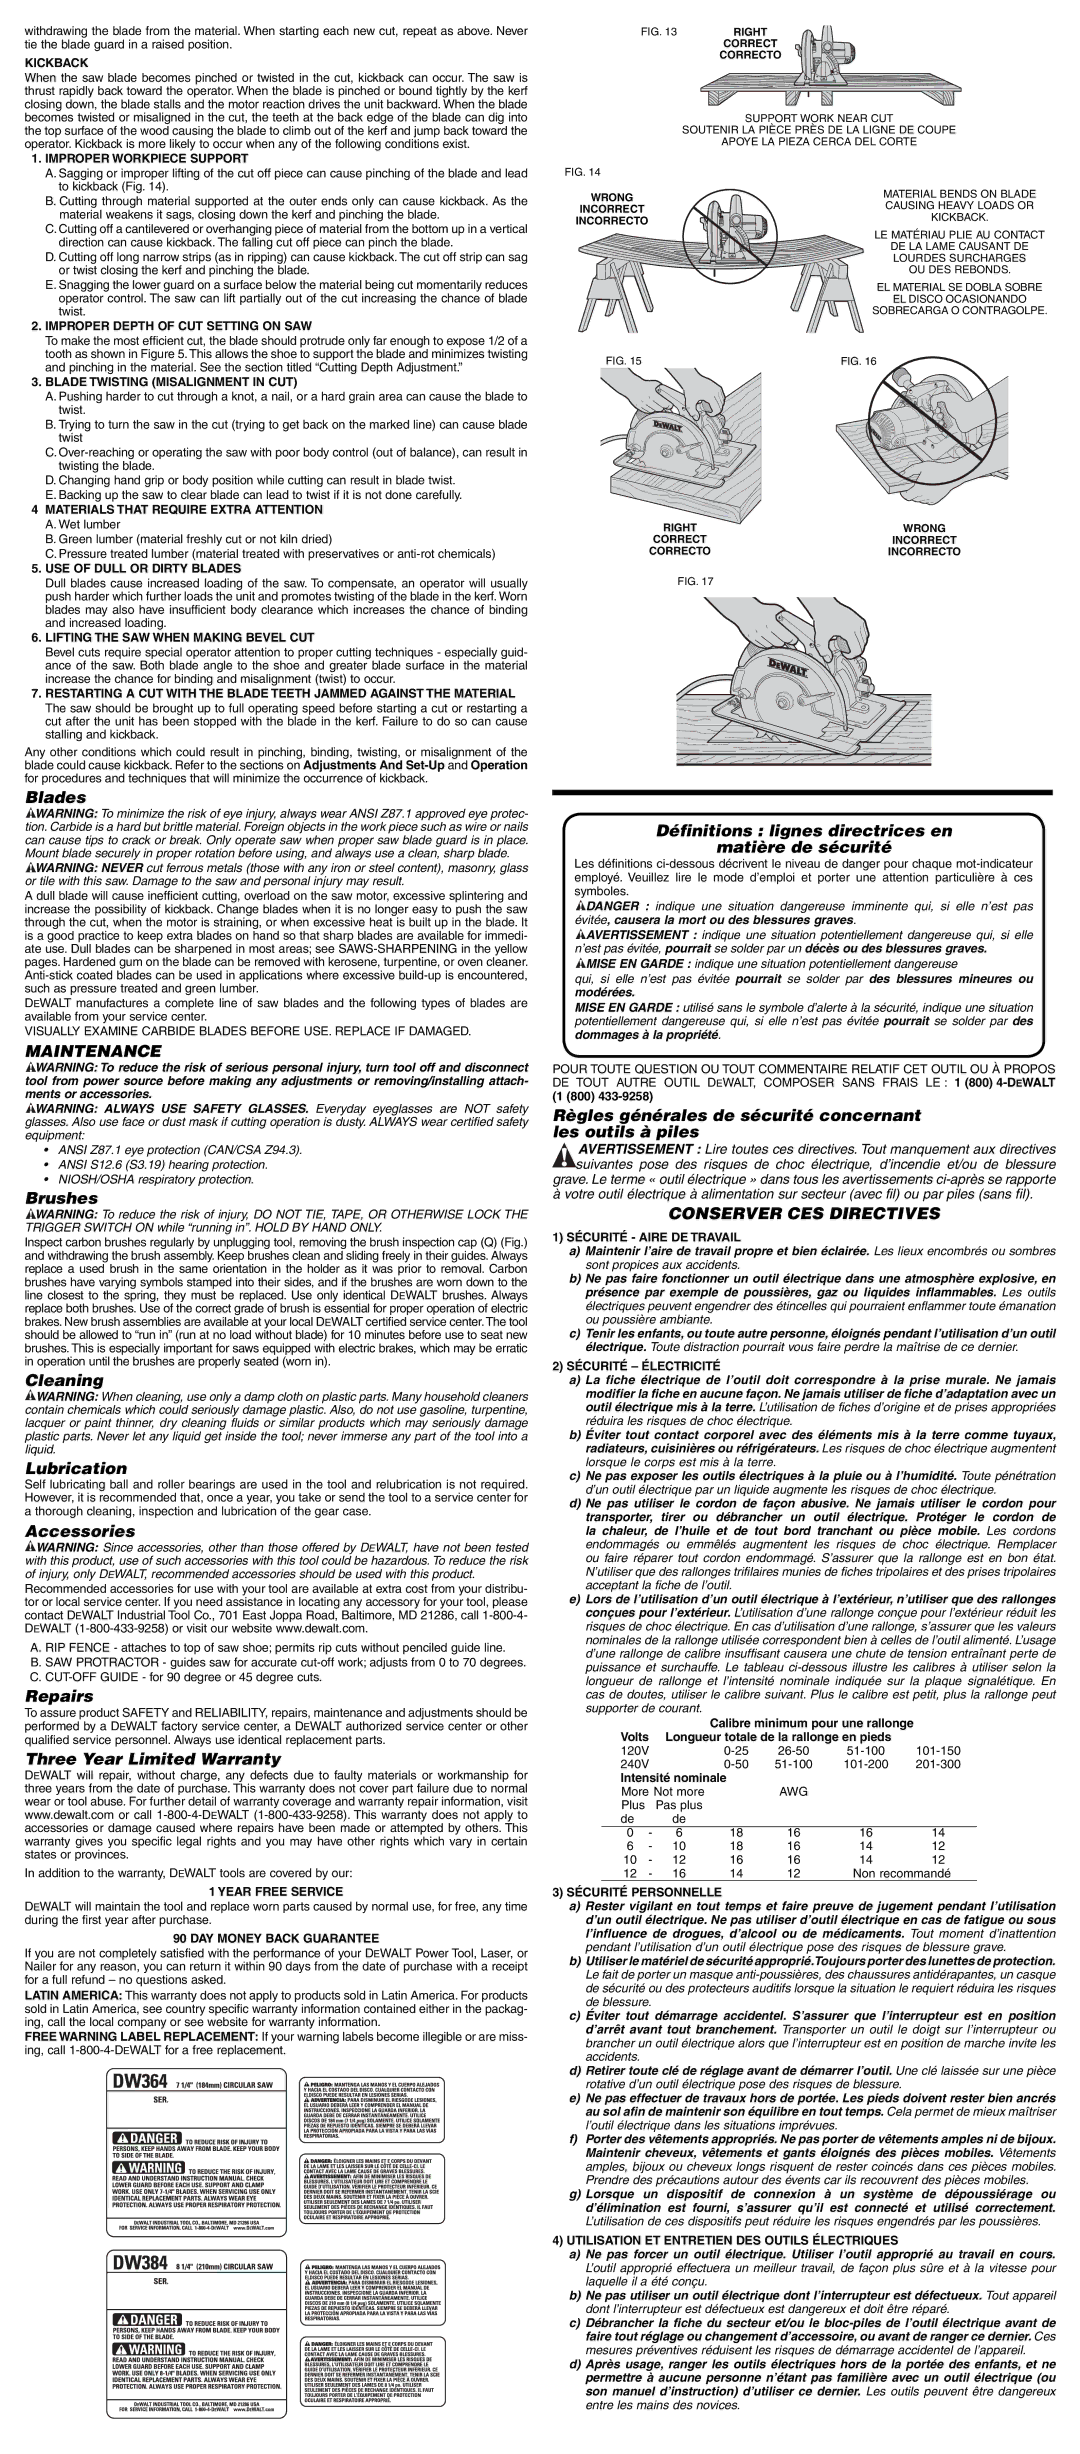
A.Sagging or improper lifting of the cut off piece can cause pinching of the blade and lead to kickback (Fig. 14).
B.Cutting through material supported at the outer ends only can cause kickback. As the material weakens it sags, closing down the kerf and pinching the blade.
C.Cutting off a cantilevered or overhanging piece of material from the bottom up in a vertical direction can cause kickback. The falling cut off piece can pinch the blade.
D.Cutting off long narrow strips (as in ripping) can cause kickback. The cut off strip can sag or twist closing the kerf and pinching the blade.
E.Snagging the lower guard on a surface below the material being cut momentarily reduces operator control. The saw can lift partially out of the cut increasing the chance of blade twist.
2.IMPROPER DEPTH OF CUT SETTING ON SAW
To make the most efficient cut, the blade should protrude only far enough to expose 1/2 of a tooth as shown in Figure 5. This allows the shoe to support the blade and minimizes twisting and pinching in the material. See the section titled “Cutting Depth Adjustment.”
3.BLADE TWISTING (MISALIGNMENT IN CUT)
A.Pushing harder to cut through a knot, a nail, or a hard grain area can cause the blade to twist.
B.Trying to turn the saw in the cut (trying to get back on the marked line) can cause blade twist
C.
D.Changing hand grip or body position while cutting can result in blade twist.
E.Backing up the saw to clear blade can lead to twist if it is not done carefully.
4MATERIALS THAT REQUIRE EXTRA ATTENTION
A.Wet lumber
B.Green lumber (material freshly cut or not kiln dried)
C.Pressure treated lumber (material treated with preservatives or
5.USE OF DULL OR DIRTY BLADES
Dull blades cause increased loading of the saw. To compensate, an operator will usually push harder which further loads the unit and promotes twisting of the blade in the kerf. Worn blades may also have insufficient body clearance which increases the chance of binding and increased loading.
6.LIFTING THE SAW WHEN MAKING BEVEL CUT
Bevel cuts require special operator attention to proper cutting techniques - especially guid- ance of the saw. Both blade angle to the shoe and greater blade surface in the material increase the chance for binding and misalignment (twist) to occur.
7.RESTARTING A CUT WITH THE BLADE TEETH JAMMED AGAINST THE MATERIAL The saw should be brought up to full operating speed before starting a cut or restarting a cut after the unit has been stopped with the blade in the kerf. Failure to do so can cause stalling and kickback.
Any other conditions which could result in pinching, binding, twisting, or misalignment of the blade could cause kickback. Refer to the sections on Adjustments And
Blades
![]() WARNING: To minimize the risk of eye injury, always wear ANSI Z87.1 approved eye protec- tion. Carbide is a hard but brittle material. Foreign objects in the work piece such as wire or nails can cause tips to crack or break. Only operate saw when proper saw blade guard is in place. Mount blade securely in proper rotation before using, and always use a clean, sharp blade.
WARNING: To minimize the risk of eye injury, always wear ANSI Z87.1 approved eye protec- tion. Carbide is a hard but brittle material. Foreign objects in the work piece such as wire or nails can cause tips to crack or break. Only operate saw when proper saw blade guard is in place. Mount blade securely in proper rotation before using, and always use a clean, sharp blade.
![]() WARNING: NEVER cut ferrous metals (those with any iron or steel content), masonry, glass or tile with this saw. Damage to the saw and personal injury may result.
WARNING: NEVER cut ferrous metals (those with any iron or steel content), masonry, glass or tile with this saw. Damage to the saw and personal injury may result.
A dull blade will cause inefficient cutting, overload on the saw motor, excessive splintering and increase the possibility of kickback. Change blades when it is no longer easy to push the saw through the cut, when the motor is straining, or when excessive heat is built up in the blade. It is a good practice to keep extra blades on hand so that sharp blades are available for immedi- ate use. Dull blades can be sharpened in most areas; see
DEWALT manufactures a complete line of saw blades and the following types of blades are available from your service center.
VISUALLY EXAMINE CARBIDE BLADES BEFORE USE. REPLACE IF DAMAGED.
MAINTENANCE
![]() WARNING: To reduce the risk of serious personal injury, turn tool off and disconnect tool from power source before making any adjustments or removing/installing attach- ments or accessories.
WARNING: To reduce the risk of serious personal injury, turn tool off and disconnect tool from power source before making any adjustments or removing/installing attach- ments or accessories.
![]() WARNING: ALWAYS USE SAFETY GLASSES. Everyday eyeglasses are NOT safety glasses. Also use face or dust mask if cutting operation is dusty. ALWAYS wear certified safety equipment:
WARNING: ALWAYS USE SAFETY GLASSES. Everyday eyeglasses are NOT safety glasses. Also use face or dust mask if cutting operation is dusty. ALWAYS wear certified safety equipment:
•ANSI Z87.1 eye protection (CAN/CSA Z94.3).
•ANSI S12.6 (S3.19) hearing protection.
•NIOSH/OSHA respiratory protection.
Brushes
![]() WARNING: To reduce the risk of injury, DO NOT TIE, TAPE, OR OTHERWISE LOCK THE TRIGGER SWITCH ON while “running in”. HOLD BY HAND ONLY.
WARNING: To reduce the risk of injury, DO NOT TIE, TAPE, OR OTHERWISE LOCK THE TRIGGER SWITCH ON while “running in”. HOLD BY HAND ONLY.
Inspect carbon brushes regularly by unplugging tool, removing the brush inspection cap (Q) (Fig.) and withdrawing the brush assembly. Keep brushes clean and sliding freely in their guides. Always replace a used brush in the same orientation in the holder as it was prior to removal. Carbon brushes have varying symbols stamped into their sides, and if the brushes are worn down to the line closest to the spring, they must be replaced. Use only identical DEWALT brushes. Always replace both brushes. Use of the correct grade of brush is essential for proper operation of electric brakes. New brush assemblies are available at your local DEWALT certified service center. The tool should be allowed to “run in” (run at no load without blade) for 10 minutes before use to seat new brushes. This is especially important for saws equipped with electric brakes, which may be erratic in operation until the brushes are properly seated (worn in).
Cleaning
![]() WARNING: When cleaning, use only a damp cloth on plastic parts. Many household cleaners contain chemicals which could seriously damage plastic. Also, do not use gasoline, turpentine, lacquer or paint thinner, dry cleaning fluids or similar products which may seriously damage plastic parts. Never let any liquid get inside the tool; never immerse any part of the tool into a liquid.
WARNING: When cleaning, use only a damp cloth on plastic parts. Many household cleaners contain chemicals which could seriously damage plastic. Also, do not use gasoline, turpentine, lacquer or paint thinner, dry cleaning fluids or similar products which may seriously damage plastic parts. Never let any liquid get inside the tool; never immerse any part of the tool into a liquid.
Lubrication
Self lubricating ball and roller bearings are used in the tool and relubrication is not required. However, it is recommended that, once a year, you take or send the tool to a service center for a thorough cleaning, inspection and lubrication of the gear case.
Accessories
![]() WARNING: Since accessories, other than those offered by DEWALT, have not been tested with this product, use of such accessories with this tool could be hazardous. To reduce the risk of injury, only DEWALT, recommended accessories should be used with this product.
WARNING: Since accessories, other than those offered by DEWALT, have not been tested with this product, use of such accessories with this tool could be hazardous. To reduce the risk of injury, only DEWALT, recommended accessories should be used with this product.
Recommended accessories for use with your tool are available at extra cost from your distribu- tor or local service center. If you need assistance in locating any accessory for your tool, please contact DEWALT Industrial Tool Co., 701 East Joppa Road, Baltimore, MD 21286, call
A. RIP FENCE - attaches to top of saw shoe; permits rip cuts without penciled guide line.
B. SAW PROTRACTOR - guides saw for accurate
Repairs
To assure product SAFETY and RELIABILITY, repairs, maintenance and adjustments should be performed by a DEWALT factory service center, a DEWALT authorized service center or other qualified service personnel. Always use identical replacement parts.
Three Year Limited Warranty
DEWALT will repair, without charge, any defects due to faulty materials or workmanship for three years from the date of purchase. This warranty does not cover part failure due to normal wear or tool abuse. For further detail of warranty coverage and warranty repair information, visit www.dewalt.com or call
In addition to the warranty, DEWALT tools are covered by our:
1 YEAR FREE SERVICE
DEWALT will maintain the tool and replace worn parts caused by normal use, for free, any time during the first year after purchase.
90 DAY MONEY BACK GUARANTEE
If you are not completely satisfied with the performance of your DEWALT Power Tool, Laser, or Nailer for any reason, you can return it within 90 days from the date of purchase with a receipt for a full refund – no questions asked.
LATIN AMERICA: This warranty does not apply to products sold in Latin America. For products sold in Latin America, see country specific warranty information contained either in the packag- ing, call the local company or see website for warranty information.
FREE WARNING LABEL REPLACEMENT: If your warning labels become illegible or are miss- ing, call
FIG. 13 | RIGHT |
| CORRECT |
| CORRECTO |
SUPPORT WORK NEAR CUT
SOUTENIR LA PIÈCE PRÈS DE LA LIGNE DE COUPE
APOYE LA PIEZA CERCA DEL CORTE
FIG. 14
WRONG | MATERIAL BENDS ON BLADE | |
CAUSING HEAVY LOADS OR | ||
INCORRECT | ||
KICKBACK. | ||
INCORRECTO | ||
| ||
| LE MATÉRIAU PLIE AU CONTACT | |
| DE LA LAME CAUSANT DE | |
| LOURDES SURCHARGES | |
| OU DES REBONDS. | |
| EL MATERIAL SE DOBLA SOBRE | |
| EL DISCO OCASIONANDO | |
| SOBRECARGA O CONTRAGOLPE. | |
FIG. 15 | FIG. 16 |
RIGHT | WRONG |
CORRECT | INCORRECT |
CORRECTO | INCORRECTO |
FIG. 17 |
|
Définitions : lignes directrices en
matière de sécurité
Les définitions
![]() DANGER : indique une situation dangereuse imminente qui, si elle n’est pas évitée, causera la mort ou des blessures graves.
DANGER : indique une situation dangereuse imminente qui, si elle n’est pas évitée, causera la mort ou des blessures graves.
![]() AVERTISSEMENT : indique une situation potentiellement dangereuse qui, si elle n’est pas évitée, pourrait se solder par un décès ou des blessures graves.
AVERTISSEMENT : indique une situation potentiellement dangereuse qui, si elle n’est pas évitée, pourrait se solder par un décès ou des blessures graves.
![]() MISE EN GARDE : indique une situation potentiellement dangereuse
MISE EN GARDE : indique une situation potentiellement dangereuse
qui, si elle n’est pas évitée pourrait se solder par des blessures mineures ou modérées.
MISE EN GARDE : utilisé sans le symbole d’alerte à la sécurité, indique une situation potentiellement dangereuse qui, si elle n’est pas évitée pourrait se solder par des dommages à la propriété.
POUR TOUTE QUESTION OU TOUT COMMENTAIRE RELATIF CET OUTIL OU À PROPOS DE TOUT AUTRE OUTIL DEWALT, COMPOSER SANS FRAIS LE : 1 (800)
Règles générales de sécurité concernant les outils à piles
AVERTISSEMENT : Lire toutes ces directives. Tout manquement aux directives ![]() suivantes pose des risques de choc électrique, d’incendie et/ou de blessure grave. Le terme « outil électrique » dans tous les avertissements
suivantes pose des risques de choc électrique, d’incendie et/ou de blessure grave. Le terme « outil électrique » dans tous les avertissements
à votre outil électrique à alimentation sur secteur (avec fil) ou par piles (sans fil).
CONSERVER CES DIRECTIVES
1)SÉCURITÉ - AIRE DE TRAVAIL
a)Maintenir l’aire de travail propre et bien éclairée. Les lieux encombrés ou sombres sont propices aux accidents.
b)Ne pas faire fonctionner un outil électrique dans une atmosphère explosive, en présence par exemple de poussières, gaz ou liquides inflammables. Les outils électriques peuvent engendrer des étincelles qui pourraient enflammer toute émanation ou poussière ambiante.
c)Tenir les enfants, ou toute autre personne, éloignés pendant l’utilisation d’un outil électrique. Toute distraction pourrait vous faire perdre la maîtrise de ce dernier.
2)SÉCURITÉ – ÉLECTRICITÉ
a)La fiche électrique de l’outil doit correspondre à la prise murale. Ne jamais modifier la fiche en aucune façon. Ne jamais utiliser de fiche d’adaptation avec un outil électrique mis à la terre. L’utilisation de fiches d’origine et de prises appropriées réduira les risques de choc électrique.
b)Éviter tout contact corporel avec des éléments mis à la terre comme tuyaux, radiateurs, cuisinières ou réfrigérateurs. Les risques de choc électrique augmentent lorsque le corps est mis à la terre.
c)Ne pas exposer les outils électriques à la pluie ou à l’humidité. Toute pénétration d’un outil électrique par un liquide augmente les risques de choc électrique.
d)Ne pas utiliser le cordon de façon abusive. Ne jamais utiliser le cordon pour transporter, tirer ou débrancher un outil électrique. Protéger le cordon de la chaleur, de l’huile et de tout bord tranchant ou pièce mobile. Les cordons endommagés ou emmêlés augmentent les risques de choc électrique. Remplacer ou faire réparer tout cordon endommagé. S’assurer que la rallonge est en bon état. N’utiliser que des rallonges trifilaires munies de fiches tripolaires et des prises tripolaires acceptant la fiche de l’outil.
e)Lors de l’utilisation d’un outil électrique à l’extérieur, n’utiliser que des rallonges conçues pour l’extérieur. L’utilisation d’une rallonge conçue pour l’extérieur réduit les risques de choc électrique. En cas d’utilisation d’une rallonge, s’assurer que les valeurs nominales de la rallonge utilisée correspondent bien à celles de l’outil alimenté. L’usage d’une rallonge de calibre insuffisant causera une chute de tension entraînant perte de puissance et surchauffe. Le tableau
|
|
| Calibre minimum pour une rallonge |
| ||
Volts | Longueur totale de la rallonge en pieds |
| ||||
120V |
| |||||
240V |
| |||||
Intensité nominale |
|
|
| |||
More Not more |
| AWG |
|
| ||
Plus |
| Pas plus |
|
|
|
|
de |
| de |
|
|
|
|
0 | - | 6 | 18 | 16 | 16 | 14 |
6 | - | 10 | 18 | 16 | 14 | 12 |
10 | - | 12 | 16 | 16 | 14 | 12 |
12 | - | 16 | 14 | 12 | Non recommandé | |
3)SÉCURITÉ PERSONNELLE
a)Rester vigilant en tout temps et faire preuve de jugement pendant l’utilisation d’un outil électrique. Ne pas utiliser d’outil électrique en cas de fatigue ou sous l’influence de drogues, d’alcool ou de médicaments. Tout moment d’inattention pendant l’utilisation d’un outil électrique pose des risques de blessure grave.
b)Utiliser le matériel de sécurité approprié.Toujours porter des lunettes de protection. Le fait de porter un masque
c)Éviter tout démarrage accidentel. S’assurer que l’interrupteur est en position d’arrêt avant tout branchement. Transporter un outil le doigt sur l’interrupteur ou brancher un outil électrique alors que l’interrupteur est en position de marche invite les accidents.
d)Retirer toute clé de réglage avant de démarrer l’outil. Une clé laissée sur une pièce rotative d’un outil électrique pose des risques de blessure.
e)Ne pas effectuer de travaux hors de portée. Les pieds doivent rester bien ancrés au sol afin de maintenir son équilibre en tout temps. Cela permet de mieux maîtriser l’outil électrique dans les situations imprévues.
f)Porter des vêtements appropriés. Ne pas porter de vêtements amples ni de bijoux. Maintenir cheveux, vêtements et gants éloignés des pièces mobiles. Vêtements amples, bijoux ou cheveux longs risquent de rester coincés dans ces pièces mobiles. Prendre des précautions autour des évents car ils recouvrent des pièces mobiles.
g)Lorsque un dispositif de connexion à un système de dépoussiérage ou d’élimination est fourni, s’assurer qu’il est connecté et utilisé correctement. L’utilisation de ces dispositifs peut réduire les risques engendrés par les poussières.
4)UTILISATION ET ENTRETIEN DES OUTILS ÉLECTRIQUES
a)Ne pas forcer un outil électrique. Utiliser l’outil approprié au travail en cours. L’outil approprié effectuera un meilleur travail, de façon plus sûre et à la vitesse pour laquelle il a été conçu.
b)Ne pas utiliser un outil électrique dont l’interrupteur est défectueux. Tout appareil dont l’interrupteur est défectueux est dangereux et doit être réparé.
c)Débrancher la fiche du secteur et/ou le
d)Après usage, ranger les outils électriques hors de la portée des enfants, et ne permettre à aucune personne n’étant pas familière avec un outil électrique (ou son manuel d’instruction) d’utiliser ce dernier. Les outils peuvent être dangereux entre les mains des novices.