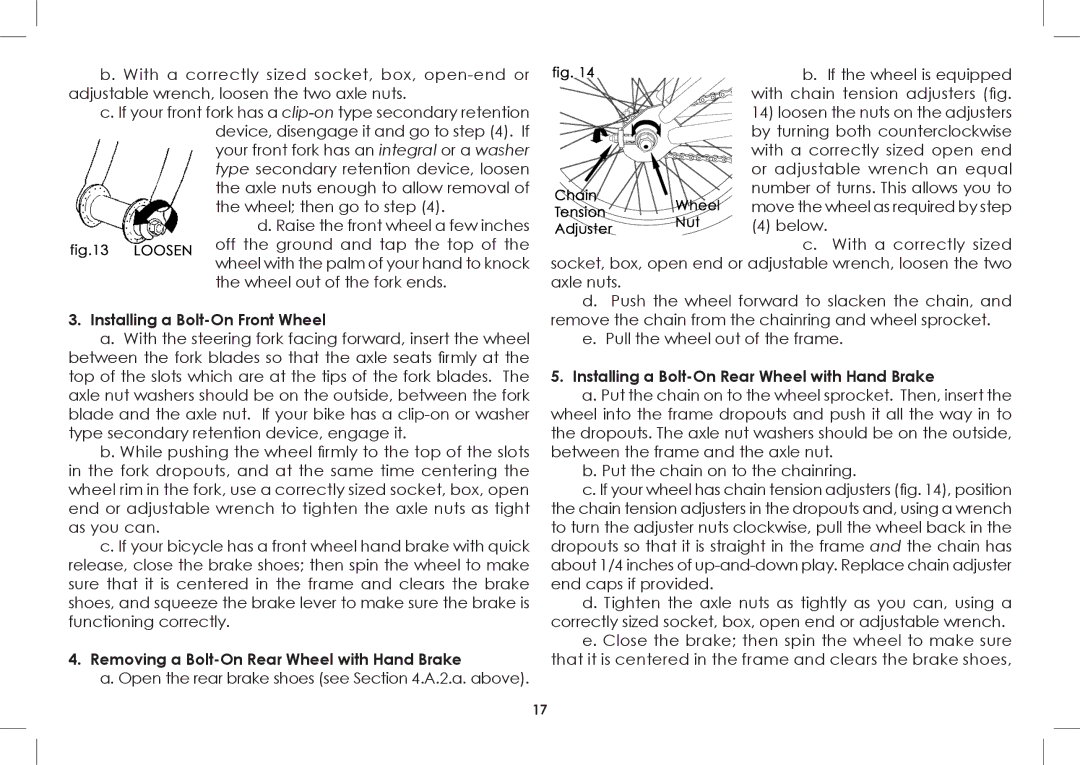
b.With a correctly sized socket, box, open-end or adjustable wrench, loosen the two axle nuts.

c.If your front fork has a clipon type secondary retention device, disengage it and go to step (4). If your front fork has an integral or a washer type secondary retention device, loosen the axle nuts enough to allow removal of the wheel; then go to step (4).

d. Raise the front wheel a few inches off the ground and tap the top of the wheel with the palm of your hand to knock the wheel out of the fork ends.

3.Installing a BoltOn Front Wheel

a.With the steering fork facing forward, insert the wheel between the fork blades so that the axle seats firmly at the top of the slots which are at the tips of the fork blades. The axle nut washers should be on the outside, between the fork blade and the axle nut. If your bike has a clipon or washer type secondary retention device, engage it.

b.While pushing the wheel firmly to the top of the slots in the fork dropouts, and at the same time centering the wheel rim in the fork, use a correctly sized socket, box, open end or adjustable wrench to tighten the axle nuts as tight as you can.

c.If your bicycle has a front wheel hand brake with quick release, close the brake shoes; then spin the wheel to make sure that it is centered in the frame and clears the brake shoes, and squeeze the brake lever to make sure the brake is functioning correctly.

4.Removing a BoltOn Rear Wheel with Hand Brake

a.Open the rear brake shoes (see Section 4.A.2.a. above).

b. If the wheel is equipped with chain tension adjusters (fig.

14)loosen the nuts on the adjusters by turning both counterclockwise with a correctly sized open end or adjustable wrench an equal number of turns. This allows you to move the wheel as required by step

(4) below.

c. With a correctly sized socket, box, open end or adjustable wrench, loosen the two axle nuts.

d.Push the wheel forward to slacken the chain, and remove the chain from the chainring and wheel sprocket.

e.Pull the wheel out of the frame.

5.Installing a BoltOn Rear Wheel with Hand Brake

a.Put the chain on to the wheel sprocket. Then, insert the wheel into the frame dropouts and push it all the way in to the dropouts. The axle nut washers should be on the outside, between the frame and the axle nut.

b.Put the chain on to the chainring.

c.If your wheel has chain tension adjusters (fig. 14), position the chain tension adjusters in the dropouts and, using a wrench to turn the adjuster nuts clockwise, pull the wheel back in the dropouts so that it is straight in the frame and the chain has about 1/4 inches of up-and-down play. Replace chain adjuster end caps if provided.

d.Tighten the axle nuts as tightly as you can, using a correctly sized socket, box, open end or adjustable wrench.

e.Close the brake; then spin the wheel to make sure that it is centered in the frame and clears the brake shoes,

17

Page 17
Image 17
Diamondback 2008-2005 manual Installing a Bolt‑On Front Wheel, Removing a Bolt‑On Rear Wheel with Hand Brake

2008-2005 specifications

The Diamondback 2008-2005 models highlight a commitment to innovation and performance in the world of bicycles. A fusion of advanced technology and user-friendly features, these bikes cater to a range of riding styles and preferences, making them a popular choice among cycling enthusiasts.

One of the standout features of the Diamondback series during this period is its focus on frame design. The bikes are constructed with high-quality aluminum and steel, ensuring durability while keeping the weight manageable for various terrains. The geometry of these frames is engineered for optimal performance, offering a balanced ride that's both responsive and stable, whether on the road or rugged trails.

In terms of technology, Diamondback has integrated cutting-edge components into their bicycles. The series includes a variety of gear options, featuring reliable Shimano and SRAM components that enhance the shifting experience. This ensures that riders can easily tackle inclines or accelerate speed on flat terrains without missing a beat. Additionally, the inclusion of hydraulic disc brakes provides superior stopping power, enhancing safety and control in all conditions, especially during wet weather.

The suspension systems featured in Diamondback bikes from 2008-2005 are another highlight. The models often utilize a combination of front suspension forks, and in some cases, full suspension setups, that effectively absorb shocks and bumps from rough terrain. This technology allows riders to maintain traction and comfort, making rides smoother and more enjoyable.

Tire selection and design also play a critical role in the performance of these bikes. Diamondback bikes are fitted with high-quality tires that provide excellent grip and traction, allowing cyclists to navigate through various surfaces, from muddy paths to city streets. The tread patterns are optimized for stability, ensuring that riders can confidently tackle corners and uneven ground.

Finally, a variety of model options in the Diamondback 2008-2005 range ensure that cyclists of all skill levels can find a suitable bike. Whether looking for a lightweight road bike for speed, a versatile hybrid for commuting, or a rugged mountain bike for adventurous trails, Diamondback has catered to diverse needs, ensuring a bike for every rider.

In conclusion, the Diamondback 2008-2005 models stand out for their superior construction, advanced technology, and thoughtful design. These bicycles represent a harmonious blend of performance, comfort, and versatility, making them a reliable choice for anyone passionate about cycling.