TROUBLESHOOTING GUIDE (cont’d)

TROUBLESHOOTING GUIDE (cont’d)


Problem


Possible Cause


Service Instructions

7. Water leaking from rear of

a. Worn or defective vacuum breaker.

a. Remove vacuum breaker cover


toilet bowl.


and look into top of vacuum


breaker. Flush toilet. If water leaks


during flush, vacuum breaker


needs to be replaced.


b. Loose vacuum breaker.

b. Secure vacuum breaker connection.


c.

Cracked or defective toilet bowl.

c.

Replace toilet bowl.


8.

Water is leaking from the

a. Clamp ring my be loose.

a. Remove plastic base cover (on


base/toilet connection.


applicable models) and tighten the


clamp ring.


b. Ball seals may be worn or defective.

b. Replace ball seals.


9.

Vacuum pump running too

a. Water leaks out of bowl between

a. Leave small amount of water in


often between flushes.


flush ball and ball seal.


bowl. If water is sucked from bowl,


(See Vacuum Tester


see problems 1 and 2.


Information on page 6.)

b. Vacuum line leak.

b. Tighten all connections at toilet,


vacuum generator or vacuum


holding tank (including hose


clamps and threaded spin nuts). If


leaks persists, contact SeaLand


Product Customer Service.


10.Vacuum pump will not

a. A vacuum leak exists.

a. See problem 8b.


shut off.

b. Insufficient vacuum (pump creates

b. Isolate pump and use vacuum


less than 10 inches Hg).


gauge to check vacuum levels.


Could be a plugged discharge line


or worn duckbill valves.


c. Faulty vacuum switch (pump

c. Replace vacuum switch.


creates more than 10 inches Hg).

d. See wiring diagram to check for


d. Improper wiring.


proper wiring.


e. Bellows not pumping.

e. Tighten set screw in eccentric to


motor shaft. Otherwise, check for


damage to bellows and motor


shaft. Replace if necessary.


11. Vacuum pump will not run.

a. No electrical power.

a. Check input power, circuit breaker


and fuse.


b. Loose or broken electrical wiring.

b. Tighten or reconnect wires at


vacuum pump and tank, vacuum


generator, or vacuum holding tank.


c.

Improper electrical connections.

c.

Be sure wires at vacuum switch


are connected to “B” terminals.


d. Faulty vacuum switch.

d. Check vacuum switch. Short across


“B” terminals with jumper wire.


e. Faulty motor.

e. Replace motor.


f. Shut-down relay prevents pumping.

f.

Empty the holding tank.


12.Vacuum pump is running too

a. Gear motor is worn or defective.

a. Check motor and replace if


slow, overheating, blowing


necessary.


fuses or circuit breaker.

b. Plugged vent line or vent filter.

b. Disassemble and clean out vent


line. Replace vent filter if


necessary.


c.

Blockage in discharge line.

c.

Disassemble and clean discharge


line. Be certain that in-line valves


(duckbill valves) and seacock are


in proper position.


d. Improper wire size.

d. Wire size too small. Check


electrical diagram for proper wire


size for voltage of pump used.


e. Improper voltage.

e. Check input power for low voltage.


f. Vacuum pump bellows clogged

f.

Remove and clean bellows


with tissue.


assembly. (When flushing toilet,


use of more water may alleviate


this problem.)


8

Page 8
Image 8
Dometic SANITATION SYSTEM owner manual 
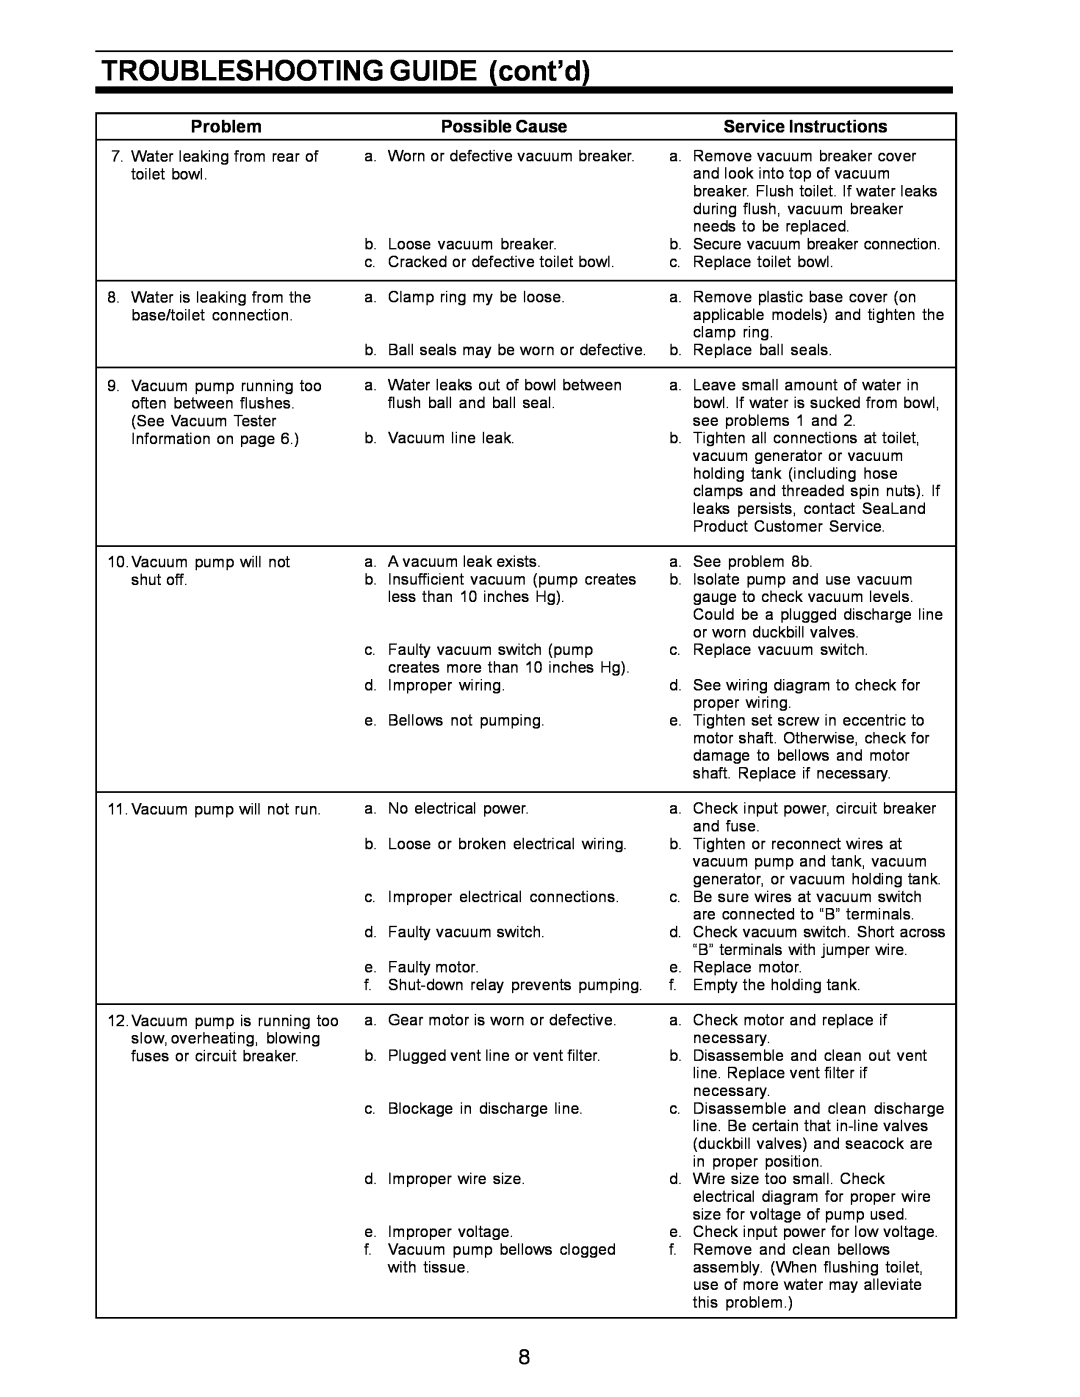
TROUBLESHOOTING GUIDE cont’d, Problem, Possible Cause, Service Instructions