OPERATIONS (continued)

Input Menu

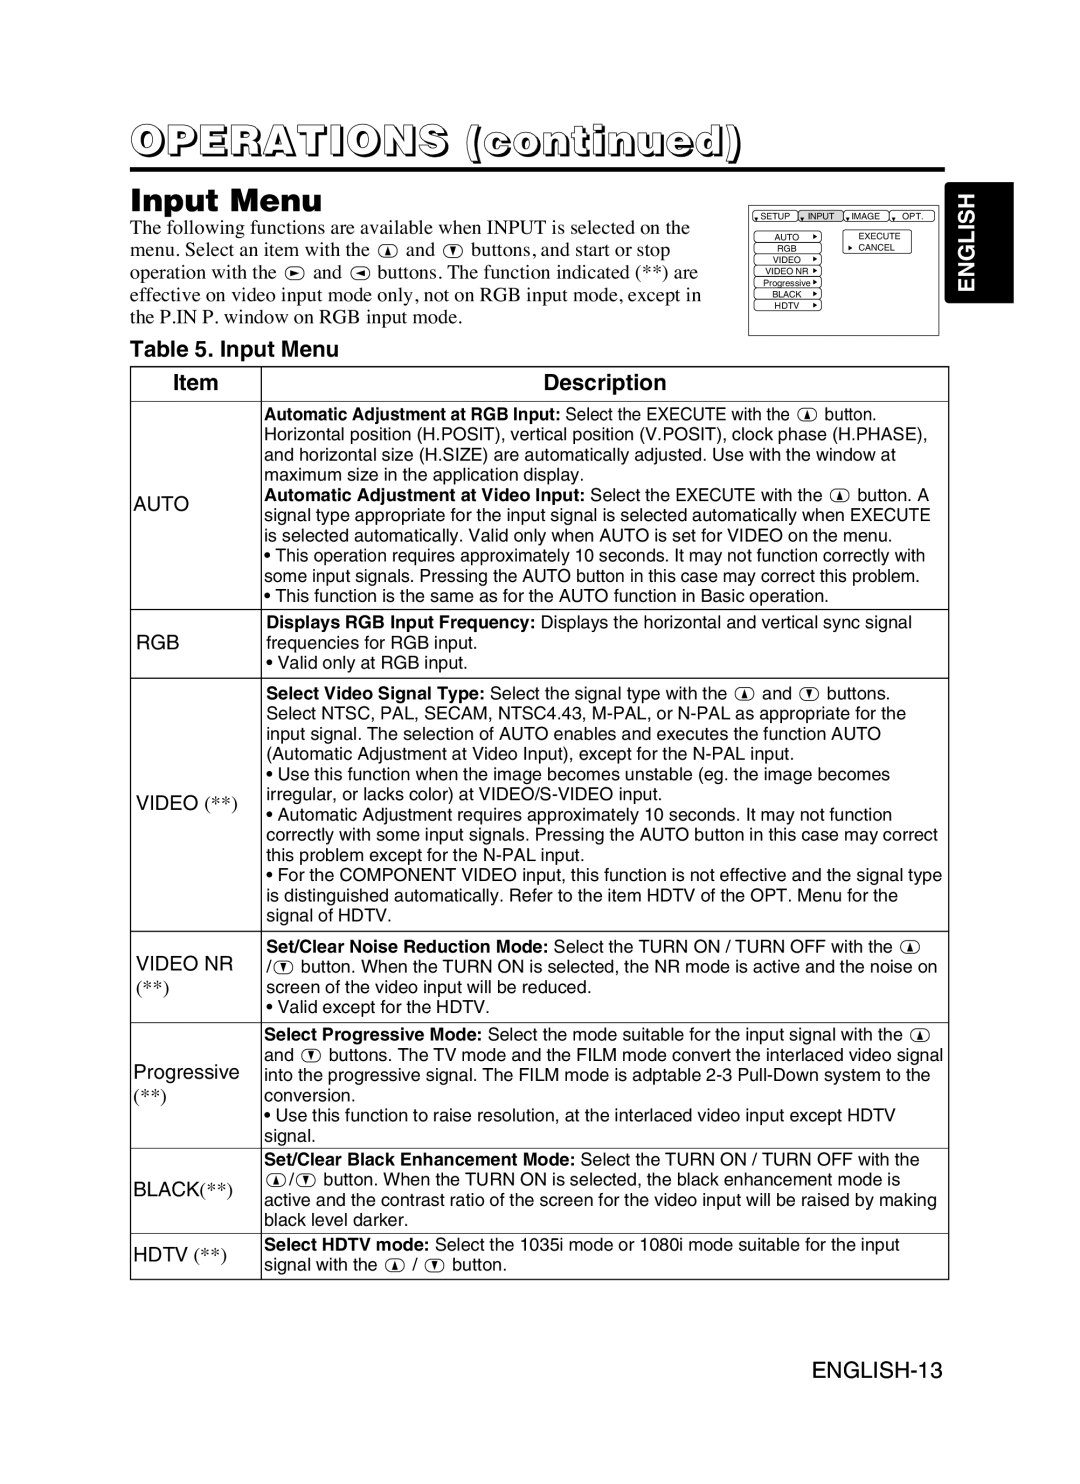
The following functions are available when INPUT is selected on the menu. Select an item with the and buttons, and start or stop operation with the and buttons. The function indicated (**) are effective on video input mode only, not on RGB input mode, except in the P.IN P. window on RGB input mode.

SETUP

INPUT

IMAGE

OPT.

ENGLISH

AUTO


EXECUTE


RGB


CANCEL


VIDEO


VIDEO NR


Progressive


BLACK


HDTV


Table 5. Input Menu

Item

Description


Automatic Adjustment at RGB Input: Select the EXECUTE with the

button.


Horizontal position (H.POSIT), vertical position (V.POSIT), clock phase (H.PHASE),


and horizontal size (H.SIZE) are automatically adjusted. Use with the window at


maximum size in the application display.


AUTO

Automatic Adjustment at Video Input: Select the EXECUTE with the

button. A

signal type appropriate for the input signal is selected automatically when EXECUTE


is selected automatically. Valid only when AUTO is set for VIDEO on the menu.


• This operation requires approximately 10 seconds. It may not function correctly with


some input signals. Pressing the AUTO button in this case may correct this problem.


• This function is the same as for the AUTO function in Basic operation.


Displays RGB Input Frequency: Displays the horizontal and vertical sync signal

RGB

frequencies for RGB input.


• Valid only at RGB input.


Select Video Signal Type: Select the signal type with the

and

buttons.


Select NTSC, PAL, SECAM, NTSC4.43, M-PAL, or N-PAL as appropriate for the


input signal. The selection of AUTO enables and executes the function AUTO


(Automatic Adjustment at Video Input), except for the N-PAL input.


• Use this function when the image becomes unstable (eg. the image becomes

VIDEO (**)

irregular, or lacks color) at VIDEO/S-VIDEO input.


• Automatic Adjustment requires approximately 10 seconds. It may not function


correctly with some input signals. Pressing the AUTO button in this case may correct


this problem except for the N-PAL input.


• For the COMPONENT VIDEO input, this function is not effective and the signal type


is distinguished automatically. Refer to the item HDTV of the OPT. Menu for the


signal of HDTV.


Set/Clear Noise Reduction Mode: Select the TURN ON / TURN OFF with the VIDEO NR / button. When the TURN ON is selected, the NR mode is active and the noise on

(**)screen of the video input will be reduced.

• Valid except for the HDTV.

Select Progressive Mode: Select the mode suitable for the input signal with the

and buttons. The TV mode and the FILM mode convert the interlaced video signal Progressive into the progressive signal. The FILM mode is adptable 2-3 Pull-Down system to the

(**)conversion.

• Use this function to raise resolution, at the interlaced video input except HDTV signal.


Set/Clear Black Enhancement Mode: Select the TURN ON / TURN OFF with the

BLACK(**)

/ button. When the TURN ON is selected, the black enhancement mode is

active and the contrast ratio of the screen for the video input will be raised by making


black level darker.


HDTV (**)

Select HDTV mode: Select the 1035i mode or 1080i mode suitable for the input

signal with the / button.


ENGLISH-13

Page 15
Image 15
Dukane 28A8941, 8941A user manual Input Menu Description, Rgb, Black

28A8941, 8941A specifications

The Dukane 8941A and 28A8941 are advanced ultrasonic welding systems designed for high-performance applications across a variety of industries. These machines exemplify the cutting-edge technology that Dukane has to offer, making them vital tools for manufacturers seeking reliable and efficient joining solutions.

One of the standout features of the Dukane 8941A and 28A8941 is their ultrasonic technology, which utilizes high-frequency vibration to create localized heating at the interface of materials. This process allows for quick and efficient joining of thermoplastics, metals, and other materials with minimal pressure and without the need for adhesives or fasteners. The systems operate at frequencies typically around 20 kHz, which optimizes the welding process by ensuring fast cycle times and consistent, repeatable results.

The systems come equipped with an intuitive user interface, making it easy for operators to set parameters and monitor the welding process in real-time. This user-friendly design helps minimize the learning curve and allows for efficient operation in various production environments. Additionally, the machines provide comprehensive data logging capabilities, enabling users to track performance metrics and maintain quality control with ease.

Another significant characteristic of the Dukane 8941A and 28A8941 is their adaptability. These ultrasonic welding systems can be tailored to accommodate different applications, whether the need is for spot welding, staking, or cutting. The machines can also handle a wide range of material thicknesses, ensuring versatility in manufacturing processes.

In terms of durability and maintenance, Dukane has designed these systems with robust components that are engineered for prolonged use. Regular maintenance is made simple, allowing manufacturers to keep their equipment running smoothly with minimal downtime.

Moreover, the Dukane 8941A and 28A8941 incorporate advanced safety features, ensuring that operators can work without risk. The systems include emergency stop buttons, overload protection, and built-in fail-safes, prioritizing both performance and operator security.

In summary, the Dukane 8941A and 28A8941 ultrasonic welding systems represent a pinnacle of modern manufacturing technology. With their efficient ultrasonic technology, user-friendly interfaces, adaptability to various applications, durability, and integrated safety features, these machines stand out as premier solutions for businesses looking to enhance their production capabilities.