6
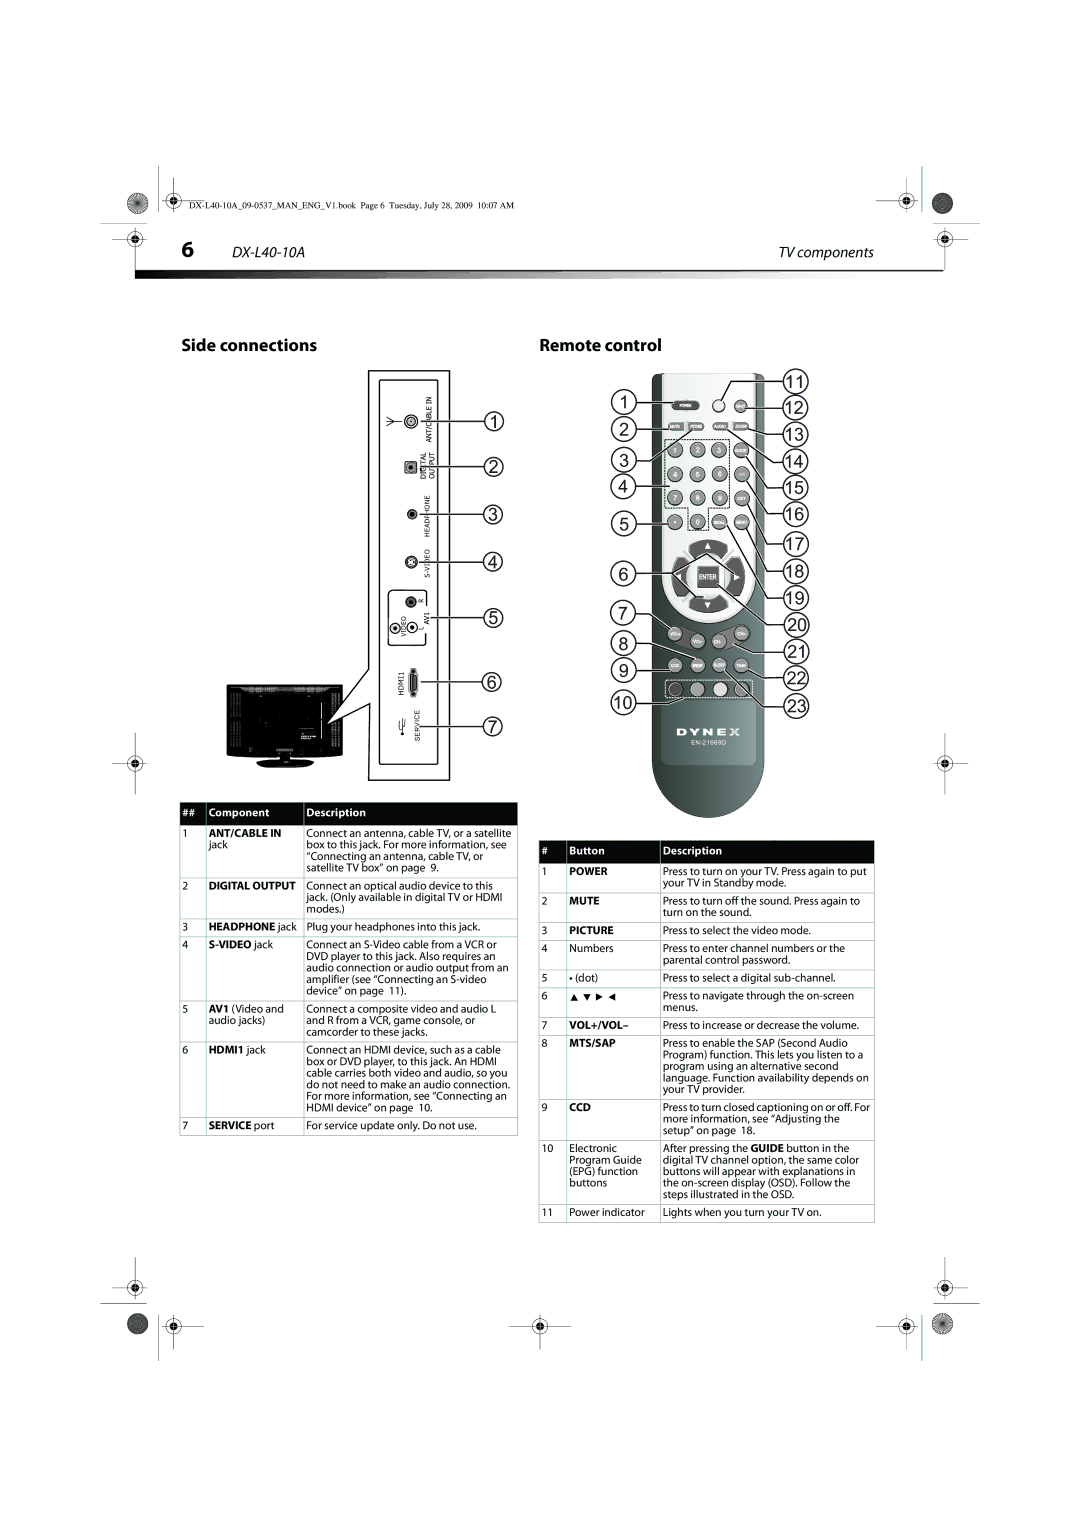
Side connections
| R |
VIDEO | L |
HDMI1![]()
E
ERVIC
S
TV components
Remote control
| 1 |
|
|
|
| 11 |
|
| POWER |
| INPUT | 12 | |
1 | 2 | MUTE | PICTURE | AUDIO | ZOOM | 13 |
|
| |||||
| 3 | 1 | 2 | 3 | GUIDE | 14 |
2 | 4 | 5 | 6 | INFO | ||
| 4 | 7 | 8 | 9 | EXIT | 15 |
|
| 16 | ||||
3 | 5 |
| 0 | RECALL | MENU | |
|
| |||||
4 |
|
|
|
|
| 17 |
6 |
| ENTER |
| 18 | ||
|
|
| ||||
5 | 7 |
|
|
|
| 19 |
|
|
|
| 20 | ||
| 8 | VOL+ |
| CH+ | ||
|
| VOL- | CH- |
| 21 | |
| 9 | CCD | MTS/SAP | SLEEP | TIME | |
| 22 | |||||
6 |
|
|
|
| ||
10 |
|
|
|
| ||
7 |
|
|
|
| 23 | |
|
|
|
| |||
|
|
|
|
| ||
|
| ## | Component | Description |
|
|
|
|
|
|
| 1 | ANT/CABLE IN | Connect an antenna, cable TV, or a satellite |
|
|
| jack | box to this jack. For more information, see |
|
|
|
| “Connecting an antenna, cable TV, or |
|
|
|
| satellite TV box” on page 9. |
|
|
|
|
|
|
| 2 | DIGITAL OUTPUT | Connect an optical audio device to this |
|
|
|
| jack. (Only available in digital TV or HDMI |
|
|
|
| modes.) |
|
|
|
|
|
|
| 3 | HEADPHONE jack | Plug your headphones into this jack. |
|
|
|
|
|
|
| 4 |
| Connect an |
|
|
|
| DVD player to this jack. Also requires an |
|
|
|
| audio connection or audio output from an |
|
|
|
| amplifier (see “Connecting an |
|
|
|
| device” on page 11). |
|
|
|
|
|
|
| 5 | AV1 (Video and | Connect a composite video and audio L |
|
|
| audio jacks) | and R from a VCR, game console, or |
|
|
|
| camcorder to these jacks. |
|
|
|
|
|
|
| 6 | HDMI1 jack | Connect an HDMI device, such as a cable |
|
|
|
| box or DVD player, to this jack. An HDMI |
|
|
|
| cable carries both video and audio, so you |
|
|
|
| do not need to make an audio connection. |
|
|
|
| For more information, see “Connecting an |
|
|
|
| HDMI device” on page 10. |
|
|
|
|
|
|
| 7 | SERVICE port | For service update only. Do not use. |
|
|
|
|
|
|
|
|
|
|
|
|
|
|
|
|
|
|
|
|
# | Button | Description |
|
|
|
1 | POWER | Press to turn on your TV. Press again to put |
|
| your TV in Standby mode. |
|
|
|
2 | MUTE | Press to turn off the sound. Press again to |
|
| turn on the sound. |
|
|
|
3 | PICTURE | Press to select the video mode. |
|
|
|
4 | Numbers | Press to enter channel numbers or the |
|
| parental control password. |
|
|
|
5 | • (dot) | Press to select a digital |
|
|
|
6 |
| Press to navigate through the |
|
| menus. |
7VOL+/VOL– Press to increase or decrease the volume.
8 | MTS/SAP | Press to enable the SAP (Second Audio |
|
| Program) function. This lets you listen to a |
|
| program using an alternative second |
|
| language. Function availability depends on |
|
| your TV provider. |
|
|
|
9 | CCD | Press to turn closed captioning on or off. For |
|
| more information, see “Adjusting the |
|
| setup” on page 18. |
|
|
|
10 | Electronic | After pressing the GUIDE button in the |
| Program Guide | digital TV channel option, the same color |
| (EPG) function | buttons will appear with explanations in |
| buttons | the |
|
| steps illustrated in the OSD. |
|
|
|
11 | Power indicator | Lights when you turn your TV on. |