4.Move hinge to the other side and reattach with the 4 screws removed in Step 2.

5.Move handle bracket to the other side and reattach with the 2 screws removed in Step 3.

6.Set the inner door assembly aside.

Reinstalling the door

1.Check for fingerprints on the glass. Clean if necessary.

2.Place the inner door assembly into the outer door assembly. Align the hinge in the opening on the side. To fit correctly, the inside door assembly edge is completely inside the outside door assembly edge.

3.Reassemble the inner and outer door assemblies with the 6 screws.

4.Replace the 2 handle screws for the door handle of the door assembly.

5.Use a small flat-blade screwdriver to remove hole plugs in the door opening. Slide the head of the screwdriver under the cap of each hole plug, being careful not to scratch the dryer surface. Lift up. Remove the hole plugs in the door opening and insert in the opposite side.

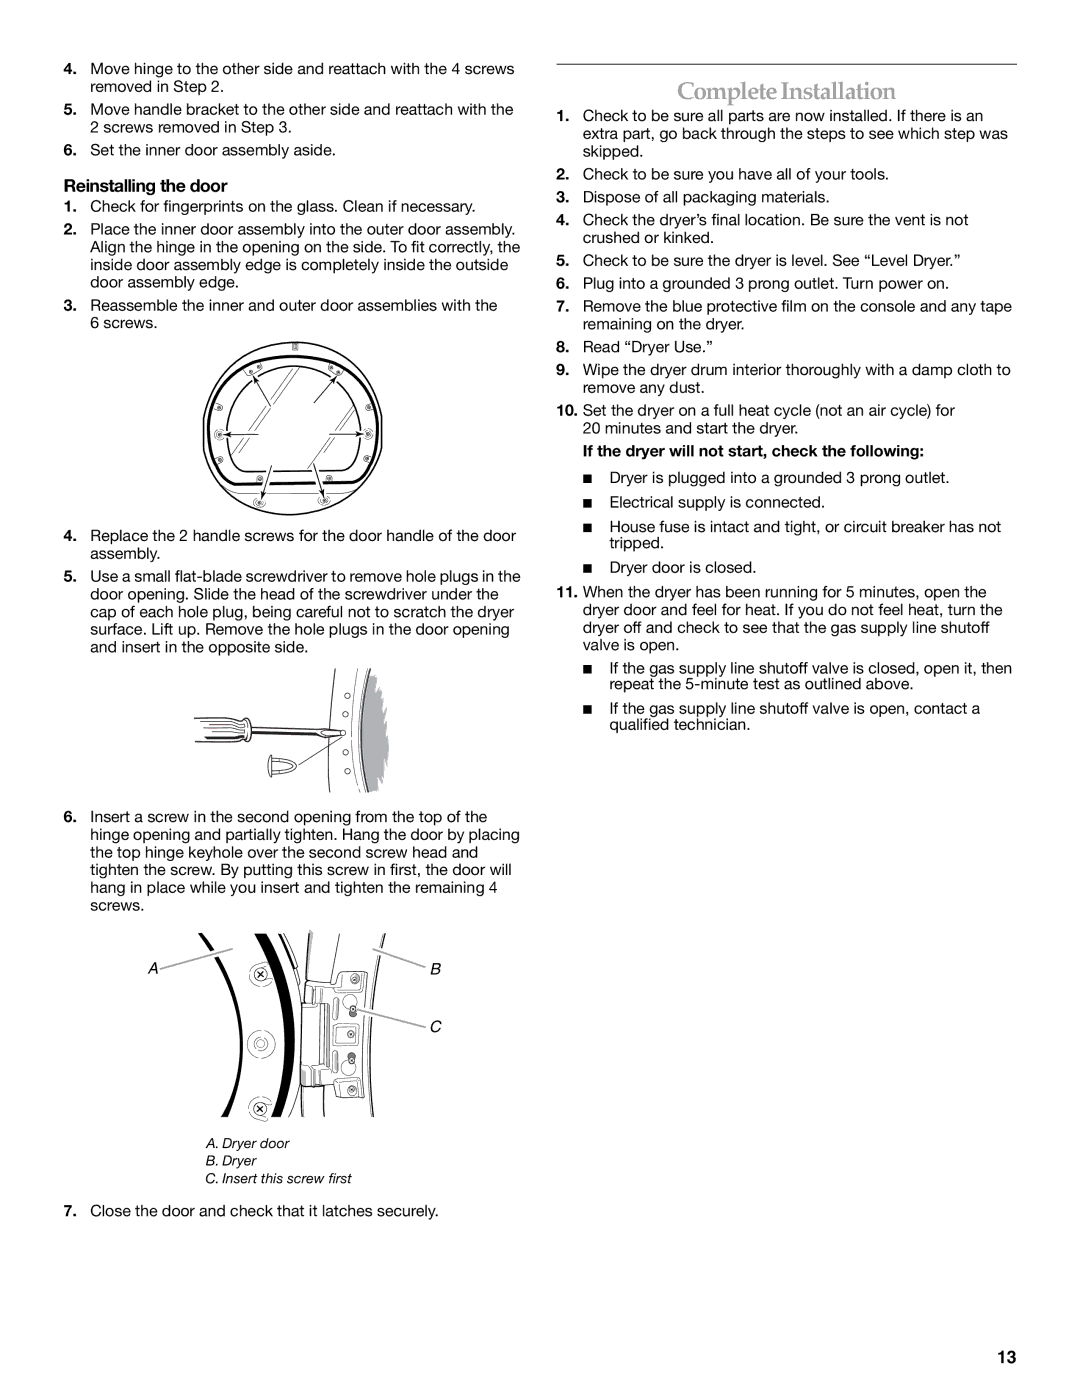
6.Insert a screw in the second opening from the top of the hinge opening and partially tighten. Hang the door by placing the top hinge keyhole over the second screw head and tighten the screw. By putting this screw in first, the door will hang in place while you insert and tighten the remaining 4 screws.

A B

C

Complete Installation

1.Check to be sure all parts are now installed. If there is an extra part, go back through the steps to see which step was skipped.

2.Check to be sure you have all of your tools.

3.Dispose of all packaging materials.

4.Check the dryer’s final location. Be sure the vent is not crushed or kinked.

5.Check to be sure the dryer is level. See “Level Dryer.”

6.Plug into a grounded 3 prong outlet. Turn power on.

7.Remove the blue protective film on the console and any tape remaining on the dryer.

8.Read “Dryer Use.”

9.Wipe the dryer drum interior thoroughly with a damp cloth to remove any dust.

10.Set the dryer on a full heat cycle (not an air cycle) for 20 minutes and start the dryer.

If the dryer will not start, check the following:

Dryer is plugged into a grounded 3 prong outlet.

Electrical supply is connected.

House fuse is intact and tight, or circuit breaker has not tripped.

Dryer door is closed.

11.When the dryer has been running for 5 minutes, open the dryer door and feel for heat. If you do not feel heat, turn the dryer off and check to see that the gas supply line shutoff valve is open.

If the gas supply line shutoff valve is closed, open it, then repeat the 5-minute test as outlined above.

If the gas supply line shutoff valve is open, contact a qualified technician.

A. Dryer door

B.Dryer

C.Insert this screw first

7.Close the door and check that it latches securely.

13

Page 13
Image 13
Electrolux FKGHS01P manual Complete Installation, Reinstalling the door, If the dryer will not start, check the following

FKGHS01P specifications

The Electrolux FKGHS01P is a highly regarded kitchen appliance that brings together innovation, design, and functionality. This cooking device is not just a standard kitchen appliance; it epitomizes modern cooking technology, ensuring a seamless culinary experience.

One of the main features of the FKGHS01P is its advanced induction cooking technology. Induction cooktops are known for their quick heating capabilities, and the FKGHS01P excels in this category. Induction cooking works by generating heat directly in the cookware through electromagnetic energy, which can reduce cooking times significantly. This also translates to increased energy efficiency as it wastes less heat than traditional gas or electric cooktops.

The appliance boasts a sleek and contemporary design, which makes it an attractive addition to any kitchen. Its smooth surface is easy to clean, and the minimalistic aesthetic fits well with modern kitchen decor. With intuitive controls, users can easily adjust cooking temperatures and settings, providing a user-friendly cooking experience.

Another standout feature of the Electrolux FKGHS01P is its versatile cooking zones. The induction cooktop includes multiple cooking zones of varying sizes, allowing users to accommodate a range of pot and pan sizes. Whether you're boiling pasta or simmering sauces, there is enough room to cook multiple dishes simultaneously.

Equipped with safety features, the FKGHS01P includes child lock settings and automatic shut-off systems, providing peace of mind for families. Furthermore, the induction technology allows for quick temperature adjustments, enhancing control over cooking processes and reducing the risk of burns or accidents.

In terms of smart technology, the Electrolux FKGHS01P integrates seamlessly with smart home systems, enabling connectivity and convenience. Users can monitor their cooking from a mobile device, receive notifications, and even manage timers remotely.

In summary, the Electrolux FKGHS01P offers a blend of state-of-the-art technology, safety, and sleek design. With its induction cooking capabilities, versatile zones, and smart home integration, it caters to both novice cooks and culinary enthusiasts alike. Its commitment to efficiency and user-friendliness makes it a standout appliance in the contemporary kitchen landscape.