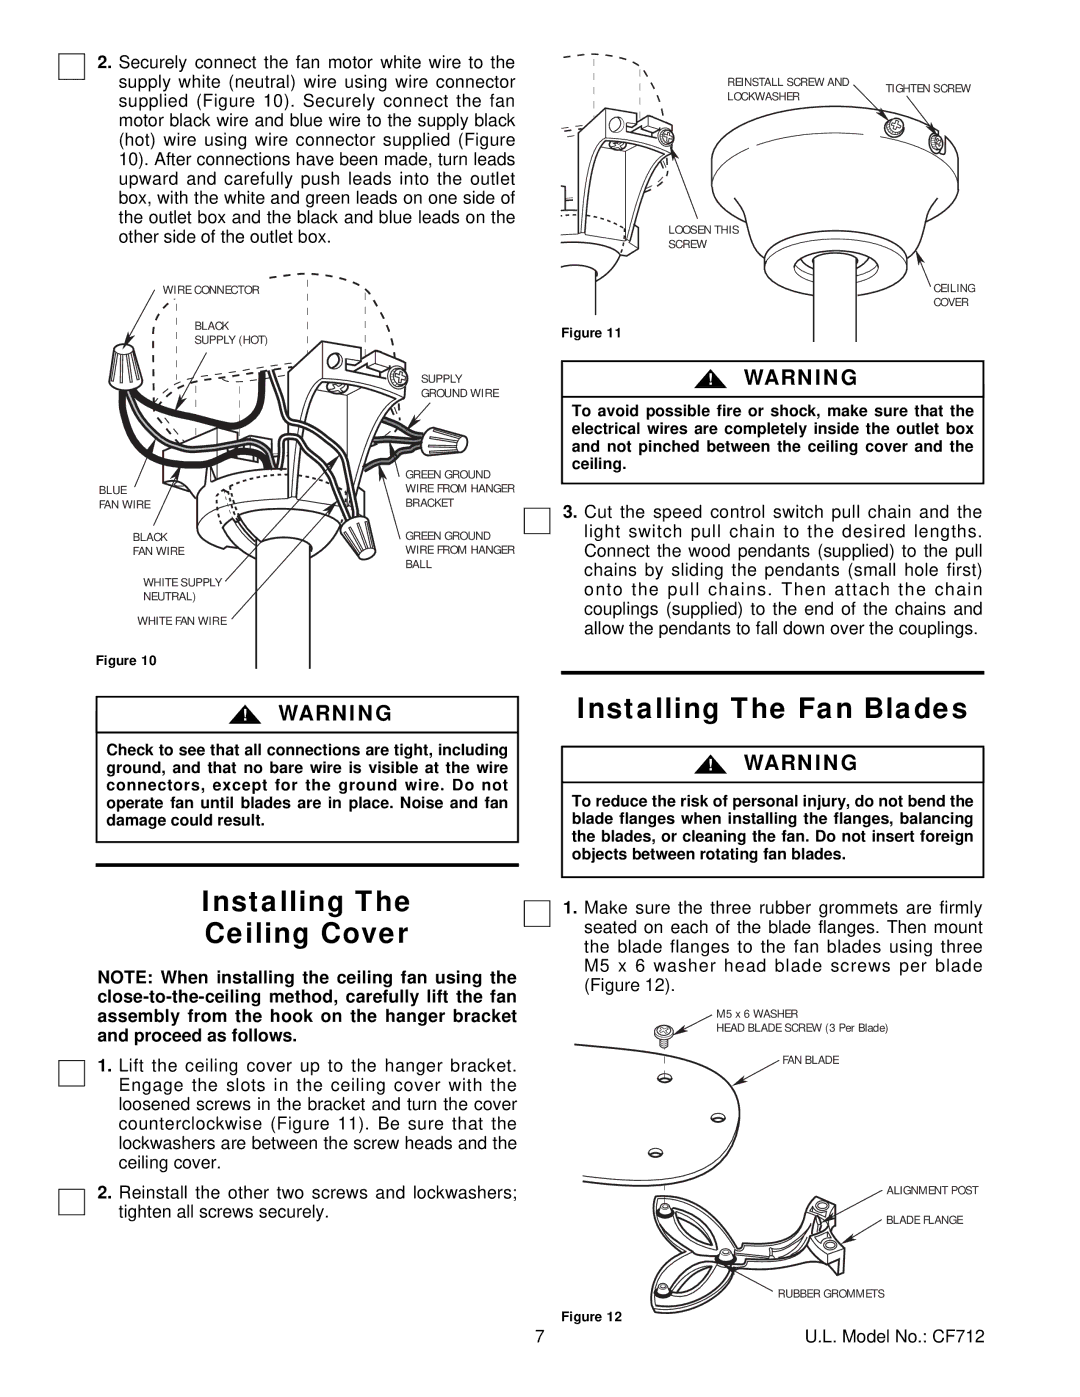
2.Securely connect the fan motor white wire to the supply white (neutral) wire using wire connector supplied (Figure 10). Securely connect the fan motor black wire and blue wire to the supply black (hot) wire using wire connector supplied (Figure 10). After connections have been made, turn leads upward and carefully push leads into the outlet box, with the white and green leads on one side of the outlet box and the black and blue leads on the other side of the outlet box.

REINSTALL SCREW AND

TIGHTEN SCREW

LOCKWASHER


LOOSEN THIS

SCREW

WIRE CONNECTOR

BLACK

SUPPLY (HOT)

BLUE

FAN WIRE

BLACK

FAN WIRE

WHITE SUPPLY

NEUTRAL)

WHITE FAN WIRE

Figure 10

SUPPLY

GROUND WIRE

GREEN GROUND

WIRE FROM HANGER

BRACKET

GREEN GROUND

WIRE FROM HANGER

BALL

CEILING

COVER

Figure 11

!WARNING

To avoid possible fire or shock, make sure that the electrical wires are completely inside the outlet box and not pinched between the ceiling cover and the ceiling.

3.Cut the speed control switch pull chain and the light switch pull chain to the desired lengths. Connect the wood pendants (supplied) to the pull chains by sliding the pendants (small hole first) onto the pull chains. Then attach the chain couplings (supplied) to the end of the chains and allow the pendants to fall down over the couplings.

!WARNING

Check to see that all connections are tight, including ground, and that no bare wire is visible at the wire connectors, except for the ground wire. Do not operate fan until blades are in place. Noise and fan damage could result.

Installing The Fan Blades

!WARNING

To reduce the risk of personal injury, do not bend the blade flanges when installing the flanges, balancing the blades, or cleaning the fan. Do not insert foreign objects between rotating fan blades.

Installing The

Ceiling Cover

NOTE: When installing the ceiling fan using the close-to-the-ceiling method, carefully lift the fan assembly from the hook on the hanger bracket and proceed as follows.

1.Lift the ceiling cover up to the hanger bracket. Engage the slots in the ceiling cover with the loosened screws in the bracket and turn the cover counterclockwise (Figure 11). Be sure that the lockwashers are between the screw heads and the ceiling cover.

2.Reinstall the other two screws and lockwashers; tighten all screws securely.

1.Make sure the three rubber grommets are firmly seated on each of the blade flanges. Then mount the blade flanges to the fan blades using three M5 x 6 washer head blade screws per blade (Figure 12).

M5 x 6 WASHER

HEAD BLADE SCREW (3 Per Blade)

FAN BLADE

ALIGNMENT POST

BLADE FLANGE

RUBBER GROMMETS

Figure 12

7

U.L. Model No.: CF712

Page 7
Image 7
Emerson CF712AB01, CF712WW01, CF712BS01, CF712TZ01, CF712WB01, CF712ORB01 Installing The Fan Blades, Installing Ceiling Cover

CF712SCB01, CF712TZ01, CF712WW01, CF712ORB01, CF712AW01 specifications

The Emerson CF712AB01, CF712WB01, CF712BS01, CF712AW01, and CF712ORB01 are a series of stylish ceiling fans designed to enhance the aesthetic and comfort of any living space. Each model is equipped with key features and modern technologies that set them apart in the market.

One of the standout features of the Emerson CF712 series is its sleek design that effortlessly blends into various interior styles. Whether it's the Antique Brass finish of the CF712AB01, the White finish of the CF712WB01, the Brushed Steel of the CF712BS01, the Aged Walnut of the CF712AW01, or the Oil-Rubbed Bronze of the CF712ORB01, each fan adds a touch of elegance to any room. The color options cater to different design preferences, allowing homeowners to find the perfect match for their decor.

In addition to their aesthetic appeal, the fans in this series are designed for optimal functionality and energy efficiency. The blade pitch and motor design work together to produce a powerful airflow, ensuring that any room feels comfortable regardless of the season. The fans are fitted with reversible motors, enabling users to switch the direction of the blades with ease. This feature allows for a cooling breeze in the summer and a gentle updraft in the winter, aiding in the circulation of warm air.

Installation and maintenance of the CF712 ceiling fans are simplified through innovative engineering. Many models come with a Quick Connect system for more effortless assembly. The blades are crafted from high-quality materials that are not only durable but also easy to clean, ensuring longevity and reduced maintenance effort.

Moreover, these fans are often compatible with various control options, including pull chains and remote controls, giving users the flexibility to operate them from anywhere in the room. Some models also support smart home technology, allowing integration with platforms like Alexa and Google Assistant for voice-activated control.

The Emerson CF712 series caters to sustainability-conscious consumers as well. By consuming less electricity than traditional fans while still delivering high performance, these fans help reduce energy costs and environmental impact.

Overall, the Emerson CF712AB01, CF712WB01, CF712BS01, CF712AW01, and CF712ORB01 ceiling fans combine elegant design, advanced technology, and energy-efficient operation, making them an excellent choice for enhancing both style and comfort in any home.