How to Put Your Ceiling Fan Together

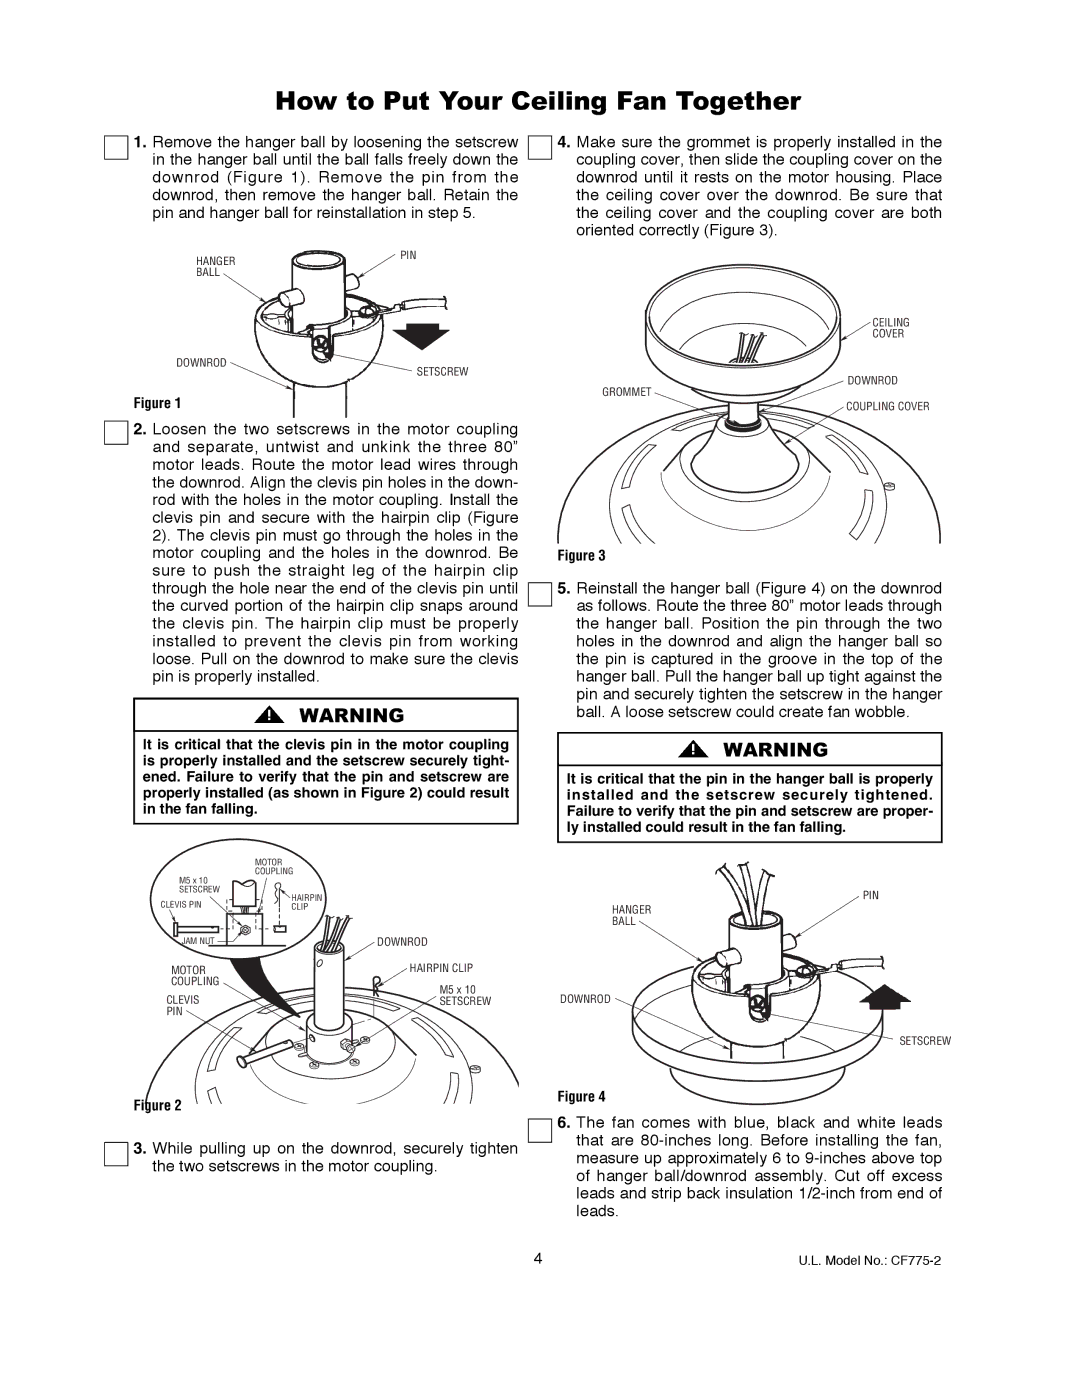
1.Remove the hanger ball by loosening the setscrew in the hanger ball until the ball falls freely down the downrod (Figure 1). Remove the pin from the downrod, then remove the hanger ball. Retain the pin and hanger ball for reinstallation in step 5.

HANGER

PIN

BALL


DOWNROD

SETSCREW

Figure 1

2.Loosen the two setscrews in the motor coupling and separate, untwist and unkink the three 80” motor leads. Route the motor lead wires through the downrod. Align the clevis pin holes in the down- rod with the holes in the motor coupling. Install the clevis pin and secure with the hairpin clip (Figure 2). The clevis pin must go through the holes in the motor coupling and the holes in the downrod. Be sure to push the straight leg of the hairpin clip through the hole near the end of the clevis pin until the curved portion of the hairpin clip snaps around the clevis pin. The hairpin clip must be properly installed to prevent the clevis pin from working loose. Pull on the downrod to make sure the clevis pin is properly installed.

WARNING

It is critical that the clevis pin in the motor coupling is properly installed and the setscrew securely tight- ened. Failure to verify that the pin and setscrew are properly installed (as shown in Figure 2) could result in the fan falling.

4.Make sure the grommet is properly installed in the coupling cover, then slide the coupling cover on the downrod until it rests on the motor housing. Place the ceiling cover over the downrod. Be sure that the ceiling cover and the coupling cover are both oriented correctly (Figure 3).

CEILING

COVER

DOWNROD

GROMMET

COUPLING COVER

Figure 3

5.Reinstall the hanger ball (Figure 4) on the downrod as follows. Route the three 80” motor leads through the hanger ball. Position the pin through the two holes in the downrod and align the hanger ball so the pin is captured in the groove in the top of the hanger ball. Pull the hanger ball up tight against the pin and securely tighten the setscrew in the hanger ball. A loose setscrew could create fan wobble.

WARNING

It is critical that the pin in the hanger ball is properly installed and the setscrew securely tightened. Failure to verify that the pin and setscrew are proper- ly installed could result in the fan falling.


MOTOR


M5 x 10

COUPLING


SETSCREW

HAIRPIN

PIN

CLEVIS PIN

CLIP

HANGER


BALL

JAM NUT


DOWNROD

MOTOR

HAIRPIN CLIP


COUPLING

M5 x 10


CLEVIS

DOWNROD

SETSCREW

PIN


Figure 2

SETSCREW

Figure 4

3.While pulling up on the downrod, securely tighten the two setscrews in the motor coupling.

6.The fan comes with blue, black and white leads that are 80-inches long. Before installing the fan, measure up approximately 6 to 9-inches above top of hanger ball/downrod assembly. Cut off excess leads and strip back insulation 1/2-inch from end of leads.

4

U.L. Model No.: CF775-2

Page 4
Image 4
Emerson CF775ORB02, CF775BS02, CF775AW02 warranty How to Put Your Ceiling Fan Together

CF775AW02, CF775ORB02, CF775BS02 specifications

The Emerson CF775 series of ceiling fans, including the CF775BS02, CF775AW02, and CF775ORB02 models, are designed to elevate both the functionality and aesthetics of any living space. With a perfect blend of style and performance, these fans stand out for their innovative features and user-friendly technology.

One of the key features of the Emerson CF775 series is its powerful DC motor. This motor not only ensures energy-efficient operation but also enhances the fan's performance, resulting in a quieter and more powerful airflow. Unlike traditional AC motors, the DC motor allows for better control over speed settings, allowing users to choose from multiple speed options to suit their preferences.

The design of the CF775 fans is another highlight. With options in various finishes, including brushed steel (BS02), antique white (AW02), and oil-rubbed bronze (ORB02), they cater to a range of interior design styles, from modern to traditional. Each fan features a sleek, contemporary silhouette complemented by elegantly designed blades, providing not just function, but also a focal point in any room.

Installation is made simple with the CF775 series thanks to the easy-mount system, which allows quick and hassle-free setup. The fans are also compatible with various wall control systems, giving users the option to remotely adjust settings based on their convenience.

Energy efficiency is a critical consideration for many consumers, and the Emerson CF775 series addresses this concern. These fans are designed to comply with Energy Star standards, helping homeowners save on their energy bills while enjoying a comfortable atmosphere. Additionally, the energy-efficient DC motor significantly reduces power consumption compared to traditional fans.

The CF775 series includes integrated LED lighting options, enhancing their versatility. The diffused light offers illumination without the harshness associated with traditional bulbs, creating a warm and inviting ambiance in any room. Users can also adjust the brightness, making it perfect for different settings and times of day.

In conclusion, the Emerson CF775BS02, CF775AW02, and CF775ORB02 models exemplify the ideal combination of style, functionality, and energy efficiency. Whether for residential or commercial spaces, these ceiling fans are designed to provide reliable performance while enhancing the overall décor. With advanced technologies and thoughtful design, they are a worthy addition to any modern home.