LC420EM8
To Receive DIGITAL/ANALOG SIGNAL, YOU Must Connect Antenna
RADIO-TV Interference
Precautions
Introduction
FCC Warning
Location and Handling
Do not handle the power cord with wet hands
Avoid a place with drastic temperature changes
When Carrying this Unit
5Trademark Information
5Supplied Accessories
5Symbols Used in this Manual
5Attaching the Stand
Contents
Features
DTV/TV/CATV
5Installing the Batteries
5Buttons on the Remote Control
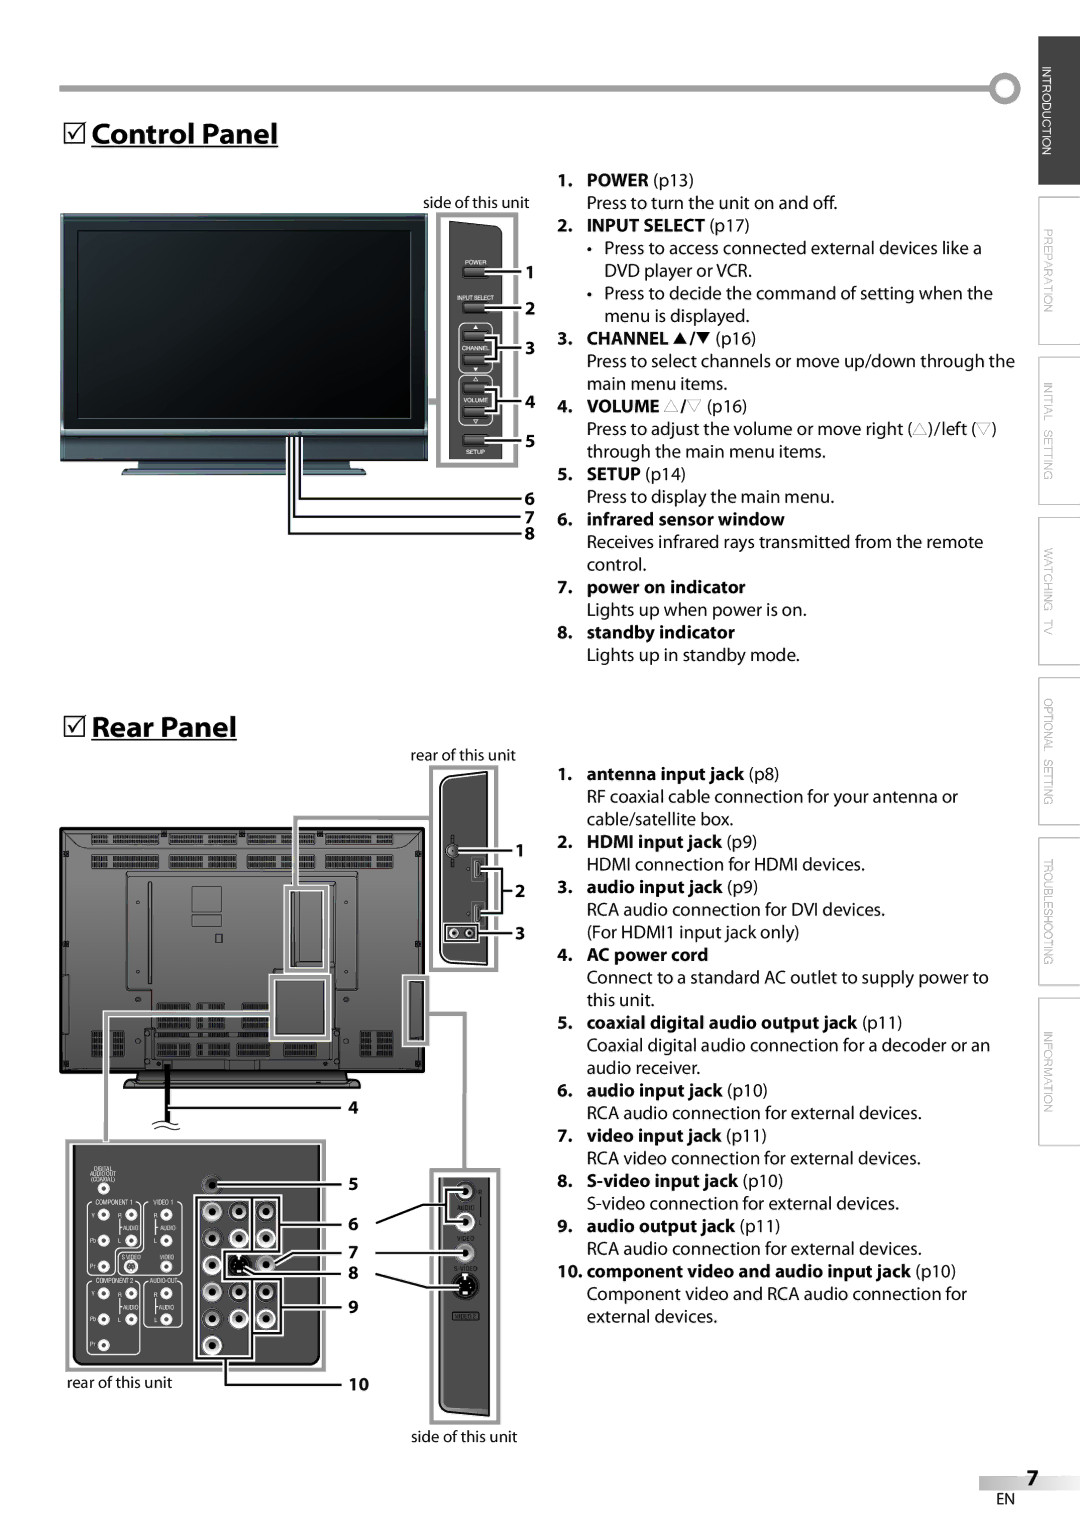
5Rear Panel
5Control Panel
Connection to Cable Box or Satellite Box
Preparation
5Basic Connection
Antenna Connection
Hdmi Connection
5External Device Connection
HDMI-DVI Connection
Video Connection
Component Video Connection
Analog
Audio Output Connection
# Caution
5Attaching a Wall Mount Bracket sold separately
Scanning and memorizing of channels start automatically
Initial Setting
5Initial Setup
Make sure if the unit is connected to antenna or cable
5Auto Channel Scan
5Main Menu
5Language Selection
Press Setup to exit
Language
5Channel Selection
5Volume Adjustment
5Sleep Timer
Watching TV
5Switching Each Mode
5Still Mode
5Switching Audio Mode
Day of Memoriesi
5Screen Information
Broadcasting Information
Press Info
5TV Screen Display Mode
Enter
Optional Setting
5Channel List
5Manual Register
Antenna
5Antenna Confirmation
5Picture Adjustment
Surround
5Sound Adjustment
You can adjust treble, bass and surround
Adjust the sound setting
CC2, CC4, Text2 and Text4
Caption Mode CC1 and Text1
5Closed Caption
CC3 and Text3
DTV CC
5DTV Closed Caption
Use Cursor K/L to select DTV CC, then press Enter
Font Size
Setting description for each item is shown below
5CC Style
Font Style
Back Opacity
Font Color
Font Opacity
Back Color
Chip ip
Chipip Enter password
Chip
Use Cursor K/L to select V-chip, then press Enter
Chipip
To Set the Sub Ratings
Use Cursor K/L to select Mpaa Rating, then press Enter
Use Cursor K/L to select TV Rating, then press Enter
Chipip Enter password Confirm password
Use Cursor K/L to select New Password, then press Enter
HDMI1
5HDMI Audio
5Troubleshooting Guide
Troubleshooting
Symptom Remedy
Delayed behind the dialogue
Check the batteries of the remote control
Refer to IR Signal Check on
Interrupt the remote control signal of this unit
With an AM radio
Maintenance
Information
Glossary
5Cable Channel Designations
5General Specifications
5Electrical Specification
5Other Specifications
Limited Warranty
Manual del Usuario
Advertencia DE LA FCC
Introducción
Precauciones
Número de serie
Transporte DE Esta Unidad
Para Evitar Peligros DE Descarga Eléctrica O Incendio
Colocación Y Manejo
Nota Acerca DEL Reciclado
5Información sobre Marcas Registradas
5Accesorios Suministrados
5Conectar el Soporte
5Símbolos Utilizados en este Manual
Contenido
Características
5Instalación de las Pilas
5Botnes en el Mando a Distancia
5Panel Trasero
5Panel de Control
Conexión a Caja de Cable o Caja de Satélite
Preparación
5Conexión Básica
Conexión de Antena
Conexión Hdmi
5Conexión de Dispositivo Externo
Conexión HDMI-DVI
Conexión de S-video
Conexión de Vídeo en Componentes
Conexión de Salida de Audio
Conexión de Vídeo
Analógica
# Cuidado
Ajuste Inicial
5Configuración Inicial
Esta operación tardará unos momentos
5Exploración Automática de Canales
5Menú Principal
5Selección de Idioma
Presione Setup para salir
IdiomaI
5Temporizador de Apagado
5Ajuste de Volumen
Para VER LA Televisión
5Selección de Canal
5Para Cambiar entre Cada Modo
5Modo Fijo
Estéreo
Un díaía de recuerdos
5Información de Pantalla
Información de emisión
Presione Info
5Modo de Visualización de Pantalla del Televisor
Lista Canales l
Ajuste Opcional
5Lista de Canales
5Registro Manual
Antena
5Confirmación de la Antena
Modo de Imagen
5Ajuste de Imagen
Restablecer Ajustes
Tempe. de Color
Utilice Cursor K /L para seleccionar Restablecer, y
5Ajuste de Sonido
Agudo, Grave
Función surround, luego presione Enter
2, S.C.4, Texto2 y Texto4
Subtítulos
Modo de subtítulos S.C.1 y Texto1
3 y Texto3
DTV deseados, y luego presione Enter
5Subtítulos en DTV
Como sigue
5Estilo CC
Tamaño Fuente
Luego presione Enter
Opaco Atrás
Color Fuente
Tipo Borde
Color Fondo
Chipip Introduzca cód. de acceso
Clasificación deseada y luego presione Enter
Para Ajustar las Subcategorías
Picture Association of America
Utilice Cursor K/L/s/B para seleccionar la
Nueva Código de Acceso
Audio
5Audio Hdmi
5Guía de Solución de Problemas
Solución DE Problemas
Síntoma Solución
Infrarrojos en la parte delantera de la unidad
El número de canal
Introducido cambia
Con el sensor de infrarrojos
Con una radio AM
Información
Glosario
Mantenimiento
5Otras Especificaciones
5Denominaciones de Canales de Cable
5Especificaciones Generales
5Especificación Eléctrica
Garantía Limitada