Euro-Pro NP320 manual Component Maintenance Schedule, Cleaning the PRE-MOTOR Filters

Models: NP320

1 16
Download 16 pages 51.5 Kb
Page 10
Image 10

Maintenance - cont.


COMPONENT

MAINTENANCE SCHEDULE


1

Dust Cup

Empty each time you vacuum.


2

Pre-Motor Foam Filter

Rinse and air dry every month under normal use.


3

Pre-Motor Felt Filter

Rinse and air dry every month under normal use.


4

Post-Motor HEPA Filter

Clean once every 24 months under normal use.


DO NOT operate the vacuum without ALL the filters in place.

DO NOT operate the vacuum with WET filters.

DO NOT put the filters in the washing machine or dishwasher.

NOTE: The material in the filters will discolor over time. This is

NORMAL and will not affect the performance of the filters.

IMPORTANT: Loss of Suction may occur if foam filter is not cleaned every month. Rinse and allow to air dry completely. Tap loose dirt from foam filter as needed in between washing. Foam filter may appear dirty after use - this is normal.

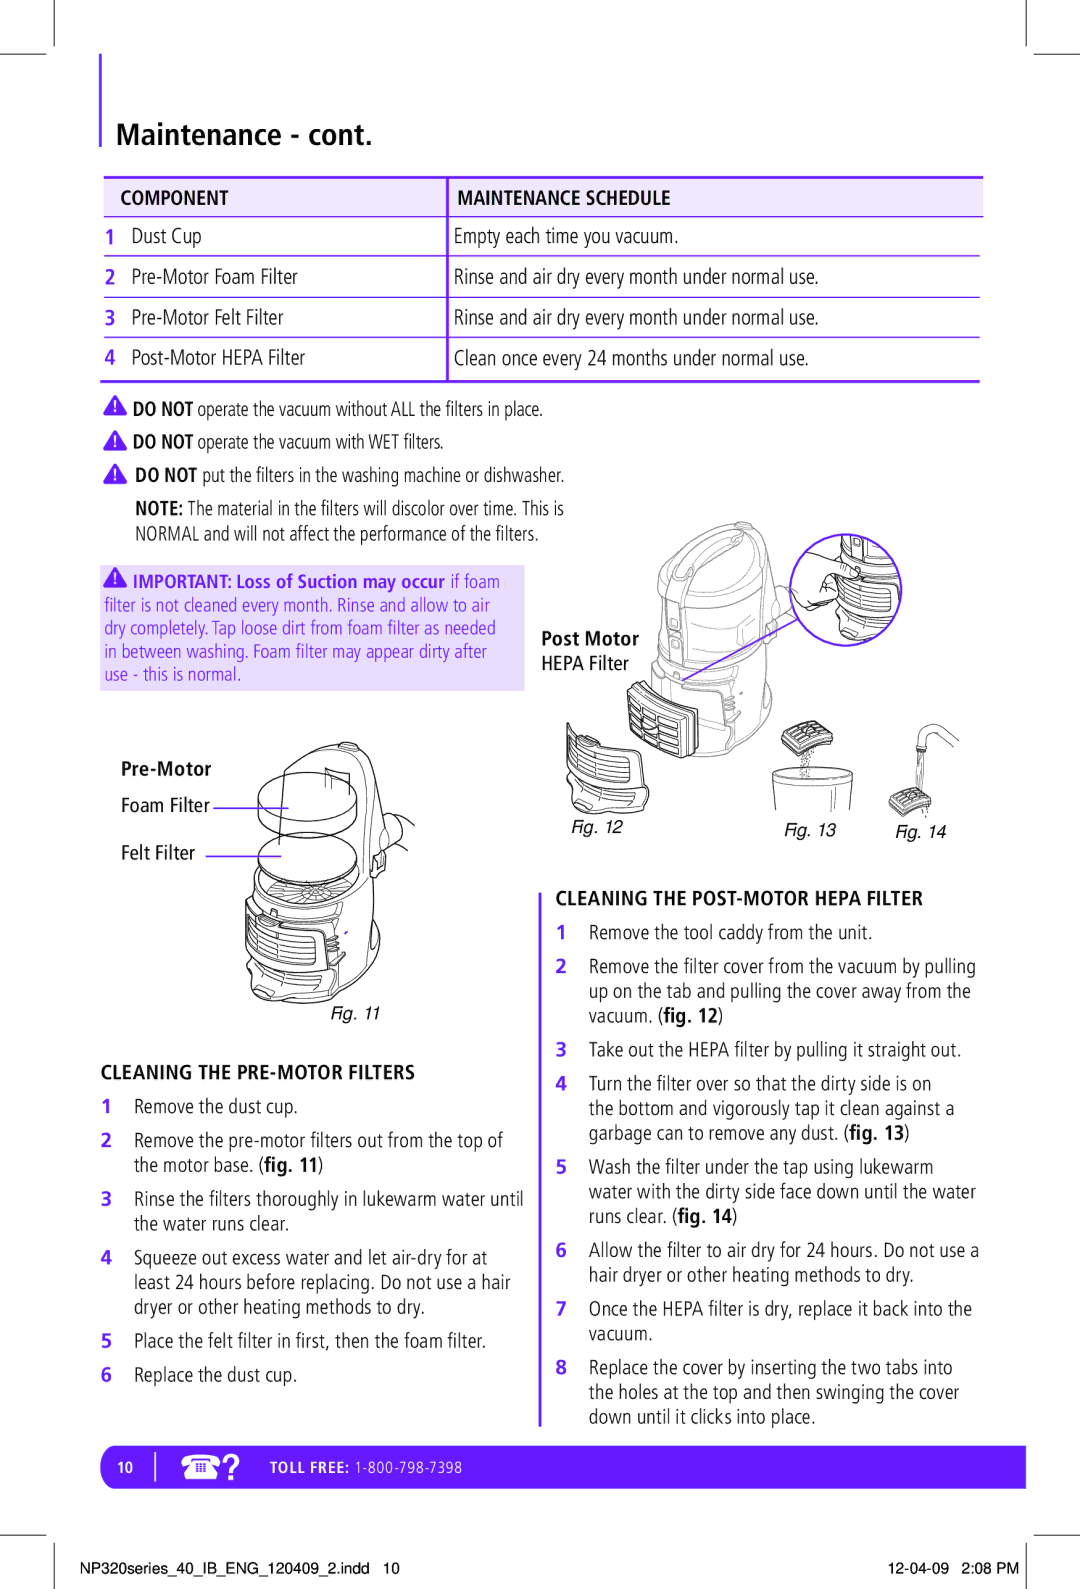
Pre-Motor

Foam Filter

Felt Filter

Post Motor

HEPA Filter

Fig. 12

Fig. 13

Fig. 14

Fig. 11

CLEANING THE PRE-MOTOR FILTERS

1Remove the dust cup.

2Remove the pre-motor filters out from the top of the motor base. (fig. 11)

3Rinse the filters thoroughly in lukewarm water until the water runs clear.

4Squeeze out excess water and let air-dry for at least 24 hours before replacing. Do not use a hair dryer or other heating methods to dry.

5Place the felt filter in first, then the foam filter.

6Replace the dust cup.

CLEANING THE POST-MOTOR HEPA FILTER

1Remove the tool caddy from the unit.

2Remove the filter cover from the vacuum by pulling up on the tab and pulling the cover away from the vacuum. (fig. 12)

3Take out the HEPA filter by pulling it straight out.

4Turn the filter over so that the dirty side is on the bottom and vigorously tap it clean against a garbage can to remove any dust. (fig. 13)

5Wash the filter under the tap using lukewarm water with the dirty side face down until the water runs clear. (fig. 14)

6Allow the filter to air dry for 24 hours. Do not use a hair dryer or other heating methods to dry.

7Once the HEPA filter is dry, replace it back into the vacuum.

8Replace the cover by inserting the two tabs into the holes at the top and then swinging the cover down until it clicks into place.

10

TOLL FREE: 1-800-798-7398

NP320series_40_IB_ENG_120409_2.indd 10

12-04-09 2:08 PM

Page 10
Image 10
Euro-Pro NP320 manual Component Maintenance Schedule, Cleaning the PRE-MOTOR Filters, Cleaning the POST-MOTOR Hepa Filter

NP320 specifications

The Euro-Pro NP320 is a versatile and innovative kitchen appliance designed to enhance cooking efficiency and simplify meal preparation. With its sleek design and user-friendly features, it serves as an essential tool for both novice cooks and seasoned chefs alike.

One of the standout features of the Euro-Pro NP320 is its powerful 1200-watt heating element. This high-powered system ensures that food is cooked evenly and quickly, reducing preparation time significantly. Whether you're sautéing vegetables, simmering sauces, or frying meats, the NP320 provides consistent results that help bring culinary creations to life.

The NP320 is equipped with advanced cooking technologies that set it apart from traditional cooking appliances. One such technology is its multi-function capability, allowing users to perform various cooking methods within a single unit. From steaming and frying to grilling and slow cooking, the NP320 adapts to a variety of cooking styles, making it a one-stop solution for all kitchen needs.

The appliance also features a non-stick cooking surface, which makes food release easy and cleanup a breeze. This surface ensures that users spend less time scrubbing and more time enjoying their meals. Additionally, the NP320 comes with a range of accessories, including a steaming tray and grill rack, further expanding its cooking capabilities.

Safety is also a key consideration in the design of the Euro-Pro NP320. It includes a built-in auto shut-off function that activates when the cooking cycle is complete, preventing overcooking and enhancing peace of mind. Moreover, its cool-touch handles ensure safe handling, even during high-temperature cooking tasks.

For added convenience, the NP320 features an adjustable temperature control system, allowing users to select the optimal heat setting for their specific cooking needs. This precise control ensures that delicate dishes are prepared perfectly, while also accommodating high-heat methods for more robust recipes.

With its blend of performance, versatility, and safety, the Euro-Pro NP320 is more than just a kitchen appliance; it’s a valuable companion in the culinary journey. Its ability to streamline cooking processes while delivering impressive results makes it a must-have for anyone looking to elevate their home cooking experience. Whether used for everyday meals or special occasions, the NP320 stands out as a reliable and efficient kitchen solution.