DÉPANNAGE

ASSEMBLY INSTRUCTIONS

Nettoyer & changer les courroies ATTENTION: Pour réduire le risque de décharge électrique, le cordon d’alimentation

6. Levez le couvert de courroie (sur le

côté droit du suceur) qui couvre les

courroies et le rouleau de la brosse.

Thank you for purchasing an Infinity Vacuum. To ensure your vacuum never loses suction, you must perform regular maintenance tasks. Refer to your Owner’s Manual for step by step instructions.

doit être débranché avant de faire de l’entretien ou du dépannage. Occasionnellement les courroies du suceur auront besoin d’être changées, la fréquence dépendra de l’usage que vous en faites.

Si le rouleau de la brosse ne s’enclenche pas lorsque le sélecteur tapis-à-plancher est à la position tapis :

1.Mettez l’aspirateur à la position Arrêt et débranchez de l’alimentation électrique.

2.Dégagez la poignée en appuyant sur la pédale de dégagement de la poignée et tirez jusqu’à ce que la poignée soit dégagée de sa position verticale. Tourner l’aspirateur à l’envers et placez sur le plancher.

3.Avec un tourne-vis Phillips #1, enlevez les quatre (4) vis sur la plaque inférieure. (Fig. 47)

(Fig. 50)

Couvert de courroie

Fig. 50

7.Il y a deux courroies dans le suceur. (Figure 51). Enlever délicatement tout résidu qui pourrait se trouver alentour de la courroie.

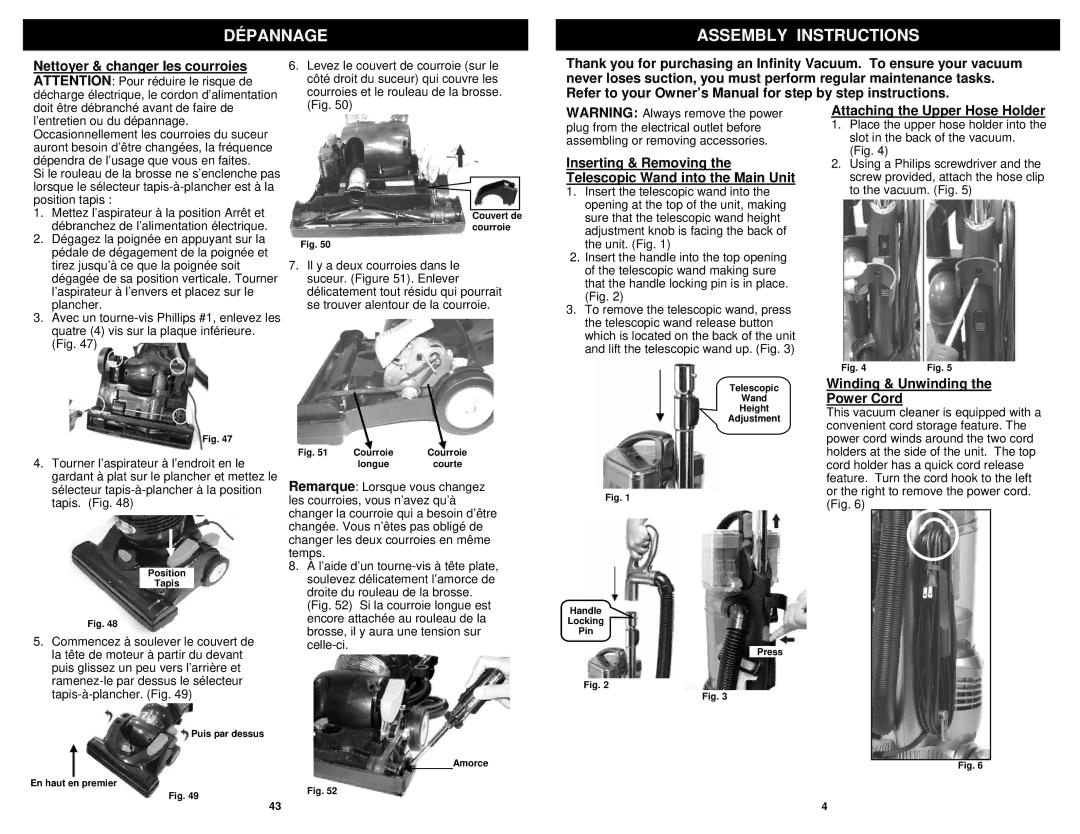
WARNING: Always remove the power plug from the electrical outlet before assembling or removing accessories.

Inserting & Removing the Telescopic Wand into the Main Unit

1.Insert the telescopic wand into the opening at the top of the unit, making sure that the telescopic wand height adjustment knob is facing the back of the unit. (Fig. 1)

2.Insert the handle into the top opening of the telescopic wand making sure

that the handle locking pin is in place. (Fig. 2)

3.To remove the telescopic wand, press the telescopic wand release button which is located on the back of the unit and lift the telescopic wand up. (Fig. 3)

Telescopic

Wand

Height

Adjustment

Attaching the Upper Hose Holder

1.Place the upper hose holder into the slot in the back of the vacuum.

(Fig. 4)

2.Using a Philips screwdriver and the screw provided, attach the hose clip to the vacuum. (Fig. 5)

Fig. 4

Fig. 5

Winding & Unwinding the Power Cord

This vacuum cleaner is equipped with a convenient cord storage feature. The

Fig. 47

4.Tourner l’aspirateur à l’endroit en le gardant à plat sur le plancher et mettez le sélecteur tapis-à-plancher à la position tapis. (Fig. 48)

Position

Tapis

Fig. 48

5.Commencez à soulever le couvert de la tête de moteur à partir du devant puis glissez un peu vers l’arrière et ramenez-le par dessus le sélecteur tapis-à-plancher. (Fig. 49)

Fig. 51

Courroie

Courroie


longue

courte

Remarque: Lorsque vous changez les courroies, vous n’avez qu’à changer la courroie qui a besoin d’être changée. Vous n’êtes pas obligé de changer les deux courroies en même temps.

8.À l’aide d’un tourne-vis à tête plate, soulevez délicatement l’amorce de droite du rouleau de la brosse.

(Fig. 52) Si la courroie longue est encore attachée au rouleau de la brosse, il y aura une tension sur celle-ci.

Fig. 1

Handle

Locking

Pin

Press

Fig. 2

Fig. 3

power cord winds around the two cord holders at the side of the unit. The top cord holder has a quick cord release feature. Turn the cord hook to the left or the right to remove the power cord. (Fig. 6)

Puis par dessus


Amorce

En haut en premier

Fig. 52

Fig. 49


43

Fig. 6

4

Page 5
Image 5
Euro-Pro NV30 owner manual Dépannage Assembly Instructions, Inserting & Removing the Telescopic Wand into the Main Unit

NV30 specifications

The Euro-Pro NV30 is a cutting-edge home cleaning device designed to elevate household maintenance through innovative technology and user-friendly features. This vacuum cleaner is part of Euro-Pro's commitment to delivering high-quality products that simplify cleaning tasks while ensuring exceptional performance.

One of the standout features of the Euro-Pro NV30 is its powerful suction capability. Integrated with a high-efficiency motor, the NV30 is capable of picking up even the most stubborn dirt, debris, and pet hair. This makes it an ideal choice for pet owners and households with children, where messes are a common occurrence. The vacuum's advanced filtration system ensures that not only is dirt removed from surfaces, but allergens and fine particles are also trapped, contributing to a healthier home environment.

The design of the Euro-Pro NV30 is both functional and aesthetically pleasing. With a lightweight build, it offers ease of movement and maneuverability around furniture and tight spaces. The vacuum features an ergonomic handle, providing comfort during extended cleaning sessions. Additionally, its compact size allows for easy storage when not in use.

Another notable characteristic of the Euro-Pro NV30 is its versatility. It comes with multiple attachments, including a crevice tool, dusting brush, and upholstery nozzle, enabling users to clean various surfaces, from carpets to hard floors to delicate fabrics. This ensures that users can tackle any cleaning task with the appropriate tool at hand.

Enhanced user experience is one aspect that sets the Euro-Pro NV30 apart from other vacuum cleaners. The vacuum is designed for minimal noise operation, making it a discreet option for those who prefer quiet cleaning. Additionally, the vacuum features a large-capacity dust bin that is easy to empty and clean, reducing the frequency of maintenance.

The Euro-Pro NV30 operates on a simple plug-and-play mechanism, meaning that it requires minimal setup and can be ready to use in no time. With an emphasis on user-friendliness, this model is suitable for individuals of all ages and cleaning skill levels.

In conclusion, the Euro-Pro NV30 combines powerful suction capabilities, advanced filtration technology, and versatile design to create an effective cleaning solution for any home. Whether dealing with everyday dust or deep-seated dirt, this vacuum cleaner promises a reliable performance that meets the diverse needs of modern households.