Maintenance

Note: Do Not change hydraulic system oil (except for what can be drained when changing filter), unless it is felt the oil has been contaminated or been extremely hot.

Changing oil unnecessarily could damage hydraulic system by introducing contaminates into the system.

Hydraulic System Air Purge

Service Interval: As required

Air must be purged from the hydraulic system when any hydraulic components, including oil filter, are removed or any of the hydraulic lines are disconnected.

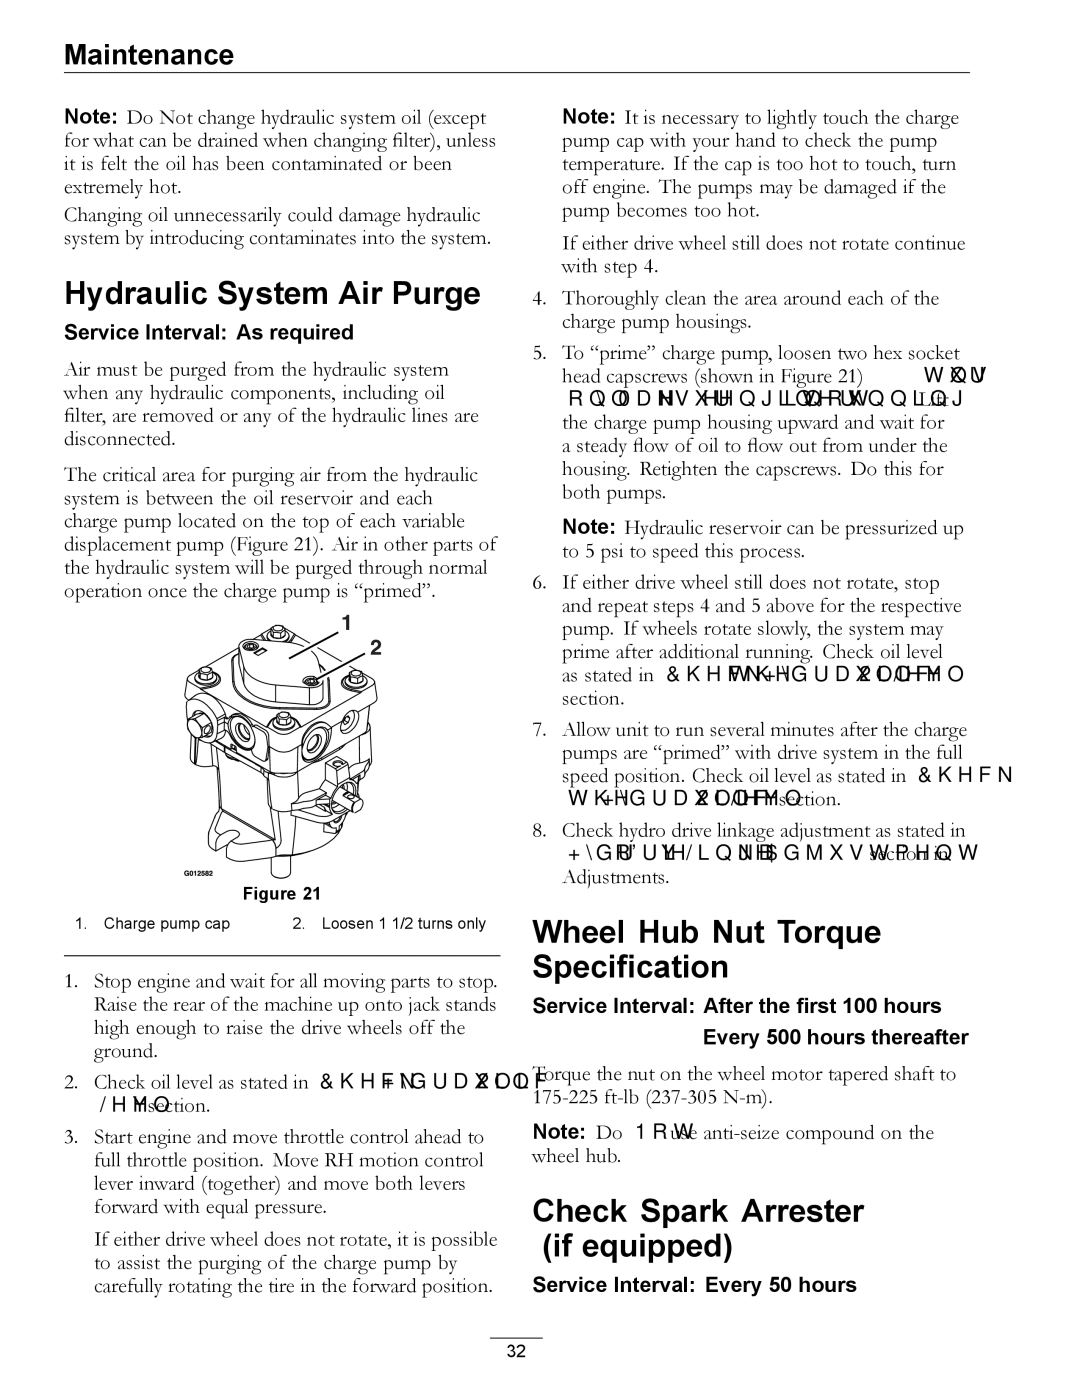
The critical area for purging air from the hydraulic system is between the oil reservoir and each charge pump located on the top of each variable displacement pump (Figure 21). Air in other parts of the hydraulic system will be purged through normal operation once the charge pump is “primed”.

Figure 21

1. Charge pump cap

2. Loosen 1 1/2 turns only

1.Stop engine and wait for all moving parts to stop. Raise the rear of the machine up onto jack stands high enough to raise the drive wheels off the ground.

2.Check oil level as stated in Check Hydraulic Oil Level section.

3.Start engine and move throttle control ahead to full throttle position. Move RH motion control lever inward (together) and move both levers forward with equal pressure.

If either drive wheel does not rotate, it is possible to assist the purging of the charge pump by carefully rotating the tire in the forward position.

Note: It is necessary to lightly touch the charge pump cap with your hand to check the pump temperature. If the cap is too hot to touch, turn off engine. The pumps may be damaged if the pump becomes too hot.

If either drive wheel still does not rotate continue with step 4.

4.Thoroughly clean the area around each of the charge pump housings.

5.To “prime” charge pump, loosen two hex socket head capscrews (shown in Figure 21) 1 1/2 turns only. Make sure engine is not running. Lift the charge pump housing upward and wait for a steady flow of oil to flow out from under the housing. Retighten the capscrews. Do this for both pumps.

Note: Hydraulic reservoir can be pressurized up to 5 psi to speed this process.

6.If either drive wheel still does not rotate, stop and repeat steps 4 and 5 above for the respective pump. If wheels rotate slowly, the system may prime after additional running. Check oil level as stated in Check the Hydraulic Oil Level section.

7.Allow unit to run several minutes after the charge pumps are “primed” with drive system in the full speed position. Check oil level as stated in Check the Hydraulic Oil Level section.

8.Check hydro drive linkage adjustment as stated in Hydro Drive Linkage Adjustment section in Adjustments.

Wheel Hub Nut Torque Specification

Service Interval: After the first 100 hours

Every 500 hours thereafter

Torque the nut on the wheel motor tapered shaft to 175-225 ft-lb (237-305 N-m).

Note: Do Not use anti-seize compound on the wheel hub.

Check Spark Arrester (if equipped)

Service Interval: Every 50 hours

32

Page 32
Image 32
Exmark 000 & higher, 920 Hydraulic System Air Purge, Wheel Hub Nut Torque Specification, Check Spark Arrester if equipped

920, 000 & higher specifications

The Exmark 920 is an exceptional piece of equipment tailored for professionals and enthusiasts alike. Designed with an emphasis on performance and reliability, this mower embodies the pinnacle of lawn care technology. Known for its robust construction, the Exmark 920 is equipped with a powerful engine, ensuring efficient and effective mowing even in demanding conditions.

One of the standout features of the Exmark 920 is its cutting deck. With a 52-inch or 60-inch mower deck option, it allows users to cover a large mowing area quickly. The deck is crafted from high-strength steel, providing durability and longevity while maintaining a lightweight design that enhances maneuverability. Innovative blade design promotes superior airflow for an even cut, preventing clumping and ensuring a polished finish across various grass types.

The Exmark 920 utilizes advanced technology, including the innovative RED Technology, which enhances engine performance by optimizing power consumption. This results in reduced fuel consumption while maintaining the required power output for demanding tasks. Additionally, the mower’s intuitive controls include a user-friendly interface, allowing for easy adjustments and settings, catering to the varying needs of different lawn types and conditions.

Another notable feature of the Exmark 920 is its all-day comfort design. With an ergonomic seat and advanced suspension system, operators can tackle long mowing sessions without discomfort. The padded seat is adjustable, providing maximum support to minimize fatigue, while the suspension system absorbs bumps and uneven terrain for a smoother ride.

Furthermore, the Exmark 920 prioritizes serviceability. Easy access points for maintenance and a well-designed layout ensure that routine tasks, such as oil changes and blade replacements, can be completed efficiently. The model also comes equipped with LED headlights for improved visibility during early morning or late evening mowing.

In summary, the Exmark 920 is a sophisticated mower combining power, advanced technology, and design for comfort and utility. Its high-performance engine, durable cutting deck, user-friendly controls, and serviceable layout make it an ideal choice for anyone seeking to achieve a well-manicured lawn with professional results. Whether for commercial or residential use, the Exmark 920 stands out as a leading option in the market, enabling users to tackle any mowing challenge with confidence and ease.