DVS 605 • Setup Guide (Continued)
Powering Up
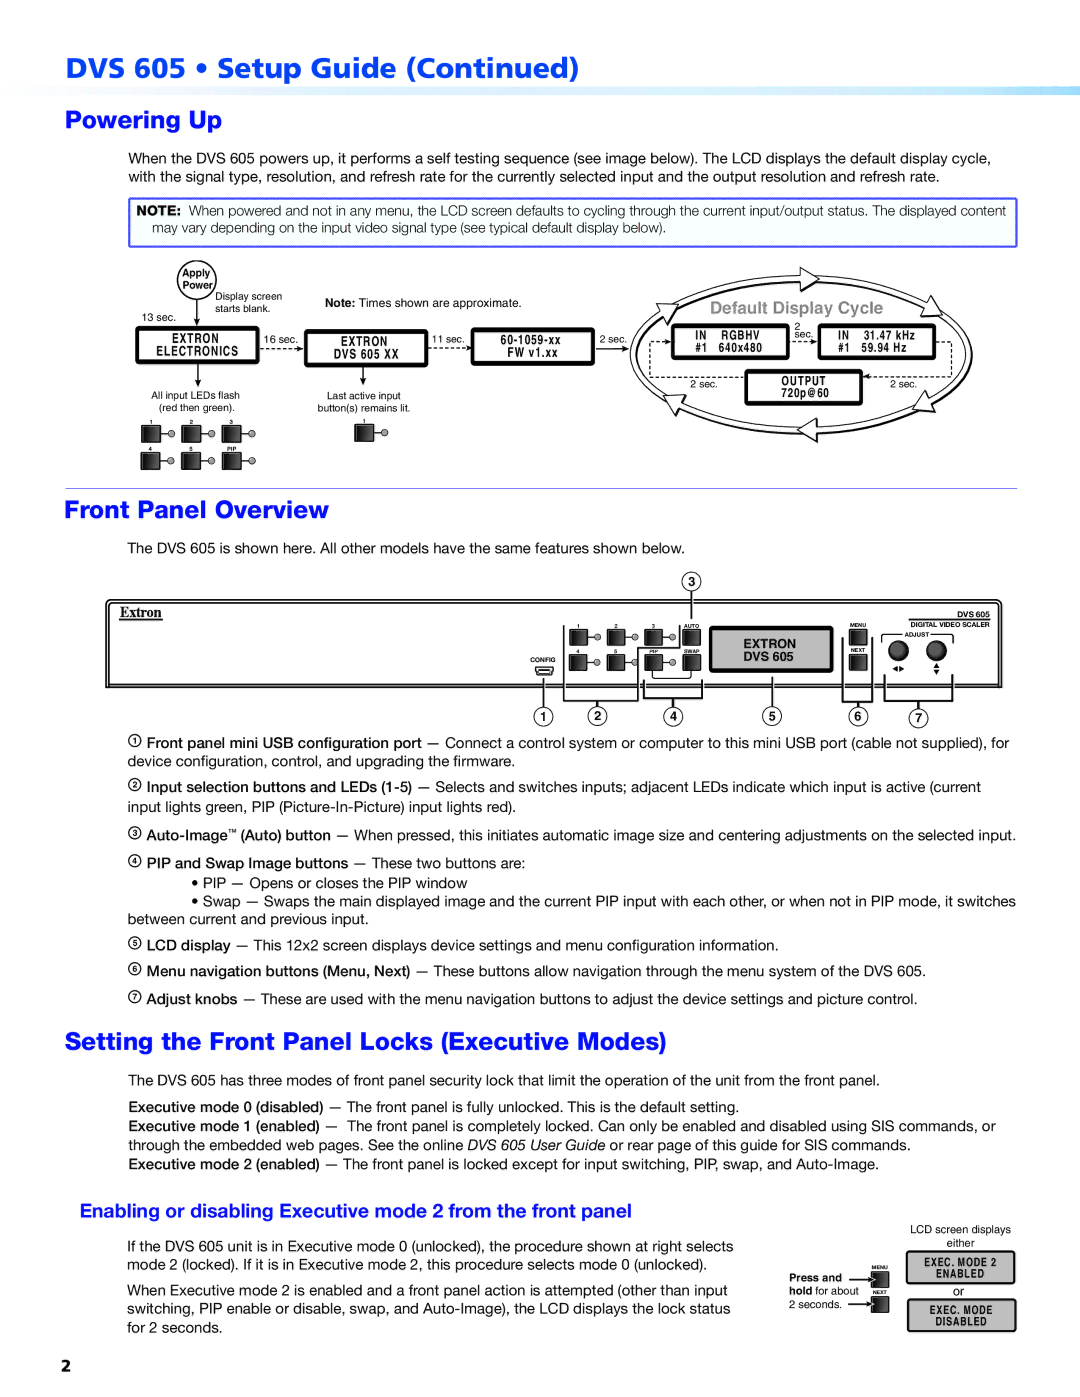
When the DVS 605 powers up, it performs a self testing sequence (see image below). The LCD displays the default display cycle, with the signal type, resolution, and refresh rate for the currently selected input and the output resolution and refresh rate.
NOTE: When powered and not in any menu, the LCD screen defaults to cycling through the current input/output status. The displayed content |
may vary depending on the input video signal type (see typical default display below). |
Apply
Power
| Display screen |
13 sec. | starts blank. |
|
|
|
|
| EXTRON |
|
|
| 16 sec. | |||
|
| ELECTRONICS |
| ||||||||
|
| ||||||||||
|
|
| |||||||||
| All input LEDs flash | ||||||||||
|
| (red then green). | |||||||||
| 1 | 2 |
|
| 3 |
|
|
| |||
|
|
|
|
|
|
|
|
|
|
|
|
|
|
|
|
|
|
|
|
|
|
|
|
Note: Times shown are approximate. |
|
| Default Display Cycle | |||||
|
|
|
|
| ||||
|
|
|
| IN | RGBHV | 2 | IN | 31.47 kHz |
EXTRON | 11 sec. | 2 sec. | sec. | |||||
#1 | 640x480 |
| #1 | 59.94 Hz | ||||
DVS 605 XX |
| FW v1.xx |
|
| ||||
|
|
|
|
|
|
| ||
|
|
|
| 2 sec. | OUTPUT |
| 2 sec. | |
Last active input |
|
|
|
|
| 720p@60 |
|
|
button(s) remains lit.
1
45PIP
Front Panel Overview
The DVS 605 is shown here. All other models have the same features shown below.
|
|
|
|
|
| 3 |
|
| |
1 | 2 | 3 |
| AUTO |
|
| |||
|
|
|
|
|
|
|
|
| EXTRON |
4 | 5 |
| PIP |
| SWAP | ||||
|
|
| DVS 605 | ||||||
CONFIG |
|
|
|
|
|
|
|
| |
|
|
|
|
|
|
|
|
|
|
|
| DVS 605 |
MENU | DIGITAL VIDEO SCALER | |
|
| ADJUST |
|
|
|
NEXT |
| |
|
|
|
1 | 2 | 4 | 5 | 6 | 7 |
A Front panel mini USB configuration port — Connect a control system or computer to this mini USB port (cable not supplied), for device configuration, control, and upgrading the firmware.
B Input selection buttons and LEDs
C
D PIP and Swap Image buttons — These two buttons are:
•PIP — Opens or closes the PIP window
•Swap — Swaps the main displayed image and the current PIP input with each other, or when not in PIP mode, it switches between current and previous input.
E LCD display — This 12x2 screen displays device settings and menu configuration information.
F Menu navigation buttons (Menu, Next) — These buttons allow navigation through the menu system of the DVS 605. G Adjust knobs — These are used with the menu navigation buttons to adjust the device settings and picture control.
Setting the Front Panel Locks (Executive Modes)
The DVS 605 has three modes of front panel security lock that limit the operation of the unit from the front panel.
Executive mode 0 (disabled) — The front panel is fully unlocked. This is the default setting.
Executive mode 1 (enabled) — The front panel is completely locked. Can only be enabled and disabled using SIS commands, or through the embedded web pages. See the online DVS 605 User Guide or rear page of this guide for SIS commands.
Executive mode 2 (enabled) — The front panel is locked except for input switching, PIP, swap, and
Enabling or disabling Executive mode 2 from the front panel
If the DVS 605 unit is in Executive mode 0 (unlocked), the procedure shown at right selects mode 2 (locked). If it is in Executive mode 2, this procedure selects mode 0 (unlocked).
When Executive mode 2 is enabled and a front panel action is attempted (other than input switching, PIP enable or disable, swap, and
Press and ![]() hold for about
hold for about
2 seconds.
MENU
NEXT
LCD screen displays
either
EXEC. MODE 2
ENABLED
or
EXEC. MODE
DISABLED
2