Remote Control Operation

General

The remote control consists of 5 control buttons and a LCD display with a visible area of 40x40mm.

The maximum range of use for the remote control is 15metres.

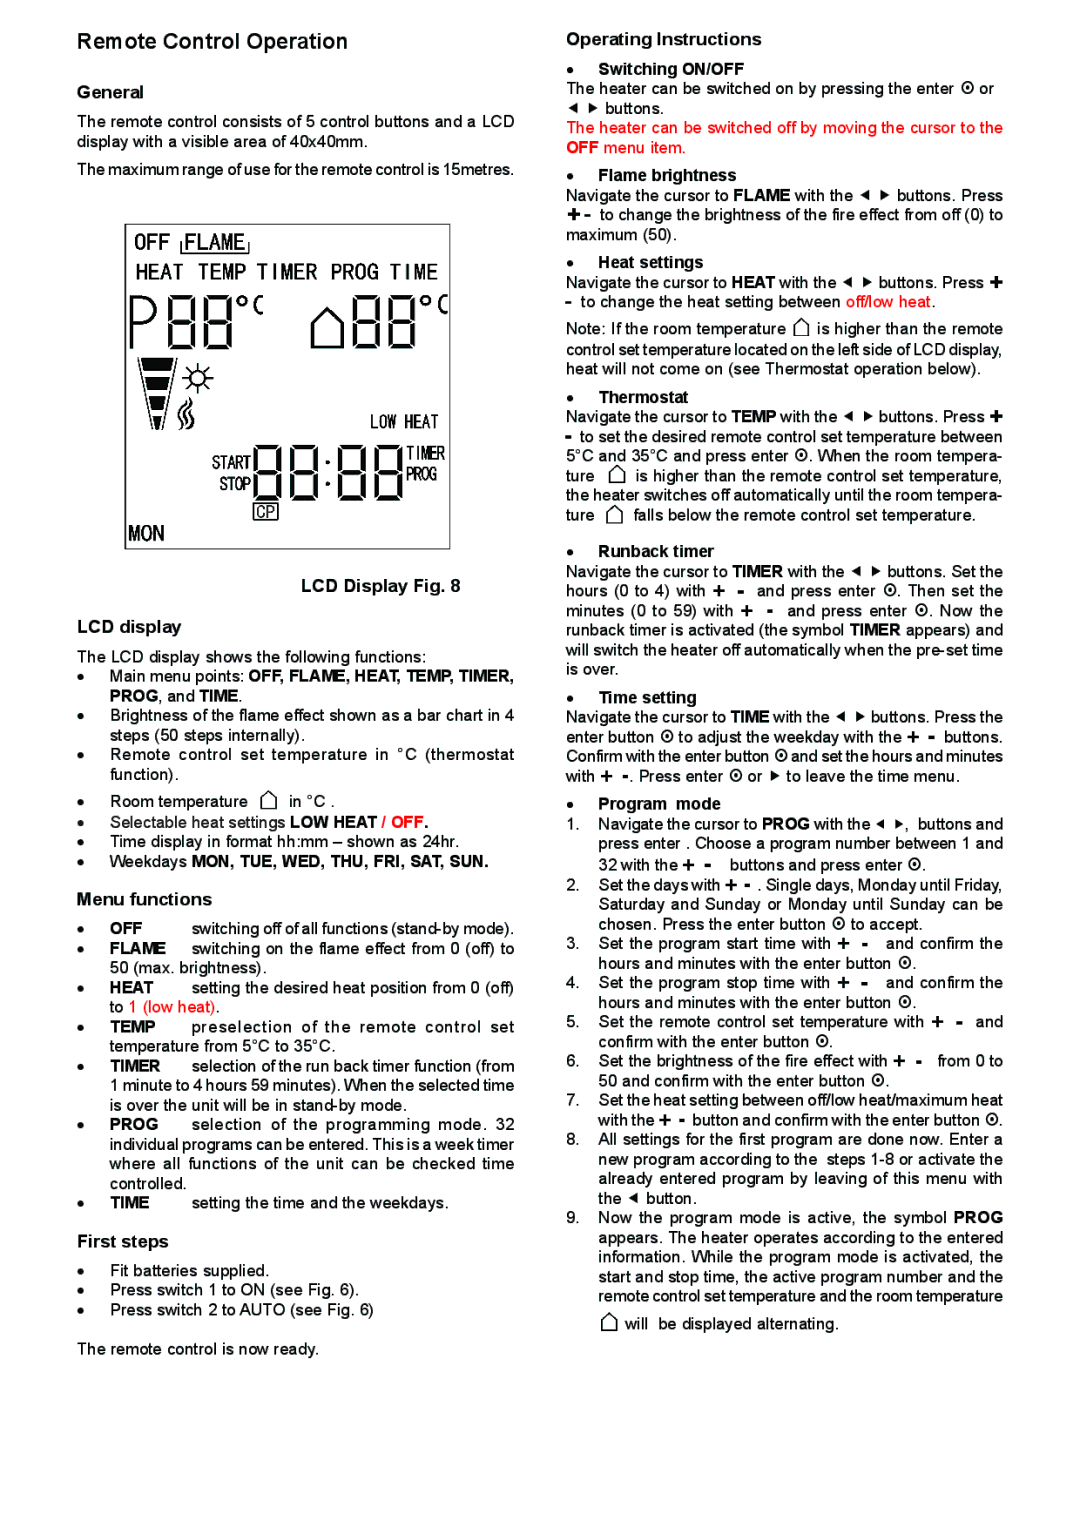
LCD Display Fig. 8

LCD display

The LCD display shows the following functions:

Main menu points: OFF, FLAME, HEAT, TEMP, TIMER, PROG, and TIME.

Brightness of the flame effect shown as a bar chart in 4 steps (50 steps internally).

Remote control set temperature in °C (thermostat function).

Room temperature in °C .

Selectable heat settings LOW HEAT / OFF.

Time display in format hh:mm – shown as 24hr.

Weekdays MON, TUE, WED, THU, FRI, SAT, SUN.

Menu functions

OFF switching off of all functions (stand-by mode).

FLAME switching on the flame effect from 0 (off) to 50 (max. brightness).

HEAT setting the desired heat position from 0 (off) to 1 (low heat).

TEMP preselection of the remote control set temperature from 5°C to 35°C.

TIMER selection of the run back timer function (from 1 minute to 4 hours 59 minutes). When the selected time is over the unit will be in stand-by mode.

PROG selection of the programming mode. 32 individual programs can be entered. This is a week timer where all functions of the unit can be checked time controlled.

TIME setting the time and the weekdays.

First steps

Fit batteries supplied.

Press switch 1 to ON (see Fig. 6).

Press switch 2 to AUTO (see Fig. 6)

The remote control is now ready.

Operating Instructions

Switching ON/OFF

The heater can be switched on by pressing the enter ~ or e f buttons.

The heater can be switched off by moving the cursor to the OFF menu item.

Flame brightness

Navigate the cursor to FLAME with the e f buttons. Press

­- to change the brightness of the fire effect from off (0) to maximum (50).

Heat settings

Navigate the cursor to HEAT with the e f buttons. Press ­

-to change the heat setting between off/low heat.

Note: If the room temperature is higher than the remote control set temperature located on the left side of LCD display, heat will not come on (see Thermostat operation below).

Thermostat

Navigate the cursor to TEMP with the e f buttons. Press ­

-to set the desired remote control set temperature between 5°C and 35°C and press enter ~. When the room tempera-

ture is higher than the remote control set temperature, the heater switches off automatically until the room tempera-

ture falls below the remote control set temperature.

Runback timer

Navigate the cursor to TIMER with the e f buttons. Set the hours (0 to 4) with ­ - and press enter ~. Then set the minutes (0 to 59) with ­ - and press enter ~. Now the runback timer is activated (the symbol TIMER appears) and will switch the heater off automatically when the pre-set time is over.

Time setting

Navigate the cursor to TIME with the e f buttons. Press the enter button ~ to adjust the weekday with the ­ - buttons. Confirm with the enter button ~and set the hours and minutes with ­ -. Press enter ~ or f to leave the time menu.

Program mode

1.Navigate the cursor to PROG with the e f, buttons and press enter . Choose a program number between 1 and 32 with the ­ - buttons and press enter ~.

2.Set the days with ­ - . Single days, Monday until Friday, Saturday and Sunday or Monday until Sunday can be chosen. Press the enter button ~ to accept.

3.Set the program start time with ­ - and confirm the hours and minutes with the enter button ~.

4.Set the program stop time with ­ - and confirm the hours and minutes with the enter button ~.

5.Set the remote control set temperature with ­ - and confirm with the enter button ~.

6.Set the brightness of the fire effect with ­ - from 0 to 50 and confirm with the enter button ~.

7.Set the heat setting between off/low heat/maximum heat with the ­ - button and confirm with the enter button ~.

8.All settings for the first program are done now. Enter a new program according to the steps 1-8 or activate the already entered program by leaving of this menu with the e button.

9.Now the program mode is active, the symbol PROG appears. The heater operates according to the entered information. While the program mode is activated, the start and stop time, the active program number and the remote control set temperature and the room temperature will be displayed alternating.

Page 4
Image 4
Faber SP4 dimensions Remote Control Operation

SP4 specifications

The Faber SP4 is a state-of-the-art range hood that seamlessly blends innovative technology with modern design, making it an essential addition to any contemporary kitchen. Known for its powerful performance and aesthetic appeal, the SP4 combines functionality with sophistication.

One of the standout features of the Faber SP4 is its impressive suction power. With a high CFM (cubic feet per minute) rating, it effectively removes smoke, odors, and grease from the air, ensuring a clean and comfortable cooking environment. The multi-speed fan options allow users to adjust the ventilation intensity based on their cooking needs, whether simmering sauces or searing meats.

The SP4 is designed with advanced noise-reduction technology, providing a quieter operation compared to traditional range hoods. This feature is particularly appreciated in open-concept kitchens, where excessive noise can disrupt the flow of conversation. The hood operates at various sound levels, allowing for a pleasant cooking experience.

A key characteristic of the Faber SP4 is its stylish and sleek design. Available in various finishes, including stainless steel and glass, it complements modern kitchen aesthetics. The minimalist design enhances the visual appeal while maintaining a strong presence above the cooking area.

In addition to its performance and design, the SP4 boasts easy-to-use controls. The intuitive interface allows users to quickly adjust settings and toggle between fan speeds and lighting. The integrated LED lighting illuminates the cooktop efficiently, providing optimal visibility while consuming less energy than traditional bulbs.

Furthermore, the SP4 is equipped with a dishwasher-safe aluminum mesh filter that captures grease particles without compromising airflow. This feature simplifies maintenance, as the filter can be easily removed and cleaned, ensuring the range hood operates at peak efficiency.

The Faber SP4 also supports various installation options, including wall-mounted and under-cabinet installations, providing flexibility to fit diverse kitchen layouts. Its compact size ensures that it doesn’t overpower the kitchen space, while still delivering robust performance.

In conclusion, the Faber SP4 range hood stands out as a superior choice for homeowners seeking efficiency, style, and ease of use in their kitchen ventilation solutions. Its thoughtful features and modern design make it an exemplary model in today’s competitive market.