Assembly Montaje Assemblage
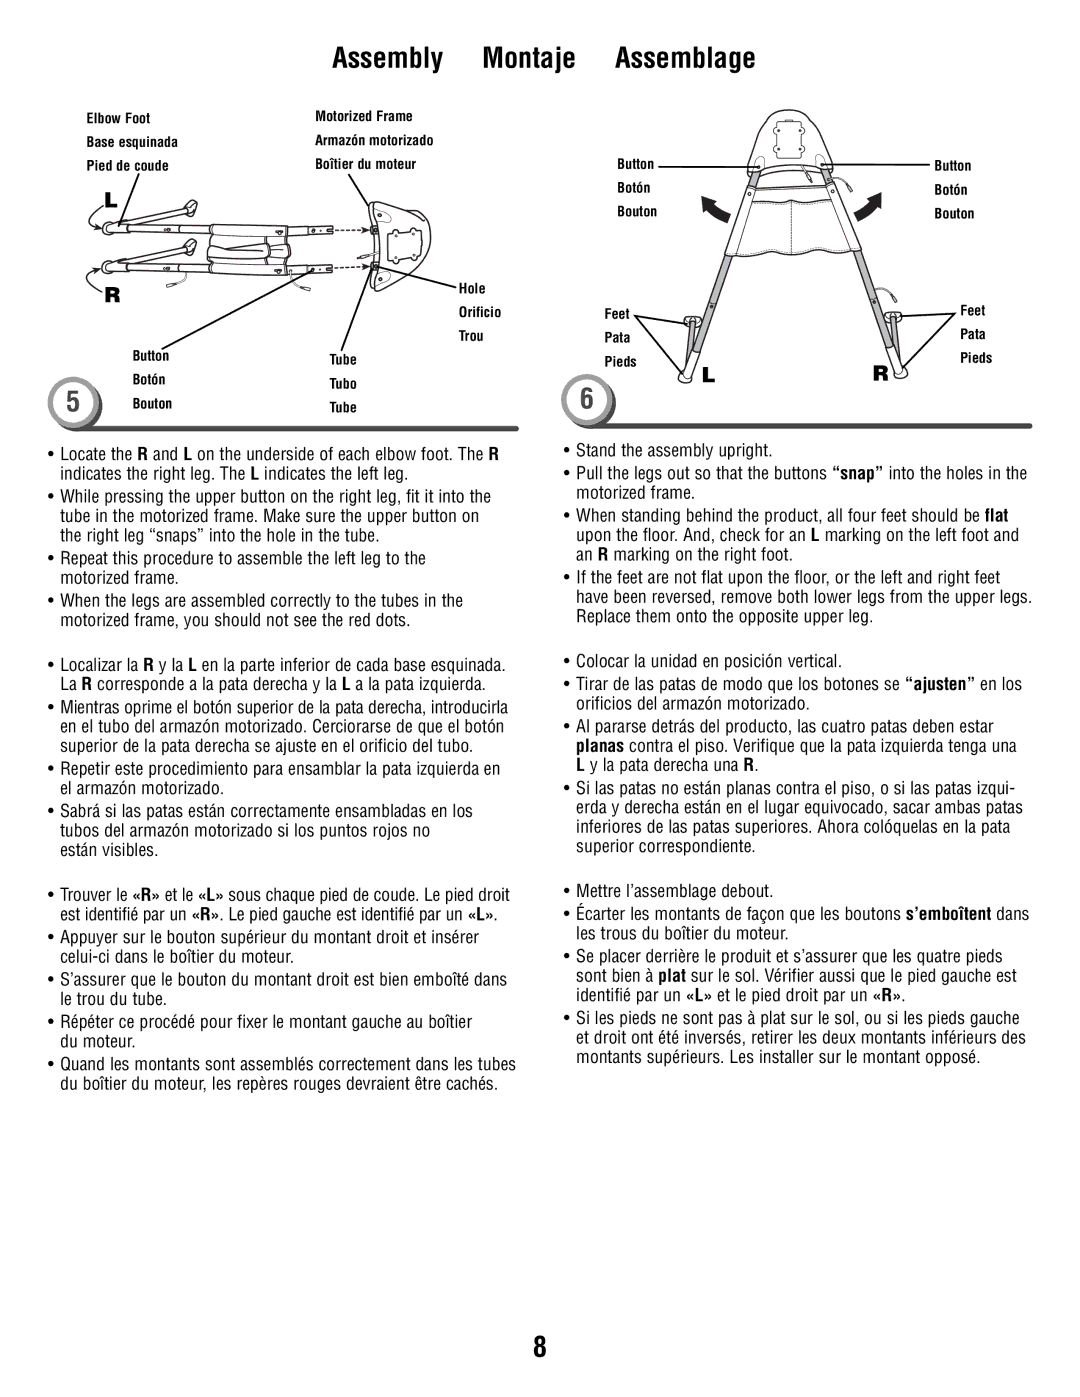
Elbow Foot | Motorized Frame | |
Base esquinada | Armazón motorizado | |
Pied de coude | Boîtier du moteur | |
L |
| |
R | Hole | |
Orificio | ||
| ||
| Trou |
| Button | Tube |
5 | Botón | Tubo |
Bouton | Tube |
•Locate the R and L on the underside of each elbow foot. The R indicates the right leg. The L indicates the left leg.
•While pressing the upper button on the right leg, fit it into the tube in the motorized frame. Make sure the upper button on the right leg “snaps” into the hole in the tube.
•Repeat this procedure to assemble the left leg to the motorized frame.
•When the legs are assembled correctly to the tubes in the motorized frame, you should not see the red dots.
•Localizar la R y la L en la parte inferior de cada base esquinada. La R corresponde a la pata derecha y la L a la pata izquierda.
•Mientras oprime el botón superior de la pata derecha, introducirla en el tubo del armazón motorizado. Cerciorarse de que el botón superior de la pata derecha se ajuste en el orificio del tubo.
•Repetir este procedimiento para ensamblar la pata izquierda en el armazón motorizado.
•Sabrá si las patas están correctamente ensambladas en los tubos del armazón motorizado si los puntos rojos no están visibles.
•Trouver le «R» et le «L» sous chaque pied de coude. Le pied droit est identifié par un «R». Le pied gauche est identifié par un «L».
•Appuyer sur le bouton supérieur du montant droit et insérer
•S’assurer que le bouton du montant droit est bien emboîté dans le trou du tube.
•Répéter ce procédé pour fixer le montant gauche au boîtier du moteur.
•Quand les montants sont assemblés correctement dans les tubes du boîtier du moteur, les repères rouges devraient être cachés.
Button | Button |
Botón | Botón |
Bouton | Bouton |
Feet | Feet |
Pata | Pata |
Pieds | Pieds |
L | R |
6
•Stand the assembly upright.
•Pull the legs out so that the buttons “snap” into the holes in the motorized frame.
•When standing behind the product, all four feet should be flat upon the floor. And, check for an L marking on the left foot and an R marking on the right foot.
•If the feet are not flat upon the floor, or the left and right feet have been reversed, remove both lower legs from the upper legs. Replace them onto the opposite upper leg.
•Colocar la unidad en posición vertical.
•Tirar de las patas de modo que los botones se “ajusten” en los orificios del armazón motorizado.
•Al pararse detrás del producto, las cuatro patas deben estar planas contra el piso. Verifique que la pata izquierda tenga una L y la pata derecha una R.
•Si las patas no están planas contra el piso, o si las patas izqui- erda y derecha están en el lugar equivocado, sacar ambas patas inferiores de las patas superiores. Ahora colóquelas en la pata superior correspondiente.
•Mettre l’assemblage debout.
•Écarter les montants de façon que les boutons s’emboîtent dans les trous du boîtier du moteur.
•Se placer derrière le produit et s’assurer que les quatre pieds sont bien à plat sur le sol. Vérifier aussi que le pied gauche est identifié par un «L» et le pied droit par un «R».
•Si les pieds ne sont pas à plat sur le sol, ou si les pieds gauche et droit ont été inversés, retirer les deux montants inférieurs des montants supérieurs. Les installer sur le montant opposé.
8