Model
Safety Instructions
Table of contents
Introduction
Precautions
Rear panel
Names and Functions
Input faders
Input select switches Input SEL INPUT/OFF/TRK
Panpot knobs PAN L/R
Monitor panpot knobs PAN MON L/MON R
Monitor level control knob MON INPUT/TRK
Input level switches Level H/M/L
Equalizer control knobs EQ HIGH/MID/LOW
AUX send knobs AUX AUX 1/AUX
Contrast adjustment knob
LCD
Scrub key Scrub
Access LED Access
Setup key Setup
Display indication select key Disp SEL
Time Base select key Time Base SEL
Stop button Stop
Play button Play
Record button RECORD/ Auto Punch
Shift key Shift
Vari Pitch key Vari PITCH/ P.EDIT
Auto Return/Auto Play mode on/off key
Locate key LOCATE/ LOC MEM
Hold/ key Hold
Undo/Redo key UNDO/REDO
Store key Store
Edit key Edit
Auto Return Start key
Auto Punch In key Auto Punch IN/ Preview
Auto Return End key Auto RTN END/ Preview
Auto Punch Out key
Clipboard In key Clipboard IN/ Preview
Monitor Out jacks MON OUT L, R Connector RCA pin
Input jacks 1, 2, 3, 4, 5, 6, 7, 8 Connector phone
Stereo Out jacks ST. OUT L, R Connector RCA pin
Front Panel Input/Output Section
Midi OUT jack Midi OUT Connector DIN 5-pin
Balanced input connectors 7, 8 Input 7
Midi in jack Midi in Connector DIN 5-pin
AUX Send jacks 1, 2 AUX Send 1
Data input jack Data in Connector Optical
Data output jack Data OUT Connector Optical
AC in connector
Power switch Power
Preset display
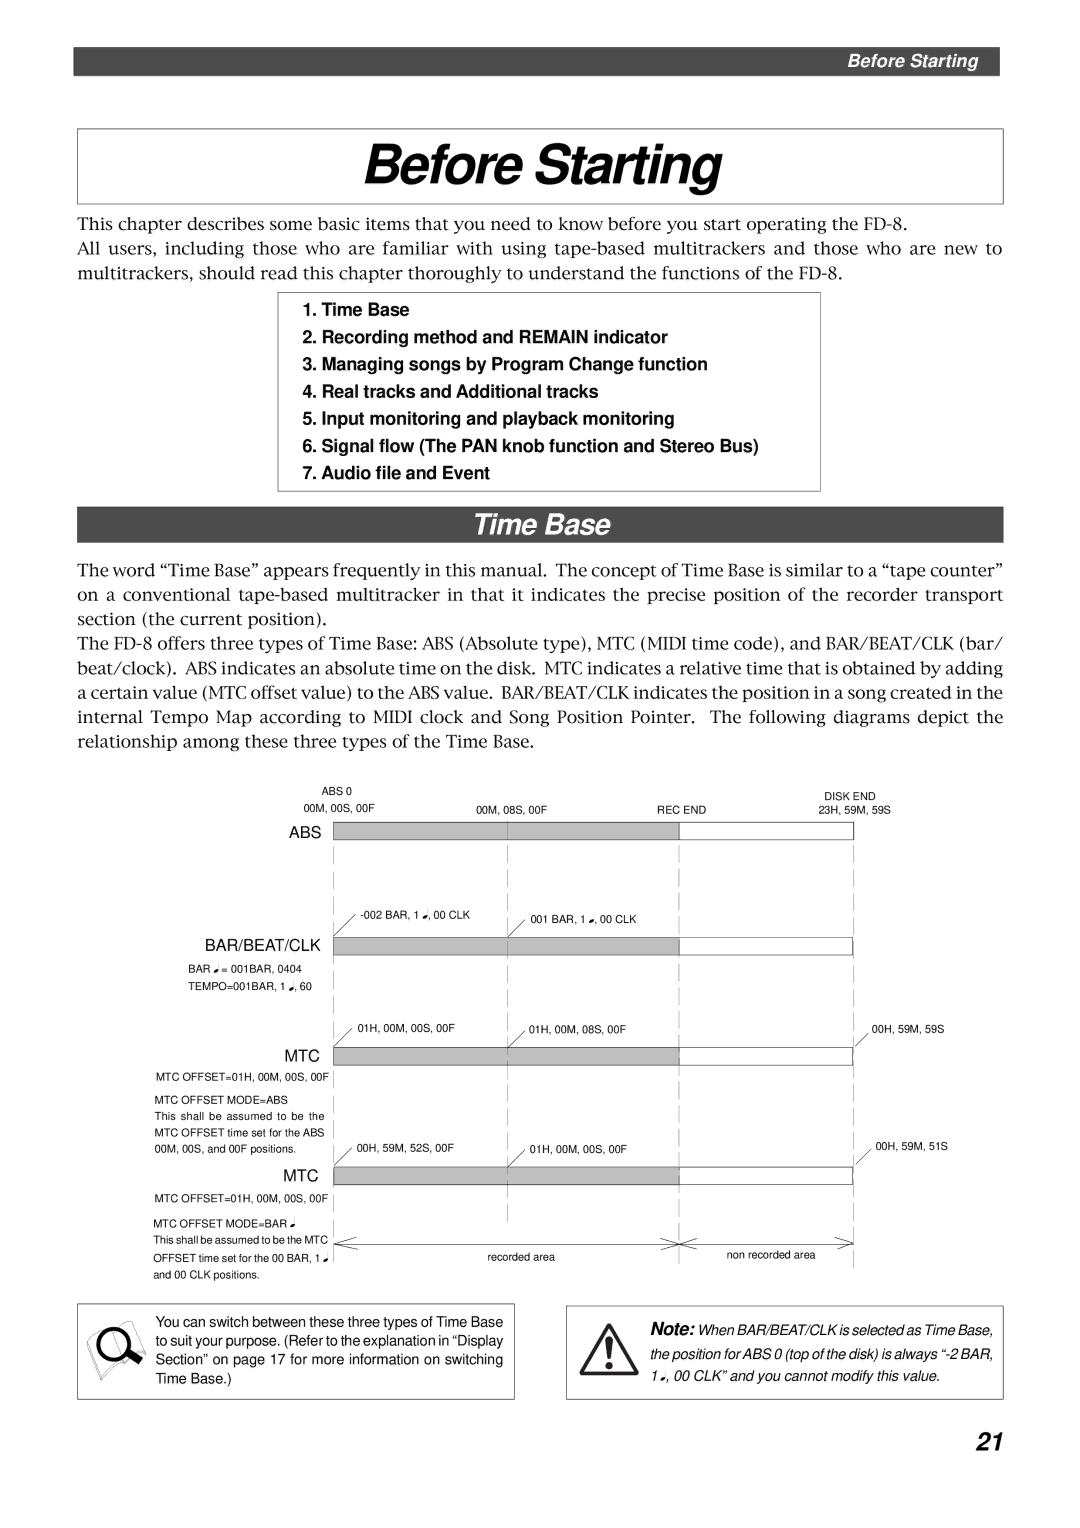
Time Base is ABS
Time Base is MTC
Time Base is BAR/BEAT/CLK
Void Out ! message
Acc Error message
Track Over message
Rec + Yes ! message
Time Base
Before Starting
Recording method and Remain indicator
Remain indicator
Recording method
Managing songs by Program Change function
You can swap data between twenty-four mono tracks
Real tracks and Additional tracks
When you set a track to recording stand-by mode
When you set a track to recording mode
Input monitoring and playback monitoring
Input monitoring
Signal flow The PAN knob function and Stereo Bus
About an audio file
Audio file and event
Formatting a Disk
Recording mode
Formatting a new disk
Formatting a current drive disk Scsi disk
Insert a formatted disk into the Scsi drive
Re-formatting a formatted disk
Press the EXECUTE/YES key
Press the EXECUTE/YES key again
Formatting an unformatted disk for backup
Formatting a backup disk Scsi disk
Insert a new disk into the backup drive
Formatting a current drive disk 2.5-inch hard disk
Formatting a backup disk fixed disk
Re-formatting a formatted disk for backup
Insert a formatted disk into the backup drive
Handling Programs
Creating a new Program
Turn the JOG dial clockwise
To enter a title
Using a Program Change function
Deleting a Program
Press the Setup key while the FD-8 is stopped
JOG dial to enter characters or numbers
Editing a Program title
After you enter the title, press the EXECUTE/YES key
Menu
Set the desired pitch data using the JOG dial
Playback in Vari Pitch Mode
Connecting a sound source and a effect unit
Recording to a Metronome Sound
Connect a microphone to input jack
Punch In/Out Recording
What is Punch In/Out recording?
Auto Punch In/Out
Storing the edit points
Setting the mixer section
Connecting the instrument
Set up the mixer section as follows
Preparation
Press the Record button while holding down the Shift key
Rehearsing Auto Punch In/Out recording
Set the track for Auto Punch In/Out to Ready
Recording level
Auto Punch In/Out Take
Undo/Redo Auto Punch In/Out recording
Press the Record button while holding down the Play button
Connecting the instrument and a foot switch
Manual Punch In/Out
Rehearsing Manual Punch In/Out recording
While holding down the Stop button, press the foot switch
Cancelling Rehearsal mode
Manual Punch In/Out take
Out point
Undo/Redo Manual Punch In/Out recording
Creating a Tempo Map
Setting the switch and knob
Checking the metronome sound
Turning the Metronome function on
Checking the recorded sound
Quitting recording
Starting recording
Press the Record button
Digital recording from an external digital device
Digital Recording
Digital recording to an external device
Setting a digital output track
Assigning output tracks
Digital mixdown
Settings for the effect units
Setting the output level and the master recorder
Mixdown
Quitting mixdown
Using an optical cable
Digital and analog simultaneous recording
Starting the recording Program
Monitoring digital inputs
Settings on the FD-8
Four-track simultaneous recording
Play the connected digital device
Sixteen channels of digital mixdown
How to use the Recorder in jack
Patch Bay Mixer etc
Direct recording of an external sound source
Copy & Paste and Move & Paste
Editing Tracks
Copy & Paste
Move & Paste
Checking the clipboard data
Executing Copy or Move
Paste start point
Key for which you wish to check the edit point
Undo/Redo Paste
Executing Paste
Select a destination track to paste data
Turn the JOG dial to enter the number of repeats Repeat=
Erase
Erasing a specified part of the data between ABS 0
Erasing data from a specified point to REC END
Executing Erase
Undo/Redo Erase
Storing the erase start and end points
Swapping mono track data between Real tracks, Addi
Track Exchange
Executing Track Exchange
Cue & Review Function
Cue & Review function using the Rewind and F FWD buttons
Digital scrubbing using Scrub mode
Press the Scrub key while the recorder section is stopped
Turn the JOG dial to perform digital scrubbing
Cue & Review function using the Shuttle feature
Storing a Locate Point Edit Point
Storing in real-time
Storing and editing the locate points to the memory keys
Press the Store key
Press the desired memory key
Editing and storing locate data
Editing and storing data
Press the HOLD/ key while the FD-8 is stopped
Press the memory key that you pressed in again
Editing the data stored in the Locate key
Press the HOLD/ key, Rewind button, or
To located the edited point, press the Locate key
Locate Function
Direct Locate
Auto Play
Auto Return
Executing the Auto Play function
Press the desired memory key Press the Locate key
Executing the Auto Return function
Auto Repeat
Store the Auto RTN Start and Auto RTN END points
Start playback a little before the Auto RTN END point
Start playback a little before the Auto RTN Start point
Executing the Auto Repeat function
Previewing the rise of the sound fade
Preview Function
Display indication during the Preview operation
Previewing the fall of the sound fade out
Executing the Preview function
Trimming the sound while previewing
Memory key Operation
Example Time Base is ABS value of SF flashes
Setting Midi Sync OUT
Connecting and setting an external device
Midi Synchronization
Midi clock sync system
Midi
Mixing down while syncing Midi sound sources
MTC sync/Machine Control system
Please read this
Mixing down while syncing the Midi sound sources
Setting up the external device
Sync system in Slave mode
Setting the FD-8
Set the following items on the sequence software
Recording
Checking the chase and lock operation
Setup of adat master
Sync system with adat by the slave mode
Setting on the FD-8 slave
Equipment connections
Checking Chase Lock
Offset mode ABS
Using a Scsi drive as the current drive
Saving and Loading Song Data
Outline of the save/load operation
Fostex D-5, Pioneer D-05
Title of data to be saved to a backup Scsi disk
Saving/loading data using another Scsi drive
Insert an unformatted disk into the backup drive
Press the EXIT/NO key to exit Setup mode
Save PGM ? menu
Load PGM ? menu
Three backup disks are required
Saving/loading via a DAT or adat
Save DAT or adat
Saving song data via a DAT or adat
Use the JOG dial to select the desired tracks
Start recording on the DAT or adat
Use the JOG dial to select a Program to save
Tips
Loading song data via a DAT or adat
Start playing the DAT or adat
Use the JOG dial to select a Program into which to load data
Set the Selector in the monitor section to MON
Saving and loading song data via a Scsi drive
If you do not wish to delete the existing data
If you wish to delete the existing data
Selecting Setup mode
Changing the Initial Settings Setup Mode
Setting a time signature Sign. Set ? menu
Storing a time signature
Select a Program for which to set a time signature
Modifying or deleting stored time signatures
Clearing all time signature and tempo settings
Rotate the JOG dial to enter the desired measure number
Measures
Checking the stored tempo setting
Setting a tempo Tempo Set ? menu
Storing a tempo value
100
Setting the Metronome function
Setting the Metronome function Click ? menu
101
Repeat steps 3-5 to store necessary tempo data
Setting a preroll time
Setting a preroll value Preroll ? menu
102
Turn the JOG dial to select on or oFF
Setting Midi sync signal
Setting Midi sync output signal Sync Out ? menu
Turn the JOG dial to select the desired Midi sync signal
103
Setting an MTC offset value Mtc Offset ? menu
Setting an MTC frame rate Frame Rate ? menu
Setting an MTC frame rate
104
Setting Offset mode Ofset Mode ? menu
Setting an MTC offset
105
Setting MTC Offset mode
Setting the Slave mode Slave Mode ? menu
Turning Slave mode on and off
106
Setting the Slave type Slave Type ? menu
Setting the Slave type external sync signal
107
Recording enabled/disabled
Setting the Record Protect function Rec Protect ? menu
Use the JOG dial to enable or disable recording
108
Setting digital input tracks
Setting digital input tracks Digi. In ? menu
109
JOG dial to specify a track
Setting digital output tracks Digi. Out ? menu
Setting digital output tracks
110
Setting BAR/BEAT resolution mode
Setting BAR/BEAT resolution mode Resolu ? menu
Use the JOG dial to turn the mode on or off
111
Setting the Midi device ID
Setting the Midi device number Device ID ? menu
Checking the number of track events NOs Event ? menu
112
113
Checking the number of track events
Midi Implementation Chart
114
Transmitted Recognized Remarks
Command List Movement Recorder
MMC Response/Information Field List Command
115
Maintenance
Specifications
116
117
118
Block Diagram
Index
Fostex Corporation
List of Scsi drive and media checked for function as of Aug