!

2

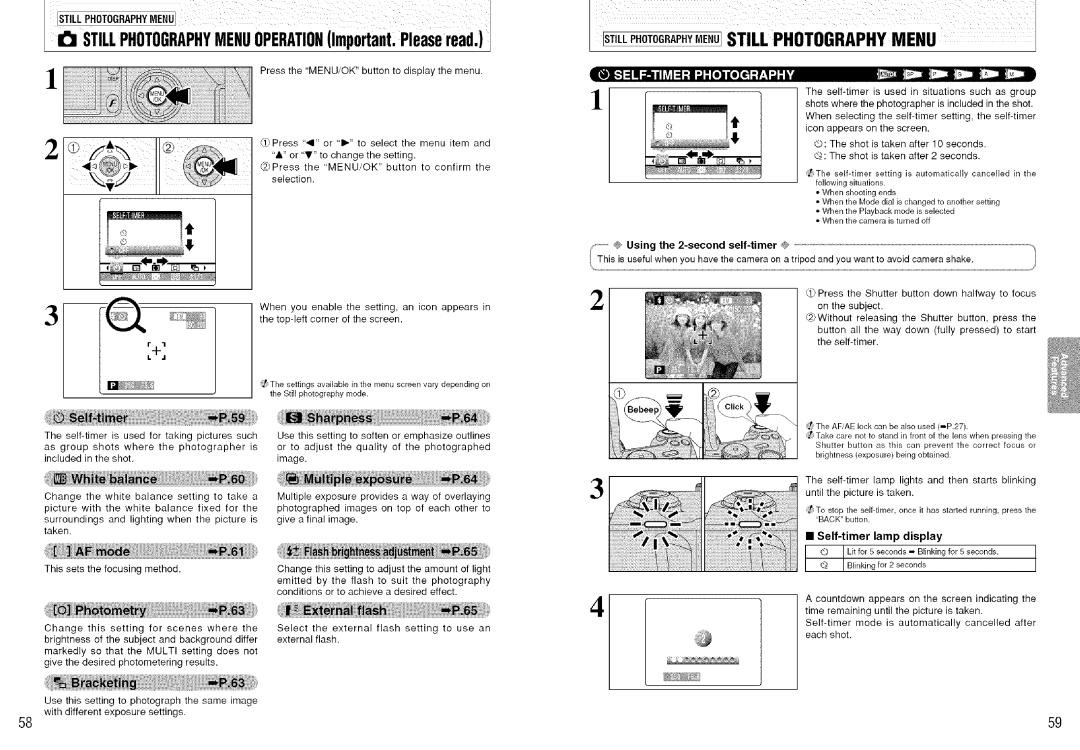
Press the "MENU/OK" button to display the menu.

@ Press "_11" or "1_." to select the menu item and

"&" or "T" to change the setting.

_w_ :11_l i h;_1:1:n :J-"[ell[oI_ :F_,q:J-"k'

!

The self-timer is used in situations such as group shots where the photographer is included in the shot.

When selecting the self-timer setting, the self-timer icon appears on the screen.

@: The shot is taken after 10 seconds.

Q : The shot is taken after 2 seconds.

i4

@Press the "MENU/OK" button to confirm the selection.

_The self-timer setting is automatically cancelled in the following situations.

• When shooting ends

• When the Mode dial is changed to another setting

• When the Playback mode is selected

• When the camera is turned off

...........@ Using the 2-second

self-timer

@

This is useful when you have the camera on a tripod and you want to avoid camera shake.

2


(.1)Press the Shutter button down halfway to focus


3

When you enable the setting, an icon appears in

the top-left corner of the screen.

r..1_1

I. .I

The settings available in the menu screen vary depending on

the Still photography mode.

on the

subject.

@Without

releasing the Shutter button, press the

button all the way down (fully pressed) to start

the self-timer.

_The AF/AE lock can be also used (_P.27).

The self-timer is used for taking pictures such

as group shots where the photographer is included in the shot.

Change the white balance setting to take a picture with the white balance fixed for the

surroundings and lighting when the picture is taken.

This sets the focusing method.

Change this setting for scenes where the brightness of the subject and background differ markedly so that the MULTI setting does not

give the desired photometering results.

Use this setting to photograph the same image with different exposure settings.

Use this setting to soften or emphasize outlines or to adjust the quality of the photographed image.

Multiple exposure provides a way of overlaying

photographed images on top of each other to give a final image.

Change this setting to adjust the amount of light

emitted by the flash to suit the photography conditions or to achieve a desired effect.

Select the external flash setting to use an external flash.

_[ Take care not to stand in front of the lens when pressing the Shutter button as this can prevent the correct focus or brightness (exposure) being obtained.

3

The

self-timer

lamp lights and then starts blinking

until

the picture

is taken.

_[ To stop the self-timer, once it has started running, press the "BACK" button.

Self-timer lamp display


_)

Lit for 5 seconds _ Blinking for 5 seconds.


_

Blinking for 2 seconds


4

A countdown

appears

on the screen indicating the

time

remaining until the picture

is taken.


Self-timer

mode is

automatically

cancelled

after


each

shot.


58

59

Page 30
Image 30
FujiFilm S7000 owner manual 11l i h11n J-elloI F,qJ-k, Self-timer lamp display, @ Using the 2-second Self-timer

S7000 specifications

The FujiFilm S7000 digital camera, launched in the early 2000s, marked a significant advancement in the world of digital photography, particularly for enthusiasts and semi-professional photographers. With its unique features and technologies, the S7000 positioned itself as a versatile camera that delivered high-quality images and usability.

One of the highlights of the S7000 is its Super CCD technology, which features a 6.3-megapixel sensor that effectively captures images at a resolution of 12-megapixels via interpolation. This technology allows for greater dynamic range and enhanced detail, making it possible to produce large prints without sacrificing quality. The camera boasts a wide ISO range from 80 to 1600, making it adaptable for various lighting conditions, whether bright daylight or low-light environments.

The S7000 features a 6x optical zoom lens with a focal length equivalent to 35-210mm in 35mm film terms, providing flexibility for different types of photography, from landscapes to close-up portraits. The lens design includes aspherical elements to reduce aberrations, ensuring sharp images across the zoom range. In addition to its optical capabilities, the camera supports digital zoom, allowing users to extend the zoom range further, albeit at a loss of quality.

An ergonomic design sets the S7000 apart, with a robust build that fits comfortably in hand. The camera features a 1.8-inch LCD screen, which can be tilted for versatile shooting angles, along with an optical viewfinder for traditional composing. Notably, the S7000 includes both manual and automatic exposure modes, giving photographers the creative control they desire while still accommodating those who prefer point-and-shoot functionality.

The S7000 also offers advanced features such as multiple scene modes and the ability to shoot in RAW format, providing flexibility in post-processing. Users benefit from its Continuous Shooting mode, allowing for capturing a rapid series of shots, which is particularly useful in sports or wildlife photography.

Overall, the FujiFilm S7000 is a significant camera that combines innovative technology with user-friendly design. Its combination of Super CCD technology, versatile zoom capabilities, and robust shooting options make it a memorable part of photography history, appealing to both beginners and seasoned photographers alike. With its introduction, FujiFilm brought the digital camera experience to new heights, laying the groundwork for future advancements in the field.