2 | Initial Setting |
You need to follow these steps when you turn on this unit for the first time.
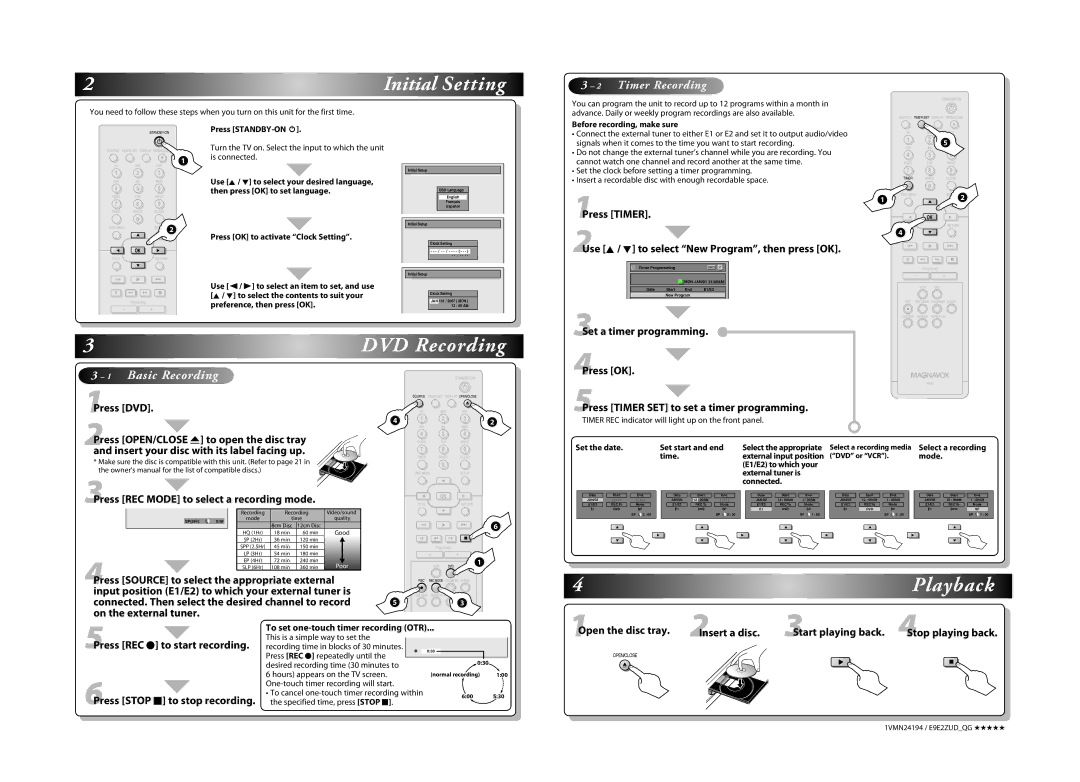
3 – 2 Timer Recording
You can program the unit to record up to 12 programs within a month in advance. Daily or weekly program recordings are also available.
SOURCE TIMERTIMER SETSET DISPLAY OPEN/CLOSE
Press | |
SOURCE TIMER SET DISPLAY OPEN/CLOSE | Turn the TV on. Select the input to which the unit |
Ais connected.
1
Before recording, make sure
• Connect the external tuner to either E1 or E2 and set it to output audio/video |
signals when it comes to the time you want to start recording. |
• Do not change the external tuner’s channel while you are recording. You |
cannot watch one channel and record another at the same time. |
|
| A |
.@/: | ABC | DEF |
1 | 2 | 5 3 |
GHI | JKL | MNO |
4 5 6
PQRS TUV WXYZ
.@/: | ABC | DEF |
1 | 2 | 3 |
GHI | JKL | MNO |
4 | 5 | 6 |
Use [K / L] to select your desired language, then press [OK] to set language.
Initial Setup
OSD Language
• Set the clock before setting a timer programming. |
• Insert a recordable disc with enough recordable space. |
7 8 9
TIMERTIMER SPACE CLEAR
0
PQRS | TUV | WXYZ |
7 | 8 | 9 |
TIMER | SPACE | CLEAR |
| 0 |
|
DISC MENU | o | SETUP 2 |
s | OK | B |
TITLE |
| RETURN |
| p |
|
j | B | i |
F | h g | C |
TRACKING
--+
Press [OK] to activate “Clock Setting”.
Use [{ / B] to select an item to set, and use [K / L] to select the contents to suit your preference, then press [OK].
English
Français
Español
Initial Setup
Clock Setting
- -
-
Initial Setup
Clock Setting
JAN / 01 / 2007 ( MON ) 12 : 00 AM
1Press [TIMER].
2Use [K / L] to select “New Program”, then press [OK].
![]()
![]() Timer Programming
Timer Programming
![]() MON JAN/01 11:00AM
MON JAN/01 11:00AM
Date Start End E1/E2
New Program
3Set a timer programming.
DISC MENU |
| SETUP 2 |
1 | oo |
|
s | OKOK | B |
TITLE |
| RETURN |
4 | pp |
|
j | B | i |
F | h g | C |
TRACKING
--+
| VCR | DVD |
REC | REC MODE | D.DUBBING AUDIO |
I |
|
|
CM SKIP | SEARCH | RAPID PLAY |
3
DVD Recording
4
3 – 1 Basic RecordingSTANDBY-ON
|
| SOURCE | TIMER SET DISPLAY OPEN/CLOSE |
| |
Press [DVD]. |
|
|
| A |
|
| .@/: | ABC | DEF |
| |
1 | 4 | 1 | 2 | 3 | 2 |
|
| GHI | JKL | MNO |
|
Press [OPEN/CLOSE A] to open the disc tray |
| 4 | 5 | 6 |
|
| PQRS | TUV | WXYZ |
| |
2 |
|
|
|
|
|
Press [OK].
5Press [TIMER SET] to set a timer programming.
TIMER REC indicator will light up on the front panel.
NB552
and insert your disc with its label facing up. |
|
| 7 |
| 8 | 9 |
| |||
* Make sure the disc is compatible with this unit. (Refer to page 21 in |
|
| TIMER | SPACE | CLEAR |
| ||||
|
|
|
| 0 |
|
| ||||
the owner's manual for the list of compatible discs.) |
|
|
|
|
|
|
|
| ||
|
|
|
| DISC MENU |
| SETUP |
| |||
3Press [REC MODE] to select a recording mode. |
|
|
|
| o |
|
| |||
|
| s |
| OK | B |
| ||||
Video/sound |
| TITLE |
| p | RETURN |
| ||||
| Recording | Recording |
|
|
|
|
| |||
SP(2Hr) | mode | time | quality |
|
|
|
|
|
| |
0:58 | 8cm Disc | 12cm Disc |
|
| j |
| B | i | 6 | |
|
|
|
|
| ||||||
|
| Good |
|
|
|
|
| |||
| HQ (1Hr) | 18 min | 60 min |
|
|
|
|
|
| |
| SP (2Hr) | 36 min | 120 min |
|
| F | h | g | C |
|
|
|
|
|
|
|
|
| |||
| SPP (2.5Hr) | 45 min | 150 min |
|
|
| TRACKING |
|
| |
| LP (3Hr) | 54 min | 180 min |
|
|
| + |
|
| |
| EP (4Hr) | 72 min | 240 min | Poor |
|
| VCR | DVD | 1 |
|
| SLP (6Hr) | 108 min | 360 min |
|
|
|
| |||
|
|
|
|
|
|
| ||||
Press [SOURCE] to select the appropriate external |
| REC | REC MODE D.DUBBING | AUDIO |
| |||||
4 |
|
|
|
|
| I |
|
|
|
|
input position (E1/E2) to which your external tuner is |
| CM SKIP SEARCH RAPID PLAY |
|
| ||||||
connected. Then select the desired channel to record | 5 |
|
|
| 3 |
| ||||
on the external tuner. |
|
|
|
|
|
|
|
|
|
|
5Press [REC I] to start recording. | To set |
|
|
| ||||||
This is a simple way to set the |
|
|
|
|
|
| ||||
recording time in blocks of 30 minutes. | I | 0:30 |
|
|
| |||||
|
| Press [REC I] repeatedly until the |
|
|
|
| 0:30 |
| ||
|
| desired recording time (30 minutes to |
|
|
|
| ||||
|
|
|
|
|
|
| ||||
6Press [STOP C] to stop recording. | 6 hours) appears on the TV screen. |
|
| (normal recording) | 1:00 | |||||
|
|
|
|
| ||||||
• To cancel |
|
| 6:00 | 5:30 | ||||||
the specified time, press [STOP C]. |
|
|
| |||||||
|
|
|
|
| ||||||
Set the date. |
|
|
|
| Set start and end | Select the appropriate |
| Select a recording media |
| Select a recording | ||||||||||||||||||||||||||||||||
|
|
|
|
|
|
|
|
| time. |
|
|
|
|
| external input position |
| (“DVD” or “VCR”). |
| mode. |
|
|
| ||||||||||||||||||||
|
|
|
|
|
|
|
|
|
|
|
|
|
|
|
|
|
|
| (E1/E2) to which your |
|
|
|
|
|
|
|
|
|
|
|
|
|
|
|
| |||||||
|
|
|
|
|
|
|
|
|
|
|
|
|
|
|
|
|
|
| external tuner is |
|
|
|
|
|
|
|
|
|
|
|
|
|
|
|
| |||||||
|
|
|
|
|
|
|
|
|
|
|
|
|
|
|
|
|
|
| connected. |
|
|
|
|
|
|
|
|
|
|
|
|
|
|
|
|
|
|
| ||||
|
|
|
|
|
|
|
|
|
|
|
|
|
|
|
|
|
|
|
|
|
|
|
|
|
|
|
|
|
|
|
|
|
|
|
|
|
|
|
|
|
|
|
|
| Date |
| Start |
| End |
|
|
|
| Date |
|
| Start | End |
|
|
|
| Date |
| Start | End |
|
|
|
| Date |
| Start | End |
|
|
|
|
| Date |
| Start | End |
| |
|
| JAN/02 | - | - |
|
|
|
| JAN/02 | 12 | : 00AM | - |
|
|
|
| JAN/02 |
| 12 : 00AM | 1 : 00AM |
|
| JAN/02 | 12 : 00AM | 1 : 00AM |
|
|
| JAN/02 | 12 : 00AM | 1 : 00AM | |||||||||||
|
| E1/E2 |
| REC To |
| Mode |
|
|
| E1/E2 |
|
| REC To | Mode |
|
|
| E1/E2 |
| REC To | Mode |
|
|
| E1/E2 |
| REC To | Mode |
|
|
|
| E1/E2 |
| REC To | Mode | ||||||
|
| E1 |
| DVD |
| SP |
|
| E1 | DVD | SP |
|
| E1 |
| DVD | SP |
|
| E1 |
| DVD | SP |
|
|
|
| E1 |
| DVD | SP | |||||||||||
|
|
|
|
|
| SP 2 : 00 |
|
|
|
|
|
|
| SP 2 : 00 |
|
|
|
|
| SP 1 : 00 |
|
|
|
|
| SP 1 : 00 |
|
|
|
|
|
| SP 1 : 00 | |||||||||
|
|
|
| o |
|
|
|
|
|
|
|
|
|
| o |
|
|
|
|
|
|
| o |
|
|
|
|
|
|
| o |
|
|
|
|
|
|
|
| o |
|
|
|
|
|
|
|
|
|
|
| B |
|
|
|
|
| B |
|
|
|
|
| B |
|
|
|
|
| B |
|
|
| ||||||||||||
|
|
|
| p |
|
|
|
|
|
|
|
|
|
| p |
|
|
|
|
|
|
| p |
|
|
|
|
|
|
| p |
|
|
|
|
|
|
|
| p |
|
|
4 |
| Playback | |
Open the disc tray. | Start playing back. |
| |
1 | 4Stop playing back. | ||
2Insert a disc. 3 | |||
OPEN/CLOSE |
|
| |
A | B | C | |
|
|
1VMN24194 / E9E2ZUD_QG ★★★★★