Cable Box or Satellite Box
Hit Setup
From Cable
Back of this unit
After all recordings, finalize your disc
Select any blank line and hit Enter
Date
At the current date
Español
Menu Others
Laser Safety
Precautions
Before you start
Make your contribution to the environment
Before you
Precautions cont’d
Supplied Accessory
Reverse engineering or disassembly is prohibited
Others Español
Dolby Digital Recording
Table of contents
Symbol
Features
Before
Description
Front Panel
Functional overview
Functional overview cont’d
Displays
Indicates a disc type and a format mode
On-screen displays
Above approx feet 5m within Below approx feet 3m within
Displays cont’d
Display message
Front Panel Display
Connection to a TV
Connections
Plug in the AC
After you have completed connections
You cannot record one channel while watching another channel
Connection to a cable box or satellite box
Audio
Connection to an Audio System
Easy DVD recording
Getting started
Speed Channel
Easy DVD recording Cont’d
Getting channels automatically
Channel setting
Adding/deleting channels
Channel setting cont’d
Selecting the TV stereo or SAP
Auto Clock Setting
Setting the clock
Manual Clock Setting
Setting the clock cont’d
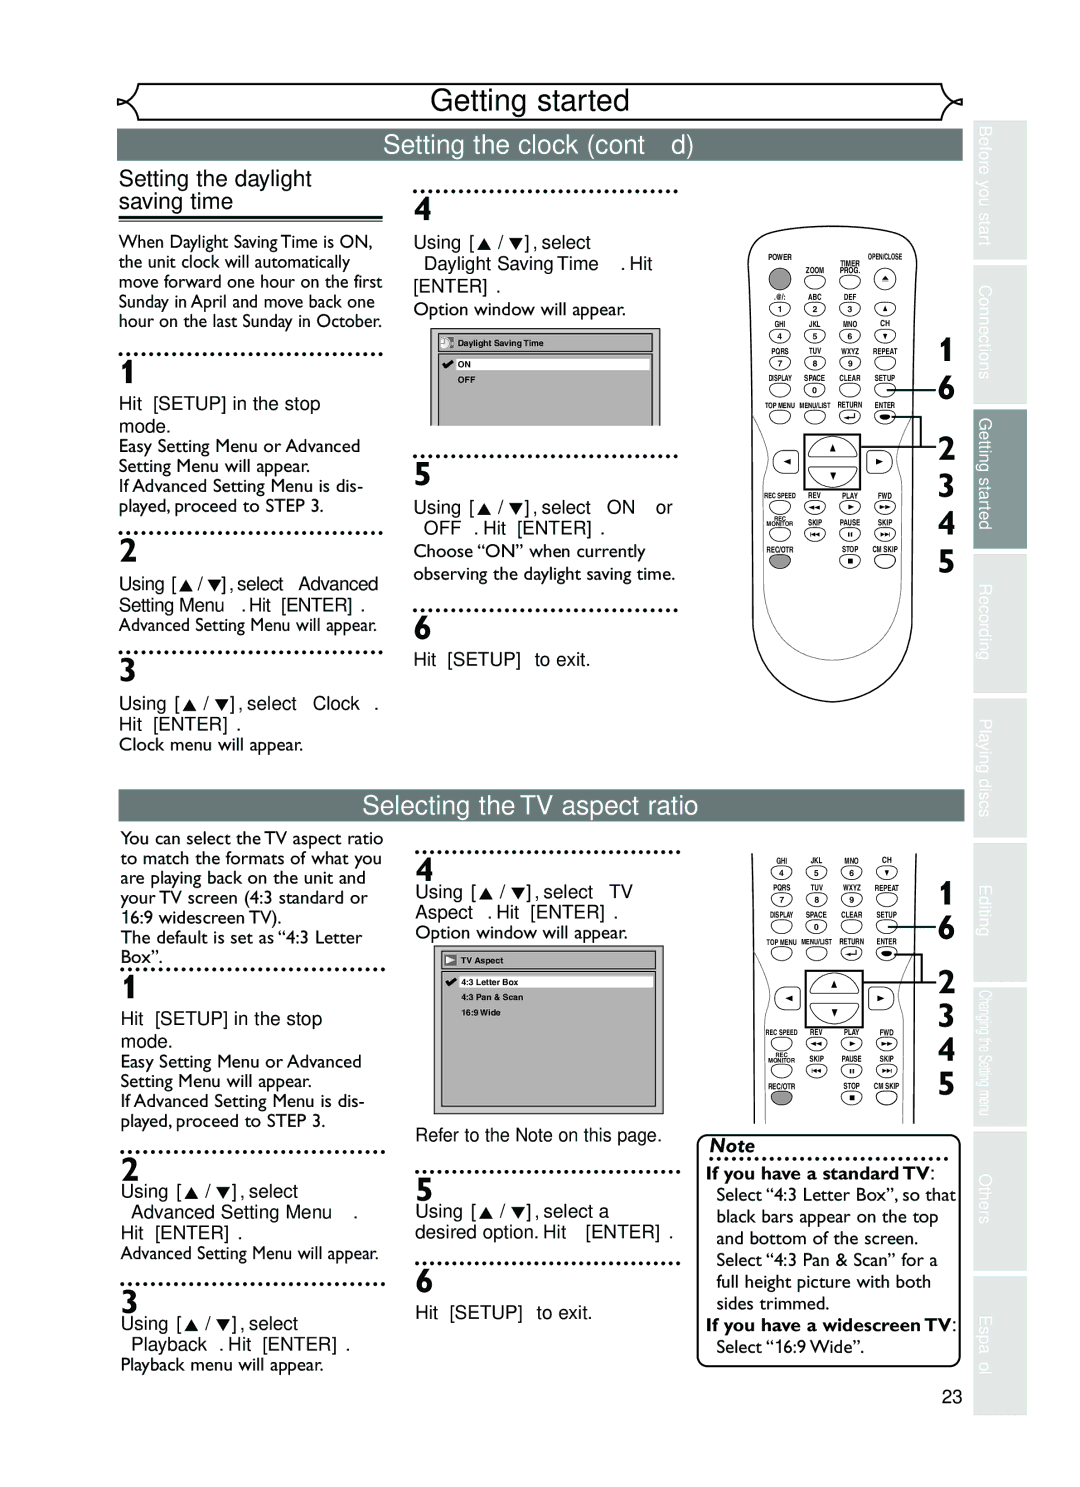
Selecting the TV aspect ratio
Setting the daylight saving time
Information on DVD recording
Recording
Information
Recordable disc
Information on DVD recording cont’d
What is CPRM?
Restrictions on recording
Making discs playable in other DVD player Finalize
Choosing the recording format of a blank disc
Formatting a disc
Reformatting a disc
Formatting a disc cont’d
Checking the recording picture and sound quality
Basic recording
When a DVD-RW disc is loaded
One-touch Timer Recording
Turn on the unit and load a recordable disc
Refer to Recording speed on
Timer Recording
Timer Recording cont’d
Priority of overlapped settings
Hints for Timer Recording
Connection to an external source
Settings for an external source
Video
Before you start Connections Getting started
Setting a disc to protect
Settings for an external source cont’d
Using K / L, select Disc Protect OFF ON. Hit Enter
Recording from an external source
Finalizing the discs
Using K / L, select on Hit Enter
Using K / L, select Auto Finalize. Hit Enter
Your setting will be activated
Finalizing the discs cont’d
Information on DVD playback
Disc Playback
Playback
Basic playback
Basic playback cont’d
When selecting track
Playing back MP3 disc
Hit Playb to start play- back
Playing back discs using the title menu
Playing back discs using the disc menu
Resume playback
Special playback
Fast forward / Fast reverse
X1.5
Pause
Special playback cont’d
Step by step playback
Slow forward / Slow reverse playback
Zoom
Marker Setup
Using Display
Using Skip H / G
Search
Title/Chapter search
Track search
Search cont’d
Time search
Repeat playback
Repeat/Random/Program playback
Random playback
Repeat/Random/Program playback cont’d
Switching subtitles
Selecting a format of audio and video
Program playback
Using K / L, select a desired audio channel. Hit Enter
Switching audio soundtrack
Selecting a format of audio and video cont’d
TOP Menu or Menu
Reducing block noise
Switching camera angles
Angle will change each time you
Information on disc editing
Editing
Using K / L / / B, select a desired title. Hit Enter
Editing discs in Video mode
Using K / L, select Title List. Hit Enter
Deleting titles
Using K / L, select Yes
Editing discs in Video mode cont’d
Using K / L, select Edit Title Name. Hit Enter
After this operation is com- pleted, hit Setup to exit
Using K / L, select Chapter Mark. Hit Enter
Setting or clearing chapter markers
Using K / L, select a desired time. Hit Enter
Using K / L, select Original. Hit Enter
Editing discs in VR mode Original
Using K / L, select Title Delete. Hit Enter
Original list will appear
Setting titles to protect
Editing discs in VR mode Original cont’d
Using K / L, select Protect. Hit Enter
Confirm the indication OFF ON. Hit Enter
Confirm the indication On OFF. Hit Enter
Releasing titles from protecting
Key icon will disappear from the title in the original list
Using K / L, select Playlist. Hit Enter
Editing discs in VR mode Playlist
Playlist will appear
Playlist menu will appear
Using K / L, select Scene Delete. Hit Enter
Editing discs in VR mode Playlist cont’d
Using K / L, select Delete. Hit Enter
Deleting parts of titles
Steps of Guide to edit title Name on this
To enter a title name, follow
Add
You cannot delete the first chapter of each title
Picture for thumbnail will be set
Setting pictures for thumbnails
Dividing a title
Using s / B, select Yes Hit Enter
Using K / L, select Title Combining. Hit Enter
Combining titles
Two titles will be combined into a single title
Deleting a Playlist
Adding titles to a Playlist
Tour of the Setting menu
Changing the Setting menu
Using K / L, select Playback. Hit Enter
Language setting
Using K / L, select a lan Guage. Hit Enter
Audio Language Default Original
Display setting
Language setting cont’d
OSD Language Default English Set the language for OSD
Audio setting
Using K / L, select a set Ting. Hit Enter
Screen Saver Default 10 minutes
Using K / L, select a setting. Hit Enter
Audio setting cont’d
When playing back disc with copyright protec- tion
When playing back a DVD-RW disc recorded in VR mode
Dynamic Range Control Default on
Settings for Parental lock level
Fast Forward with Audio Default OFF
Record the password in case you forget it
Password has not been set yet
Settings for Parental lock level cont’d
Symptom Remedy Power
Troubleshooting
Others
Symptom Remedy
Troubleshooting cont’d
Others
Cause Solution
Language code
Error message Cause Solution
Glossary
General
Specifications
Fácil grabación de DVD
Español
Puede editar lo siguiente de la lista de títulos
¿Qué son títulos y capítulos?
Original y Playlist modo VR
¿Qué significa Original o Playlist?
Limited Warranty

