INSTALLATION INSTRUCTIONS
EXHAUST
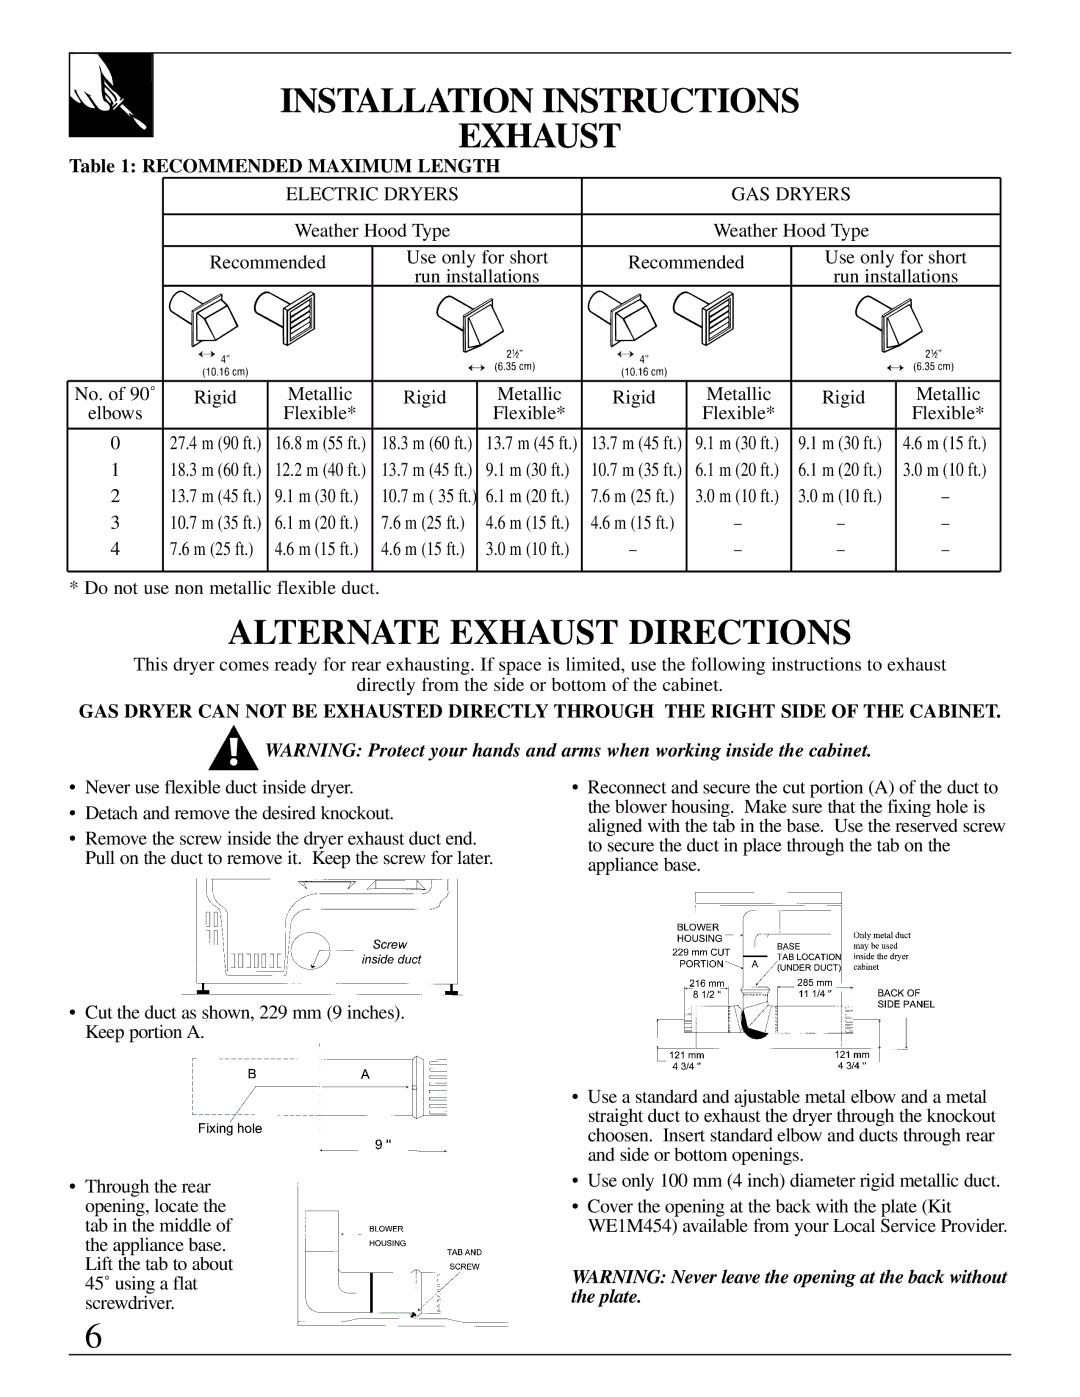
Table 1: RECOMMENDED MAXIMUM LENGTH
|
| ELECTRIC DRYERS |
|
| GAS DRYERS |
| ||
|
| Weather Hood Type |
|
| Weather Hood Type |
| ||
| Recommended | Use only for short | Recommended | Use only for short | ||||
|
|
| run installations |
|
| run installations | ||
No. of 90˚ | Rigid | Metallic | Rigid | Metallic | Rigid | Metallic | Rigid | Metallic |
elbows |
| Flexible* |
| Flexible* |
| Flexible* |
| Flexible* |
0 | 27.4 m (90 ft.) | 16.8 m (55 ft.) | 18.3 m (60 ft.) | 13.7 m (45 ft.) | 13.7 m (45 ft.) | 9.1 m (30 ft.) | 9.1 m (30 ft.) | 4.6 m (15 ft.) |
1 | 18.3 m (60 ft.) | 12.2 m (40 ft.) | 13.7 m (45 ft.) | 9.1 m (30 ft.) | 10.7 m (35 ft.) | 6.1 m (20 ft.) | 6.1 m (20 ft.) | 3.0 m (10 ft.) |
2 | 13.7 m (45 ft.) | 9.1 m (30 ft.) | 10.7 m ( 35 ft.) | 6.1 m (20 ft.) | 7.6 m (25 ft.) | 3.0 m (10 ft.) | 3.0 m (10 ft.) | – |
3 | 10.7 m (35 ft.) | 6.1 m (20 ft.) | 7.6 m (25 ft.) | 4.6 m (15 ft.) | 4.6 m (15 ft.) | – | – | – |
4 | 7.6 m (25 ft.) | 4.6 m (15 ft.) | 4.6 m (15 ft.) | 3.0 m (10 ft.) | – | – | – | – |
* Do not use non metallic flexible duct.
ALTERNATE EXHAUST DIRECTIONS
This dryer comes ready for rear exhausting. If space is limited, use the following instructions to exhaust
directly from the side or bottom of the cabinet.
GAS DRYER CAN NOT BE EXHAUSTED DIRECTLY THROUGH THE RIGHT SIDE OF THE CABINET.
WARNING: Protect your hands and arms when working inside the cabinet.
•Never use flexible duct inside dryer.
•Detach and remove the desired knockout.
•Remove the screw inside the dryer exhaust duct end. Pull on the duct to remove it. Keep the screw for later.
•Cut the duct as shown, 229 mm (9 inches). Keep portion A.
•Reconnect and secure the cut portion (A) of the duct to the blower housing. Make sure that the fixing hole is aligned with the tab in the base. Use the reserved screw to secure the duct in place through the tab on the appliance base.
•Use a standard and ajustable metal elbow and a metal straight duct to exhaust the dryer through the knockout choosen. Insert standard elbow and ducts through rear and side or bottom openings.
•Through the rear opening, locate the tab in the middle of the appliance base. Lift the tab to about 45˚ using a flat screwdriver.
6
•Use only 100 mm (4 inch) diameter rigid metallic duct.
•Cover the opening at the back with the plate (Kit WE1M454) available from your Local Service Provider.
WARNING: Never leave the opening at the back without the plate.