3/4″
3/4″  (19 mm)
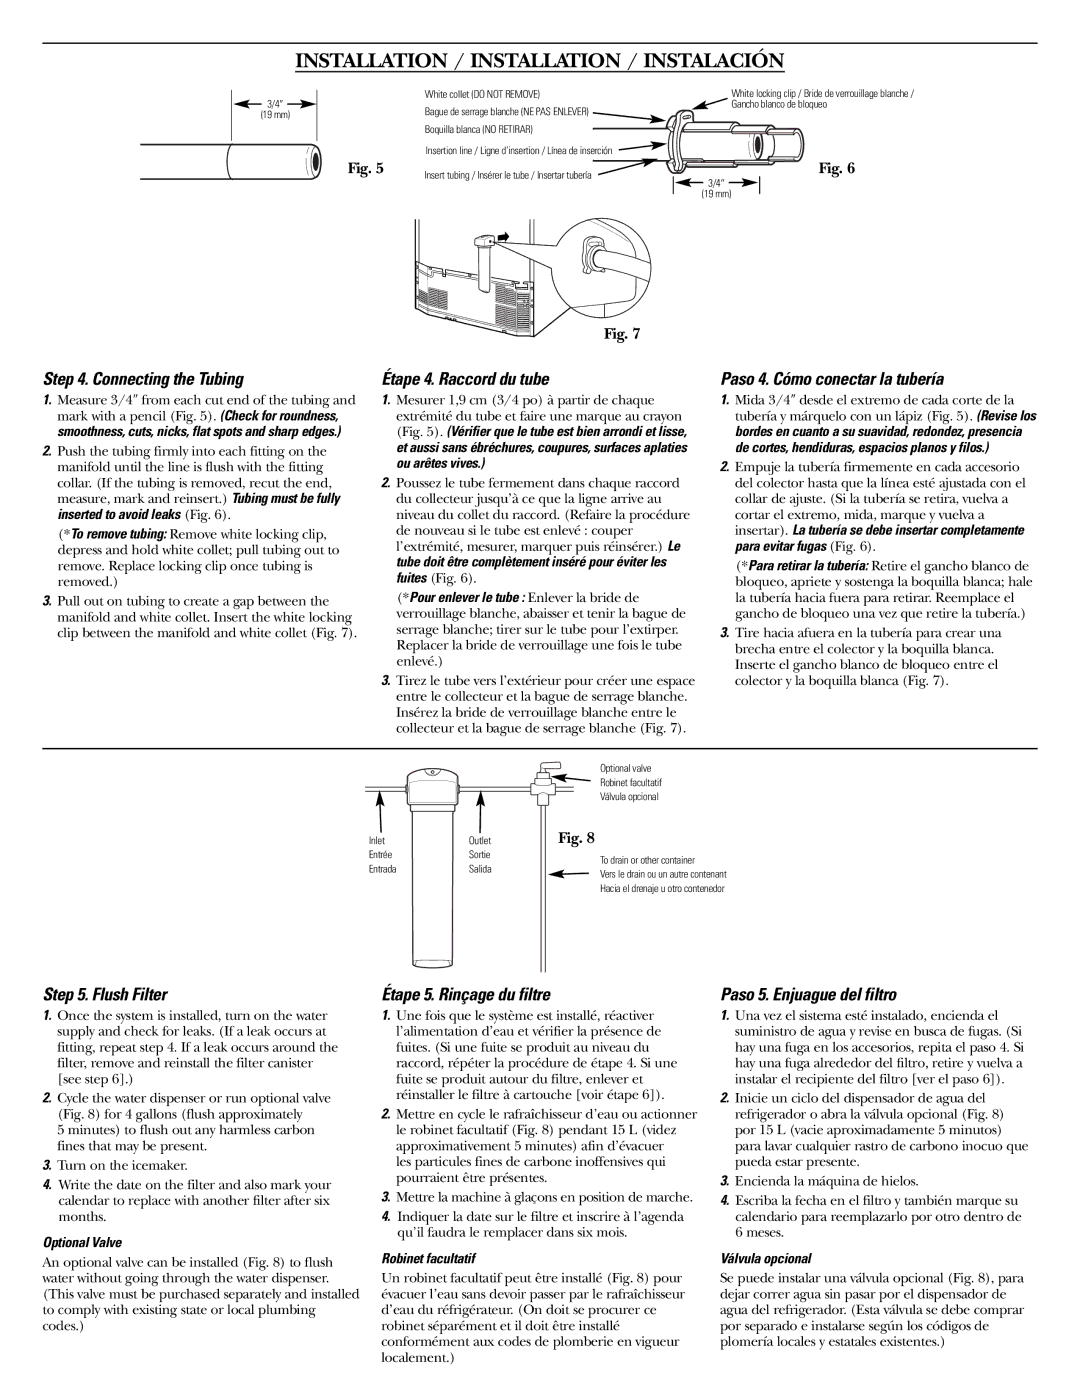
White collet (DO NOT REMOVE)
Bague de serrage blanche (NE PAS ENLEVER)
Boquilla blanca (NO RETIRAR)
Insertion line / Ligne d’insertion / Línea de inserción
Fig. 5 | Insert tubing / Insérer le tube / Insertar tubería |
|
Fig. 7
White locking clip / Bride de verrouillage blanche /  Gancho blanco de bloqueo
Fig. 6
 3/4″
3/4″  (19 mm)
1.Measure 3/4″ from each cut end of the tubing and mark with a pencil (Fig. 5). (Check for roundness, smoothness, cuts, nicks, flat spots and sharp edges.)
2.Push the tubing firmly into each fitting on the manifold until the line is flush with the fitting collar. (If the tubing is removed, recut the end, measure, mark and reinsert.) Tubing must be fully inserted to avoid leaks (Fig. 6).
(*To remove tubing: Remove white locking clip, depress and hold white collet; pull tubing out to remove. Replace locking clip once tubing is removed.)
3.Pull out on tubing to create a gap between the manifold and white collet. Insert the white locking clip between the manifold and white collet (Fig. 7).
1.Mesurer 1,9 cm (3/4 po) à partir de chaque extrémité du tube et faire une marque au crayon (Fig. 5). (Vérifier que le tube est bien arrondi et lisse, et aussi sans ébréchures, coupures, surfaces aplaties ou arêtes vives.)
2.Poussez le tube fermement dans chaque raccord du collecteur jusqu’à ce que la ligne arrive au niveau du collet du raccord. (Refaire la procédure de nouveau si le tube est enlevé : couper l’extrémité, mesurer, marquer puis réinsérer.) Le tube doit être complètement inséré pour éviter les fuites (Fig. 6).
(*Pour enlever le tube : Enlever la bride de verrouillage blanche, abaisser et tenir la bague de serrage blanche; tirer sur le tube pour l’extirper. Replacer la bride de verrouillage une fois le tube enlevé.)
3.Tirez le tube vers l’extérieur pour créer une espace entre le collecteur et la bague de serrage blanche. Insérez la bride de verrouillage blanche entre le collecteur et la bague de serrage blanche (Fig. 7).
1.Mida 3/4″ desde el extremo de cada corte de la tubería y márquelo con un lápiz (Fig. 5). (Revise los bordes en cuanto a su suavidad, redondez, presencia de cortes, hendiduras, espacios planos y filos.)
2.Empuje la tubería firmemente en cada accesorio del colector hasta que la línea esté ajustada con el collar de ajuste. (Si la tubería se retira, vuelva a cortar el extremo, mida, marque y vuelva a insertar). La tubería se debe insertar completamente para evitar fugas (Fig. 6).
(*Para retirar la tubería: Retire el gancho blanco de bloqueo, apriete y sostenga la boquilla blanca; hale la tubería hacia fuera para retirar. Reemplace el gancho de bloqueo una vez que retire la tubería.)
3.Tire hacia afuera en la tubería para crear una brecha entre el colector y la boquilla blanca. Inserte el gancho blanco de bloqueo entre el colector y la boquilla blanca (Fig. 7).
Step 5. Flush Filter
1.Once the system is installed, turn on the water supply and check for leaks. (If a leak occurs at fitting, repeat step 4. If a leak occurs around the filter, remove and reinstall the filter canister [see step 6].)
2.Cycle the water dispenser or run optional valve (Fig. 8) for 4 gallons (flush approximately
5 minutes) to flush out any harmless carbon fines that may be present.
3.Turn on the icemaker.
4.Write the date on the filter and also mark your calendar to replace with another filter after six months.
Optional Valve
An optional valve can be installed (Fig. 8) to flush water without going through the water dispenser. (This valve must be purchased separately and installed to comply with existing state or local plumbing codes.)
Étape 5. Rinçage du filtre
1.Une fois que le système est installé, réactiver l’alimentation d’eau et vérifier la présence de fuites. (Si une fuite se produit au niveau du raccord, répéter la procédure de étape 4. Si une fuite se produit autour du filtre, enlever et réinstaller le filtre à cartouche [voir étape 6]).
2.Mettre en cycle le rafraîchisseur d’eau ou actionner le robinet facultatif (Fig. 8) pendant 15 L (videz approximativement 5 minutes) afin d’évacuer
les particules fines de carbone inoffensives qui pourraient être présentes.
3.Mettre la machine à glaçons en position de marche.
4.Indiquer la date sur le filtre et inscrire à l’agenda qu’il faudra le remplacer dans six mois.
Robinet facultatif
Un robinet facultatif peut être installé (Fig. 8) pour évacuer l’eau sans devoir passer par le rafraîchisseur d’eau du réfrigérateur. (On doit se procurer ce robinet séparément et il doit être installé conformément aux codes de plomberie en vigueur localement.)
Paso 5. Enjuague del filtro
1.Una vez el sistema esté instalado, encienda el suministro de agua y revise en busca de fugas. (Si hay una fuga en los accesorios, repita el paso 4. Si hay una fuga alrededor del filtro, retire y vuelva a instalar el recipiente del filtro [ver el paso 6]).
2.Inicie un ciclo del dispensador de agua del refrigerador o abra la válvula opcional (Fig. 8) por 15 L (vacie aproximadamente 5 minutos) para lavar cualquier rastro de carbono inocuo que pueda estar presente.
3.Encienda la máquina de hielos.
4.Escriba la fecha en el filtro y también marque su calendario para reemplazarlo por otro dentro de 6 meses.
Válvula opcional
Se puede instalar una válvula opcional (Fig. 8), para dejar correr agua sin pasar por el dispensador de agua del refrigerador. (Esta válvula se debe comprar por separado e instalarse según los códigos de plomería locales y estatales existentes.)