About the water softener system.

Breaking a Salt Bridge

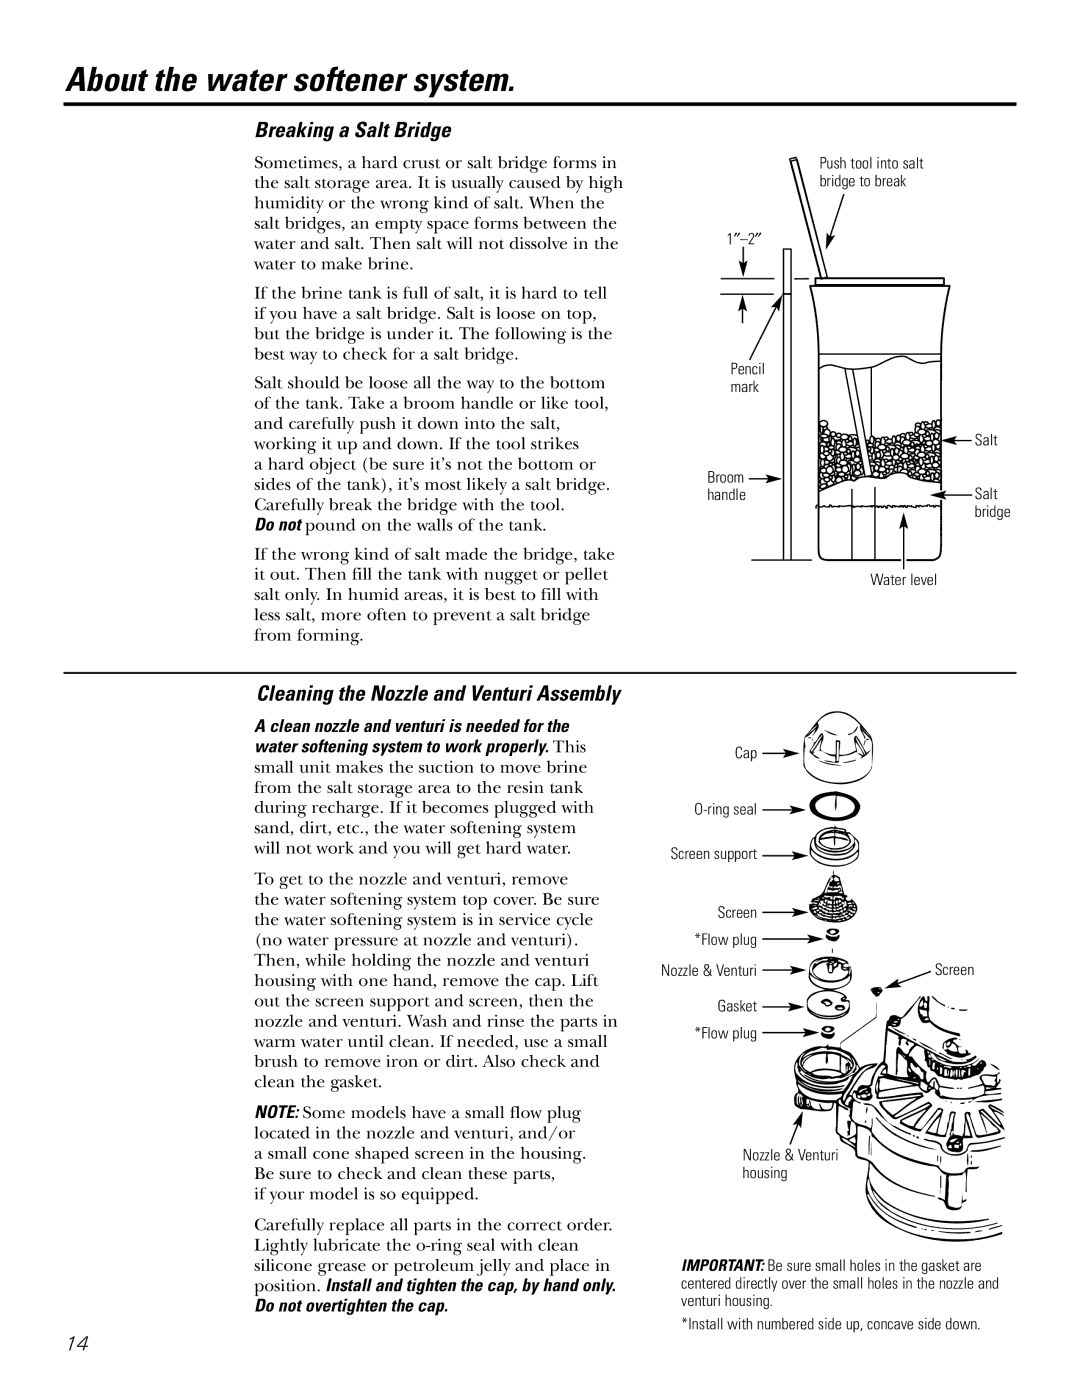
Sometimes, a hard crust or salt bridge forms in the salt storage area. It is usually caused by high humidity or the wrong kind of salt. When the salt bridges, an empty space forms between the water and salt. Then salt will not dissolve in the water to make brine.

If the brine tank is full of salt, it is hard to tell if you have a salt bridge. Salt is loose on top, but the bridge is under it. The following is the best way to check for a salt bridge.

Salt should be loose all the way to the bottom of the tank. Take a broom handle or like tool, and carefully push it down into the salt, working it up and down. If the tool strikes

a hard object (be sure it’s not the bottom or sides of the tank), it’s most likely a salt bridge. Carefully break the bridge with the tool.

Do not pound on the walls of the tank.

If the wrong kind of salt made the bridge, take it out. Then fill the tank with nugget or pellet salt only. In humid areas, it is best to fill with less salt, more often to prevent a salt bridge from forming.

Push tool into salt bridge to break

1–2

Pencil mark


Salt

Broom

Salt

handle


bridge


Water level

Cleaning the Nozzle and Venturi Assembly

A clean nozzle and venturi is needed for the water softening system to work properly. This small unit makes the suction to move brine from the salt storage area to the resin tank during recharge. If it becomes plugged with sand, dirt, etc., the water softening system will not work and you will get hard water.

To get to the nozzle and venturi, remove the water softening system top cover. Be sure the water softening system is in service cycle (no water pressure at nozzle and venturi). Then, while holding the nozzle and venturi housing with one hand, remove the cap. Lift out the screen support and screen, then the nozzle and venturi. Wash and rinse the parts in warm water until clean. If needed, use a small brush to remove iron or dirt. Also check and clean the gasket.

NOTE: Some models have a small flow plug located in the nozzle and venturi, and/or a small cone shaped screen in the housing. Be sure to check and clean these parts,

if your model is so equipped.

Carefully replace all parts in the correct order. Lightly lubricate the o-ring seal with clean silicone grease or petroleum jelly and place in position. Install and tighten the cap, by hand only.

Do not overtighten the cap.

Cap

O-ring seal

Screen support

Screen

*Flow plug

Nozzle & Venturi


Screen


Gasket

*Flow plug

Nozzle & Venturi housing

IMPORTANT: Be sure small holes in the gasket are centered directly over the small holes in the nozzle and venturi housing.

*Install with numbered side up, concave side down.

14

Page 14
Image 14
GE GXSF35E, GXSF39E installation instructions Breaking a Salt Bridge, Do not overtighten the cap

GXSF39E, GXSF35E specifications

The GE GXSF35E and GXSF39E are sophisticated water filtration systems designed to meet the diverse needs of residential consumers. Offering reliable water purification solutions, these models efficiently remove impurities, ensuring clean and safe water for household use.

Both the GXSF35E and GXSF39E units feature advanced filtration technology, specifically designed to target a broad spectrum of contaminants, including chlorine, sediment, lead, and other harmful substances. The filtration process effectively enhances the taste and smell of drinking water, allowing families to enjoy fresh and clean water directly from their taps.

One of the standout features of these models is their high-capacity filtration capabilities. The GXSF35E boasts a 35,000-gallon capacity, making it suitable for medium to large households. Conversely, the GXSF39E, designed for larger families, offers an impressive 39,000-gallon capacity. This extended capacity ensures that users have access to purified water for an extended period, reducing the frequency of cartridge replacements and associated maintenance.

In terms of technical specifications, both models utilize a unique dual-stage filtration system. The first stage consists of a high-performance sediment filter that captures large particles and sediments, while the second stage employs an activated carbon filter that removes chemical contaminants and enhances taste. This two-tiered approach ensures comprehensive purification and longevity of the filter media.

Another major characteristic of the GXSF35E and GXSF39E is their user-friendly design. With features such as easy installation processes, intuitive control panels, and filter change indicators, these systems cater to users with varying levels of technical expertise. The compact design of the units allows for versatile installation options, whether in basements, under sinks, or in utility rooms.

Both models are also equipped with smart technology, enabling users to monitor filter life through mobile applications or digital displays. This connectivity feature ensures that homeowners are well-informed when it’s time to replace filters, enhancing the system's overall efficiency and effectiveness.

In conclusion, the GE GXSF35E and GXSF39E water filtration systems stand out in the market due to their efficient filtration technologies, high capacity, user-friendly features, and smart monitoring capabilities. They provide an excellent solution for families seeking safe and clean drinking water without the hassles associated with traditional filtration methods.