Instrucciones de instalación

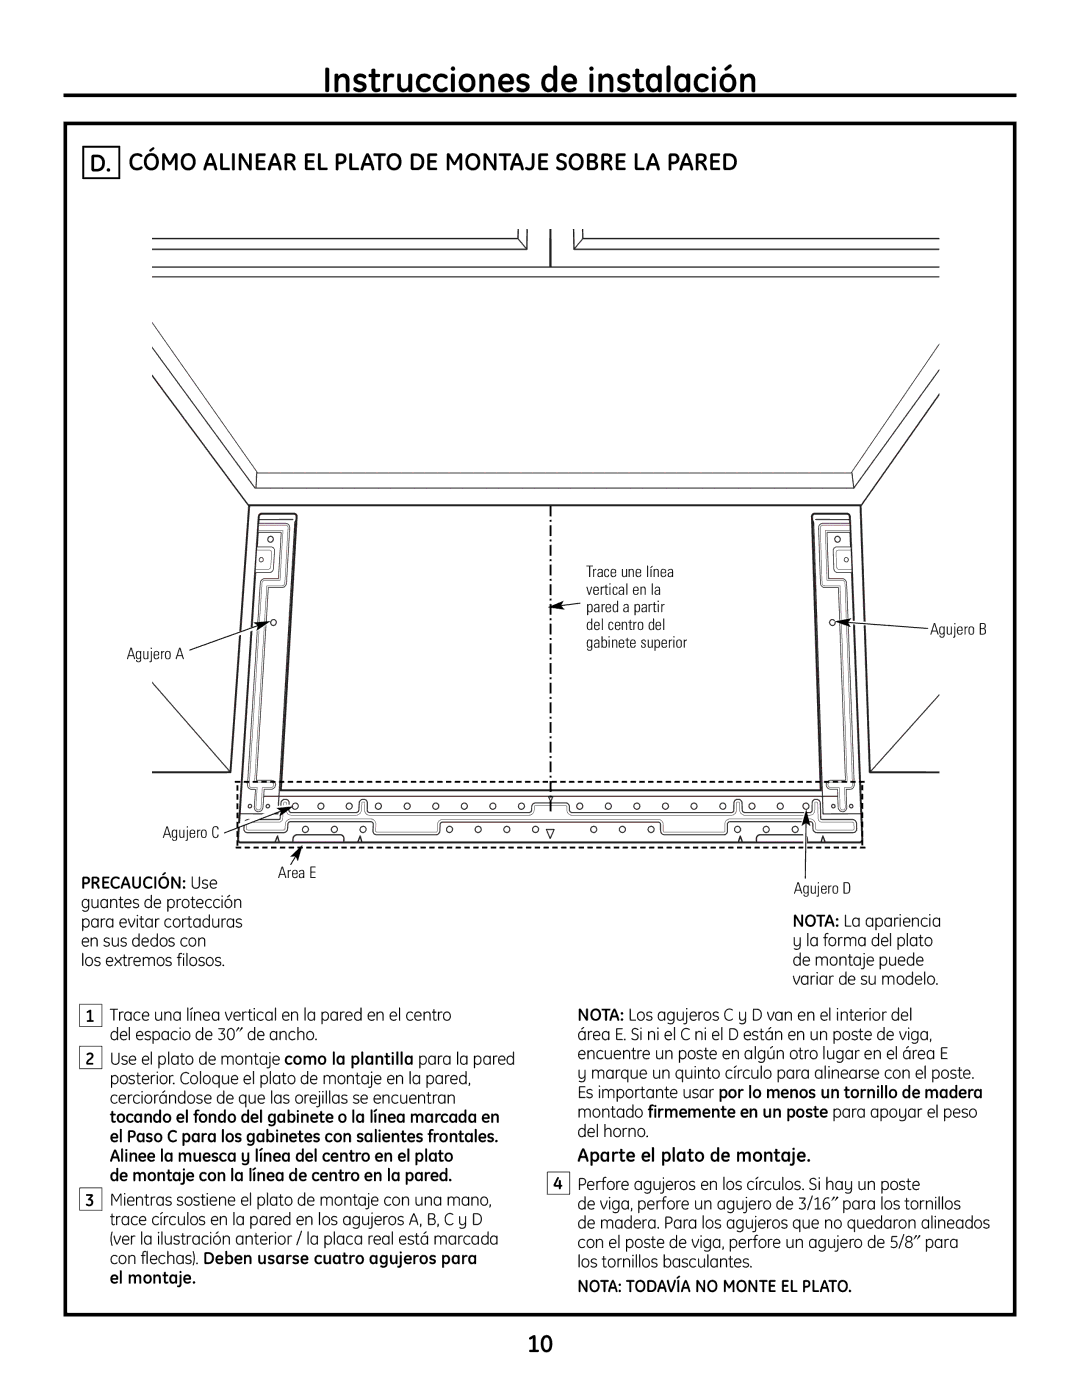
D. CÓMO ALINEAR EL PLATO DE MONTAJE SOBRE LA PARED

Trace une línea


vertical en la


pared a partir


del centro del

Agujero B

gabinete superior


Agujero A


Agujero C


Area E


PRECAUCIÓN: Use


Agujero D


guantes de protección


para evitar cortaduras


NOTA: La apariencia

en sus dedos con


y la forma del plato

los extremos filosos.


de montaje puede


variar de su modelo.


Trace una línea vertical en la pared en el centro


NOTA: Los agujeros C y D van en el interior del

1


del espacio de 30de ancho.


área E. Si ni el C ni el D están en un poste de viga,


2

Use el plato de montaje como la plantilla para la pared


encuentre un poste en algún otro lugar en el área E


posterior. Coloque el plato de montaje en la pared,


y marque un quinto círculo para alinearse con el poste.


Es importante usar por lo menos un tornillo de madera


cerciorándose de que las orejillas se encuentran


tocando el fondo del gabinete o la línea marcada en


montado firmemente en un poste para apoyar el peso


el Paso C para los gabinetes con salientes frontales.


del horno.


Alinee la muesca y línea del centro en el plato


Aparte el plato de montaje.


de montaje con la línea de centro en la pared.


4

Perfore agujeros en los círculos. Si hay un poste

3

Mientras sostiene el plato de montaje con una mano,


trace círculos en la pared en los agujeros A, B, C y D


de viga, perfore un agujero de 3/16 para los tornillos


de madera. Para los agujeros que no quedaron alineados


(ver la ilustración anterior / la placa real está marcada


con flechas). Deben usarse cuatro agujeros para


con el poste de viga, perfore un agujero de 5/8 para


los tornillos basculantes.


el montaje.


NOTA: TODAVÍA NO MONTE EL PLATO.


10

Page 34
Image 34
GE JVM1665SNSS warranty Cómo Alinear EL Plato DE Montaje Sobre LA Pared, Nota Todavía no Monte EL Plato

JVM1665, JVM1665SNSS specifications

The GE JVM1665SNSS is a versatile microwave oven that combines functionality and style, making it an excellent addition to any kitchen. This model is part of the GE lineup, recognized for its commitment to quality and innovation. The JVM1665SNSS is designed with a sleek stainless steel finish, adding a modern touch to your kitchen decor while being easy to clean.

One of the standout features of the GE JVM1665SNSS is its 1.6 cubic feet capacity, which provides ample space for cooking a variety of dishes. Its 1000 watts of power ensures efficient heating, allowing for quick meal preparation. The microwave comes equipped with a turntable, ensuring even cooking results for all food items.

The JVM1665SNSS features multiple cooking modes and options, including auto-reheat, defrost, and sensor cooking. The sensor cooking controls automatically adjust cooking time based on the moisture level in the food, ensuring optimal results without the guesswork. This technology not only enhances convenience but also helps prevent overcooking.

Another notable characteristic of this microwave is its ease of use. The simple control panel includes an intuitive layout with easy-to-read buttons that allow users to quickly select cooking programs and set times. Additionally, the microwave includes a powerful exhaust fan with multiple speed settings, effectively removing smoke, steam, and odors from the kitchen.

For added safety, the JVM1665SNSS features a child lock function, preventing unintended use by young children. The microwave also comes with a removable grease filter, which ensures that the kitchen environment remains clean and fresh during cooking.

This model is compatible with venting options, allowing it to be installed as either a recirculating or externally vented unit, providing flexibility in kitchen design. Overall, the GE JVM1665SNSS is an impressive microwave that combines modern features, advanced technologies, and user-friendly characteristics, making it a reliable choice for any home cook looking to enhance their cooking experience.