Instrucciones de instalación

A2. USE LA PLANTILLA DEL GABINETE SUPERIOR PARA LA PREPARACIÓN DEL GABINETE

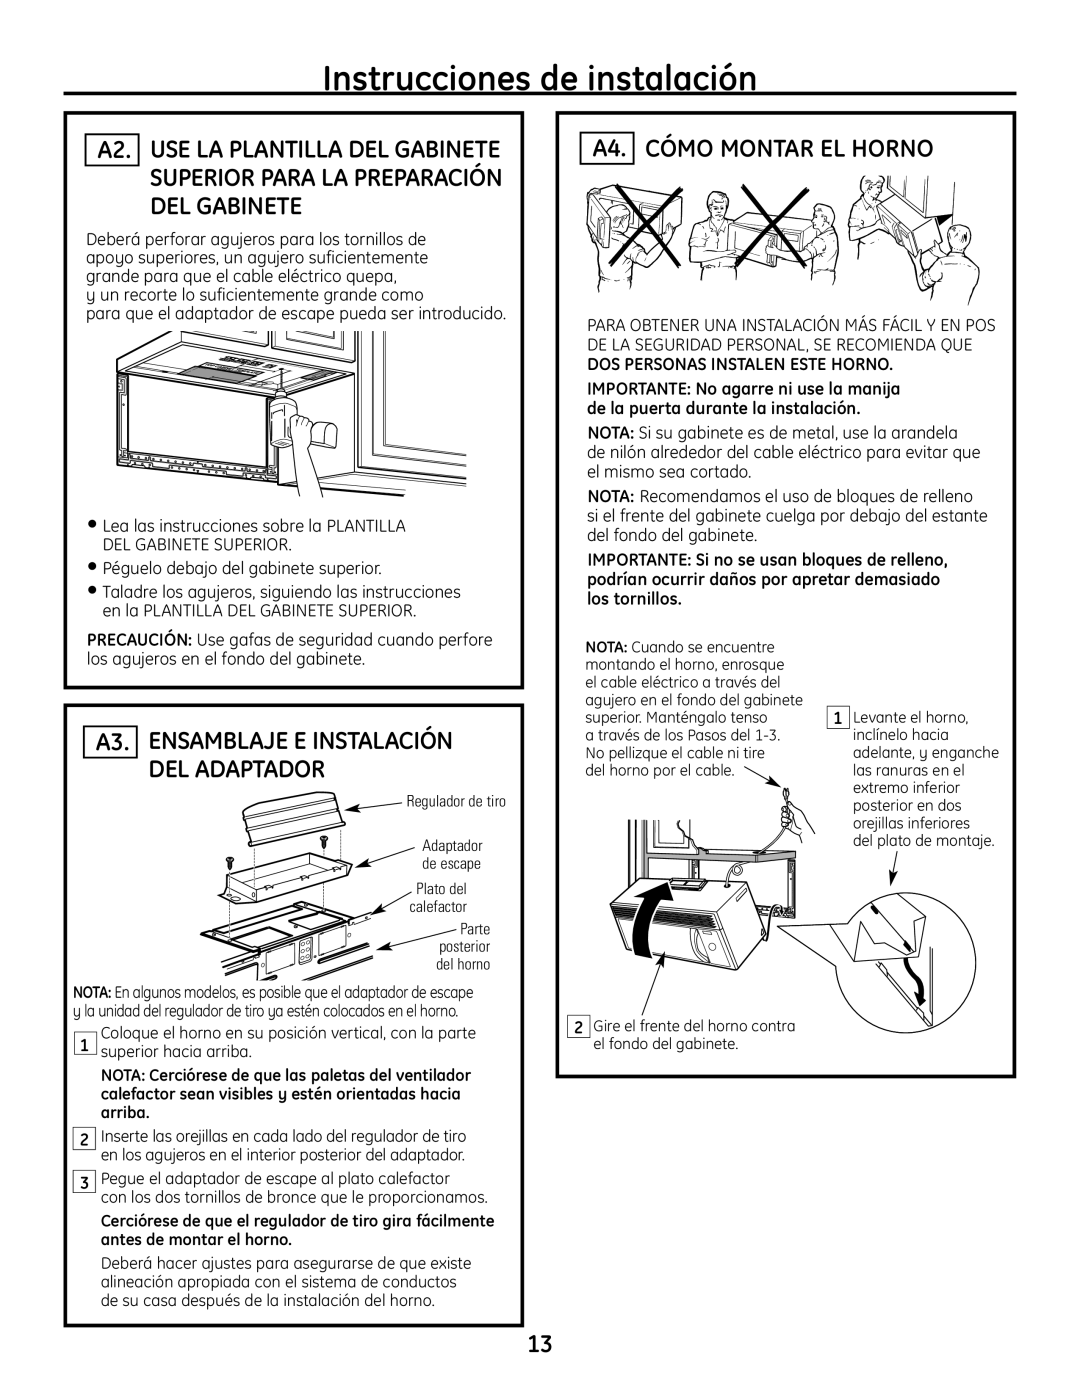
Deberá perforar agujeros para los tornillos de apoyo superiores, un agujero suficientemente grande para que el cable eléctrico quepa,

y un recorte lo suficientemente grande como

para que el adaptador de escape pueda ser introducido.

Lea las instrucciones sobre la PLANTILLA DEL GABINETE SUPERIOR.

Péguelo debajo del gabinete superior.

Taladre los agujeros, siguiendo las instrucciones en la PLANTILLA DEL GABINETE SUPERIOR.

A4. CÓMO MONTAR EL HORNO

PARA OBTENER UNA INSTALACIÓN MÁS FÁCIL Y EN POS DE LA SEGURIDAD PERSONAL, SE RECOMIENDA QUE

DOS PERSONAS INSTALEN ESTE HORNO.

IMPORTANTE: No agarre ni use la manija de la puerta durante la instalación.

NOTA: Si su gabinete es de metal, use la arandela de nilón alrededor del cable eléctrico para evitar que el mismo sea cortado.

NOTA: Recomendamos el uso de bloques de relleno si el frente del gabinete cuelga por debajo del estante del fondo del gabinete.

IMPORTANTE: Si no se usan bloques de relleno, podrían ocurrir daños por apretar demasiado los tornillos.

PRECAUCIÓN: Use gafas de seguridad cuando perfore los agujeros en el fondo del gabinete.

A3. ENSAMBLAJE E INSTALACIÓN DEL ADAPTADOR

Regulador de tiro

Adaptador de escape

Plato del calefactor

Parte posterior del horno

NOTA: En algunos modelos, es posible que el adaptador de escape y la unidad del regulador de tiro ya estén colocados en el horno.

NOTA: Cuando se encuentre montando el horno, enrosque el cable eléctrico a través del agujero en el fondo del gabinete superior. Manténgalo tenso

a través de los Pasos del 1-3. No pellizque el cable ni tire del horno por el cable.

1

Levante el horno, inclínelo hacia adelante, y enganche las ranuras en el extremo inferior posterior en dos orejillas inferiores del plato de montaje.

Coloque el horno en su posición vertical, con la parte

1 superior hacia arriba.

NOTA: Cerciórese de que las paletas del ventilador calefactor sean visibles y estén orientadas hacia arriba.

2Inserte las orejillas en cada lado del regulador de tiro en los agujeros en el interior posterior del adaptador.

3Pegue el adaptador de escape al plato calefactor

con los dos tornillos de bronce que le proporcionamos.

Cerciórese de que el regulador de tiro gira fácilmente antes de montar el horno.

Deberá hacer ajustes para asegurarse de que existe alineación apropiada con el sistema de conductos de su casa después de la instalación del horno.

2Gire el frente del horno contra el fondo del gabinete.

13

Page 37
Image 37
GE JVM1665 A4. Cómo Montar EL Horno, A3. Ensamblaje E Instalación DEL Adaptador, Péguelo debajo del gabinete superior

JVM1665, JVM1665SNSS specifications

The GE JVM1665SNSS is a versatile microwave oven that combines functionality and style, making it an excellent addition to any kitchen. This model is part of the GE lineup, recognized for its commitment to quality and innovation. The JVM1665SNSS is designed with a sleek stainless steel finish, adding a modern touch to your kitchen decor while being easy to clean.

One of the standout features of the GE JVM1665SNSS is its 1.6 cubic feet capacity, which provides ample space for cooking a variety of dishes. Its 1000 watts of power ensures efficient heating, allowing for quick meal preparation. The microwave comes equipped with a turntable, ensuring even cooking results for all food items.

The JVM1665SNSS features multiple cooking modes and options, including auto-reheat, defrost, and sensor cooking. The sensor cooking controls automatically adjust cooking time based on the moisture level in the food, ensuring optimal results without the guesswork. This technology not only enhances convenience but also helps prevent overcooking.

Another notable characteristic of this microwave is its ease of use. The simple control panel includes an intuitive layout with easy-to-read buttons that allow users to quickly select cooking programs and set times. Additionally, the microwave includes a powerful exhaust fan with multiple speed settings, effectively removing smoke, steam, and odors from the kitchen.

For added safety, the JVM1665SNSS features a child lock function, preventing unintended use by young children. The microwave also comes with a removable grease filter, which ensures that the kitchen environment remains clean and fresh during cooking.

This model is compatible with venting options, allowing it to be installed as either a recirculating or externally vented unit, providing flexibility in kitchen design. Overall, the GE JVM1665SNSS is an impressive microwave that combines modern features, advanced technologies, and user-friendly characteristics, making it a reliable choice for any home cook looking to enhance their cooking experience.