? TT,I | f |
|
|
|
|
|
|
|
|
|
|
|
|
|
|
|
|
|
|
|
|
|
|
|
|
|
|
|
|
|
|
|
|
|
|
|
|
|
|
|
|
|
|
|
|
|
|
|
|
|
|
|
|
|
|
|
|
|
|
|
|
|
|
|
|
|
|
|
|
|
| 11/ |
| , |
|
| - |
|
|
| EEL | ,, | ||||
|
|
|
|
|
|
|
| |||||||||
|
| |||||||||||||||
Ill |
|
|
|
| Ill |
|
| |||||||||
|
|
|
|
|
|
|
|
|
| |||||||
|
|
|
|
|
|
|
|
|
| |||||||
|
|
|
|
|
|
|
|
|
|
|
|
|
|
|
|
|
H7---A “-i - ‘-” -
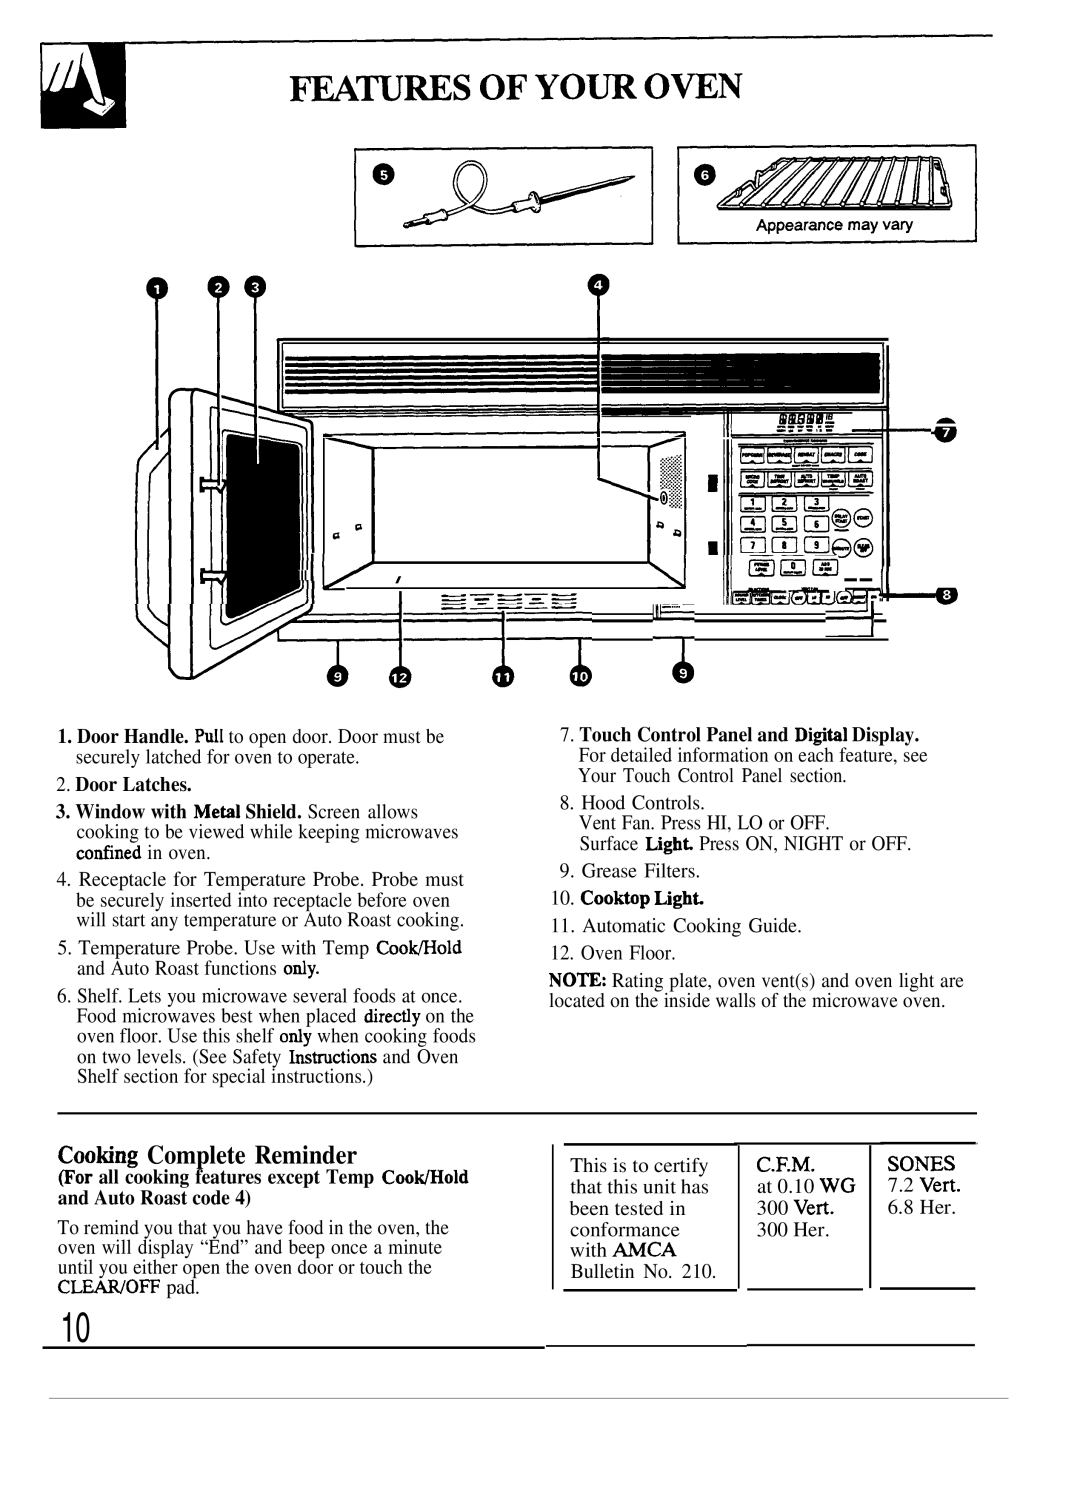
1.Door Handle. Ptil to open door. Door must be securely latched for oven to operate.
2.Door Latches.
3.Window with Metil Shield. Screen allows cooking to be viewed while keeping microwaves cotilned in oven.
4.Receptacle for Temperature Probe. Probe must be securely inserted into receptacle before oven will start any temperature or Auto Roast cooking.
5.Temperature Probe. Use with Temp CooWold and Auto Roast functions ody.
6.Shelf. Lets you microwave several foods at once. Food microwaves best when placed directiy on the oven floor. Use this shelf ody when cooking foods on two levels. (See Safety hstructions and Oven Shelf section for special instructions.)
7.Touch Control Panel and Digitil Display. For detailed information on each feature, see Your Touch Control Panel section.
8.Hood Controls.
Vent Fan. Press HI, LO or OFF.
Surface LighC Press ON, NIGHT or OFF.
9.Grease Filters.
10.Cooktop Light
11.Automatic Cooking Guide.
12.Oven Floor.
NO~: Rating plate, oven vent(s) and oven light are located on the inside walls of the microwave oven.
Coobng Complete Reminder
@or all cooking features except Temp Coo~old and Auto Roast code 4)
To remind you that you have food in the oven, the oven will display “End” and beep once a minute until you either open the oven door or touch the CLWOFF pad.
This is to certify that this unit has been tested in conformance with AMCA Bulletin No. 210.
C.F.M.
at 0.10 WG
300Vert.
300Her.
SONES
7.2Vert.
6.8Her.
10
