Instructions

About the automatic icemaker.

A newly-installed refrigerator may take 12–24 hours to begin making ice.

Installation Instructions Operating Instructions Safety

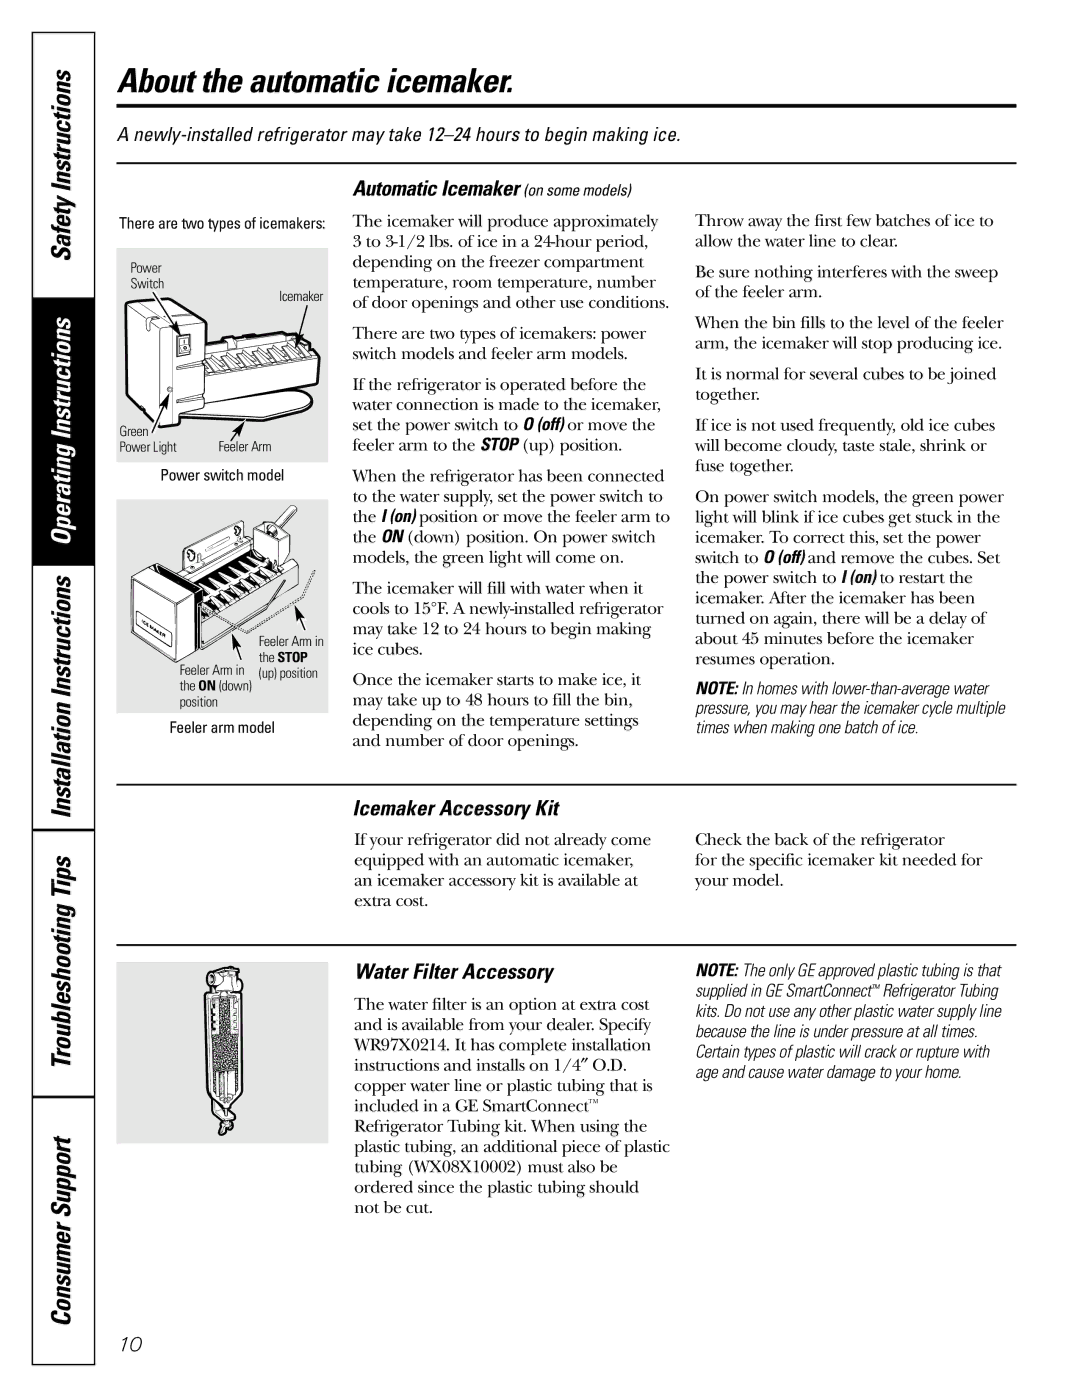
There are two types of icemakers:

Power

Switch

Icemaker

Green

Feeler Arm

Power Light

Power switch model

Feeler Arm in

the STOP

Feeler Arm in (up) position the ON (down)

position

Feeler arm model

Automatic Icemaker (on some models)

The icemaker will produce approximately 3 to 3-1/2 lbs. of ice in a 24-hour period, depending on the freezer compartment temperature, room temperature, number of door openings and other use conditions.

There are two types of icemakers: power switch models and feeler arm models.

If the refrigerator is operated before the water connection is made to the icemaker, set the power switch to O (off) or move the feeler arm to the STOP (up) position.

When the refrigerator has been connected to the water supply, set the power switch to the I (on) position or move the feeler arm to the ON (down) position. On power switch models, the green light will come on.

The icemaker will fill with water when it cools to 15°F. A newly-installed refrigerator may take 12 to 24 hours to begin making ice cubes.

Once the icemaker starts to make ice, it may take up to 48 hours to fill the bin, depending on the temperature settings and number of door openings.

Throw away the first few batches of ice to allow the water line to clear.

Be sure nothing interferes with the sweep of the feeler arm.

When the bin fills to the level of the feeler arm, the icemaker will stop producing ice.

It is normal for several cubes to be joined together.

If ice is not used frequently, old ice cubes will become cloudy, taste stale, shrink or fuse together.

On power switch models, the green power light will blink if ice cubes get stuck in the icemaker. To correct this, set the power switch to O (off) and remove the cubes. Set the power switch to I (on) to restart the icemaker. After the icemaker has been turned on again, there will be a delay of about 45 minutes before the icemaker resumes operation.

NOTE: In homes with lower-than-average water pressure, you may hear the icemaker cycle multiple times when making one batch of ice.

Tips

Icemaker Accessory Kit

If your refrigerator did not already come

Check the back of the refrigerator

equipped with an automatic icemaker,

for the specific icemaker kit needed for

an icemaker accessory kit is available at

your model.

extra cost.


Consumer Support Troubleshooting

Water Filter Accessory

The water filter is an option at extra cost and is available from your dealer. Specify WR97X0214. It has complete installation instructions and installs on 1/4″ O.D. copper water line or plastic tubing that is included in a GE SmartConnectRefrigerator Tubing kit. When using the plastic tubing, an additional piece of plastic tubing (WX08X10002) must also be ordered since the plastic tubing should not be cut.

NOTE: The only GE approved plastic tubing is that supplied in GE SmartConnectRefrigerator Tubing kits. Do not use any other plastic water supply line because the line is under pressure at all times.

Certain types of plastic will crack or rupture with age and cause water damage to your home.

10

Page 10
Image 10
GE MODELS 18 AND 19 installation instructions About the automatic icemaker, Instructions, Tips

MODELS 18 AND 19 specifications

The GE Models 18 and 19, developed by General Electric, represent significant advancements in the realm of gas turbine technology, particularly for power generation applications. Catering to the needs of utility companies and industrial users, these models stand out due to their robust design, efficiency, and reliability.

The GE Model 18, introduced in the mid-20th century, utilizes a simple yet effective gas turbine architecture. It operates on a basic Brayton cycle, forming the foundation for subsequent turbine designs. A key feature of the Model 18 is its high-pressure ratio, which allows for enhanced thermal efficiency compared to earlier models. The turbine is designed with multipoint fuel injection systems that improve combustion performance by providing a more uniform fuel distribution. Additionally, the Model 18 features advanced cooling techniques, such as air-cooled components and advanced materials that withstand high temperatures, helping to prolong the operational life of the turbine.

On the other hand, the GE Model 19 built upon the successes of its predecessor and introduced several innovative technologies. One of its standout features is its capacity for variable turbine geometry, which optimizes performance across a wide range of operating conditions. This adjustment allows the turbine to achieve higher efficiency during part-load operations, a crucial capability in today's energy market where demand can fluctuate significantly.

The Model 19 also integrates state-of-the-art control systems that enhance operational reliability and efficiency. These sophisticated systems allow for precise monitoring and adjustments to combustion parameters, reducing emissions and improving fuel consumption. Furthermore, the utilization of advanced digital technology aids in predictive maintenance, allowing operators to proactively address potential issues before they escalate into costly downtimes.

Both models feature a modular design, making maintenance and upgrades simpler and more efficient. This design philosophy reduces the time required for servicing, enabling plants to maintain higher availability and productivity. Moreover, the robust construction of the turbines ensures durability and performance even in challenging environments.

In summary, the GE Models 18 and 19 embody a blend of reliability, efficiency, and advanced technology, positioning them as vital assets in the generation of power. With features that cater to evolving energy demands and sustainability goals, these turbine models continue to play a significant role in the energy sector.