Installation Instructions
STEP 6 POSITION WATER LINE AND HOUSING WIRING
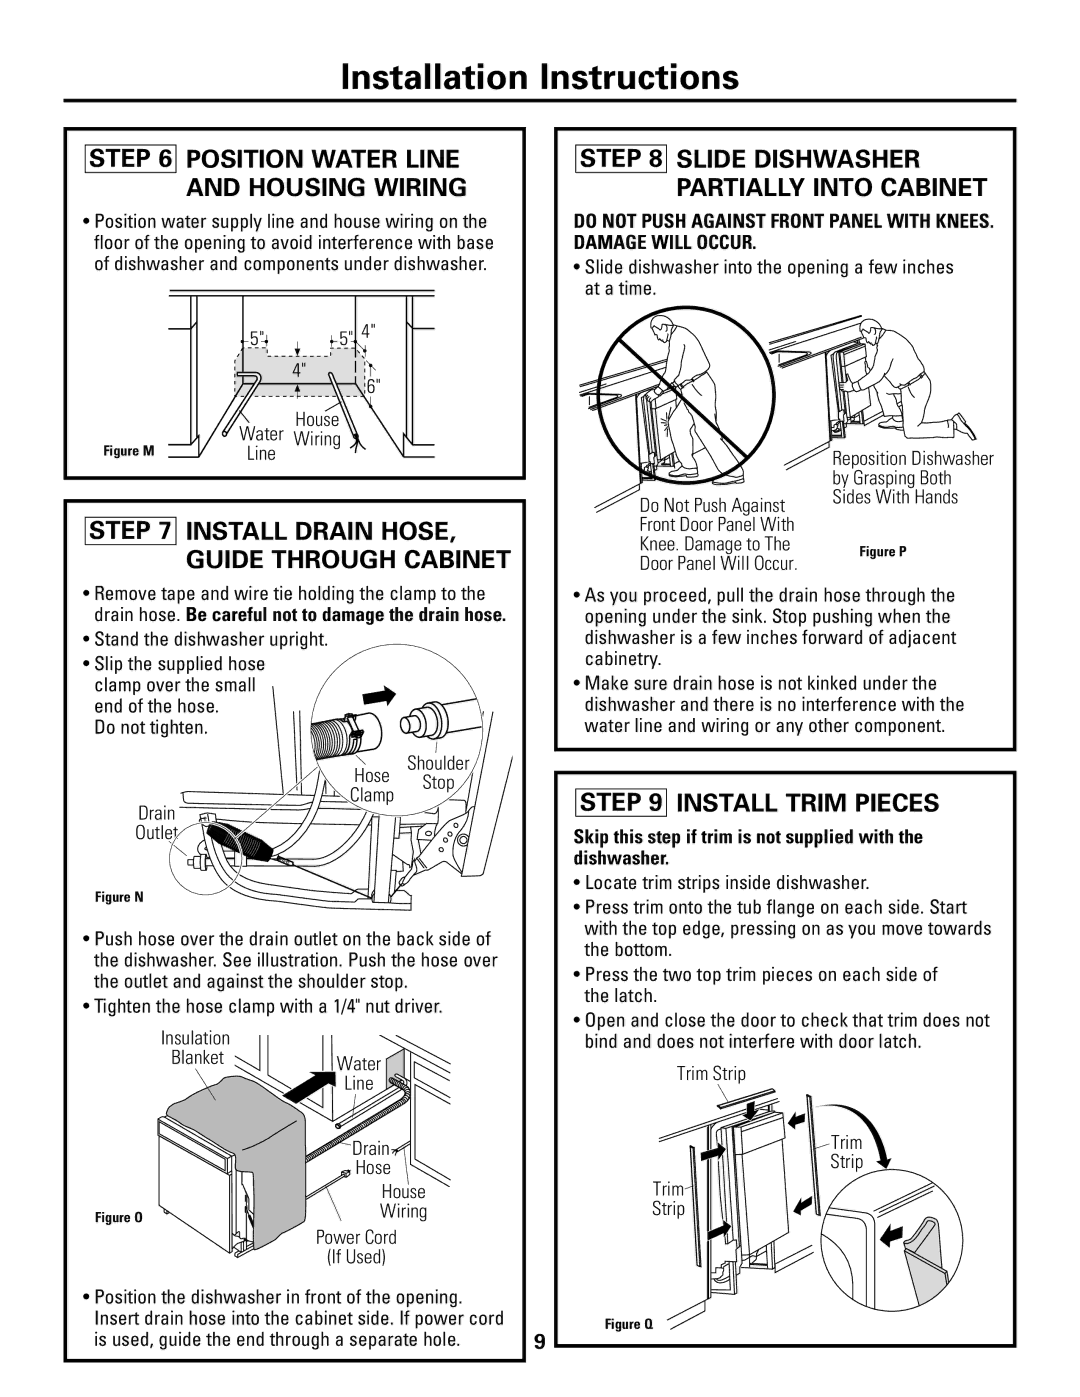
•Position water supply line and house wiring on the floor of the opening to avoid interference with base of dishwasher and components under dishwasher.
5" |
|
|
|
| 5" | 4" |
|
|
|
|
4"
6"
| House |
| Water Wiring |
Figure M | Line |
STEP 7 INSTALL DRAIN HOSE, GUIDE THROUGH CABINET
•Remove tape and wire tie holding the clamp to the drain hose. Be careful not to damage the drain hose.
•Stand the dishwasher upright.
•Slip the supplied hose clamp over the small
end of the hose. Do not tighten.
Shoulder
Hose Stop
Clamp
Drain
Outlet
Figure N
•Push hose over the drain outlet on the back side of the dishwasher. See illustration. Push the hose over the outlet and against the shoulder stop.
•Tighten the hose clamp with a 1/4" nut driver.
Insulation |
|
Blanket | Water |
| Line |
| Drain |
| Hose |
| House |
Figure O | Wiring |
| Power Cord |
| (If Used) |
•Position the dishwasher in front of the opening.
Insert drain hose into the cabinet side. If power cord |
|
is used, guide the end through a separate hole. | 9 |
STEP 8 SLIDE DISHWASHER PARTIALLY INTO CABINET
DO NOT PUSH AGAINST FRONT PANEL WITH KNEES. DAMAGE WILL OCCUR.
•Slide dishwasher into the opening a few inches at a time.
| Reposition Dishwasher | |
| by Grasping Both | |
Do Not Push Against | Sides With Hands | |
| ||
Front Door Panel With |
| |
Knee. Damage to The | Figure P | |
Door Panel Will Occur. | ||
|
•As you proceed, pull the drain hose through the opening under the sink. Stop pushing when the dishwasher is a few inches forward of adjacent cabinetry.
•Make sure drain hose is not kinked under the dishwasher and there is no interference with the water line and wiring or any other component.
STEP 9 INSTALL TRIM PIECES
Skip this step if trim is not supplied with the dishwasher.
•Locate trim strips inside dishwasher.
•Press trim onto the tub flange on each side. Start with the top edge, pressing on as you move towards the bottom.
•Press the two top trim pieces on each side of the latch.
•Open and close the door to check that trim does not bind and does not interfere with door latch.
Trim Strip
Trim
Strip
Trim
Strip